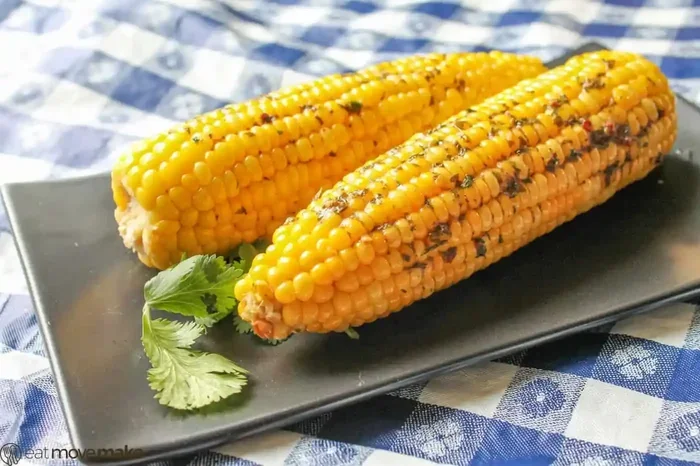
How Long To Cook Corn On The Cob In Oven Just Right
Learning how long to cook corn on the cob in oven is simple and rewarding. Most ears of corn bake perfectly in 25 to 35 minutes at 400°F. Whether you prefer juicy sweet corn or smoky flavored corn, this guide covers everything you need to know for oven-baked corn that tastes amazing every time.
There is something special about corn on the cob fresh from the oven. The kernels pop with sweetness, the outside gets a little char, and the inside stays tender and juicy. Whether you are cooking for a family dinner or a weekend barbecue, baking corn on the cob in the oven is one of the easiest ways to get great results.
Many people wonder about how long to cook corn on the cob in oven and what temperature works best. The good news is that oven-baked corn is very forgiving. Once you learn the basics, you can experiment with flavors and techniques to make it your own. This guide walks you through everything from timing and temperature to seasoning ideas and common mistakes.
By the end of this article, you will know exactly how to bake perfect corn every single time. You will also discover tips that take your oven-roasted corn from good to outstanding. Let us get started.
Key Takeaways
- Standard bake time is 25 to 35 minutes: Most corn on the cob cooks perfectly in the oven within this range at 400°F.
- Husked corn bakes faster than corn in the husk: Shucked corn takes about 25 to 30 minutes, while corn in the husk needs 30 to 40 minutes.
- Internal temperature matters: Corn is done when it reaches 170 to 180°F in the center.
- Foil wrapping keeps corn moist: Wrapping ears in foil locks in steam and prevents drying out.
- Season before baking: Butter, salt, pepper, and herbs added before cooking boost flavor significantly.
- Let corn rest after baking: Allowing 3 to 5 minutes of rest time helps juices settle and improves texture.
- Oven-roasted corn pairs with many dishes: It works great as a side dish for grilled meats, barbecues, and summer dinners.
📑 Table of Contents
- How Long To Cook Corn On The Cob In Oven: The Basics
- Best Oven Temperature For Corn On The Cob
- Step-by-Step Instructions For Oven-Baked Corn
- Tips For Perfectly Juicy Corn Every Time
- Common Mistakes To Avoid When Baking Corn
- Fun Variations And Flavor Ideas
- How To Store And Reheat Leftover Corn
- Nutritional Benefits Of Corn On The Cob
- Expert Insights On Oven-Baked Corn
- Key Takeaways
- Conclusion
How Long To Cook Corn On The Cob In Oven: The Basics
The short answer is that most corn on the cob takes between 25 and 35 minutes to bake in a preheated oven. However, the exact corn cooking time depends on a few factors. The size of the ear, whether it is husked or still in the husk, and your oven temperature all play a role.
Standard Baking Time For Different Methods
Here is a quick breakdown of baking corn on the cob based on common methods:
- Husked corn at 400°F: 25 to 30 minutes
- Corn in the husk at 400°F: 30 to 40 minutes
- Foil-wrapped corn at 375°F: 30 to 35 minutes
- Unwrapped corn at 425°F: 20 to 25 minutes
- Grilled-style oven corn at 450°F: 15 to 20 minutes
These times are guidelines. The best way to check if your sweet corn recipe is done is to pierce a kernel with a fork. If it is tender and juicy, it is ready. If it still feels firm, give it a few more minutes.
Why Timing Varies
Not all ears of corn are the same. Fresh summer corn with tender kernels cooks faster than older corn with tougher kernels. Large ears may need an extra 5 minutes, while small ears might be done in 20 minutes. The freshness of the corn matters a lot when it comes to corn on the cob cooking time.
Also, the type of oven you use can make a difference. Convection ovens circulate hot air, so they may cook corn a bit faster. Standard ovens with less airflow might need a few extra minutes. Knowing your oven helps you set accurate expectations for oven-baked corn.
Best Oven Temperature For Corn On The Cob
Temperature is the second most important factor after time when you are cooking corn on the cob in oven. Too low and the corn steams instead of roasting. Too high and the outside burns before the inside is cooked through.
Recommended Temperatures For Different Results
Most recipes call for one of three temperatures. Here is what each one does:
- 375°F: Great for foil-wrapped corn. This lower temperature steams the corn gently inside the foil, keeping it very moist. Best for beginners who want foolproof results.
- 400°F: The sweet spot for most oven roasted corn. It gives a nice balance of tenderness and slight caramelization on the outside.
- 425°F to 450°F: Best for charred or grilled-style corn. The higher heat creates a smoky, slightly crispy exterior while keeping the inside juicy.
For most home cooks, 400°F is the ideal temperature for baking corn on the cob. It is hot enough to develop flavor but not so hot that it burns quickly. If you are using a convection oven, drop the temperature by about 25 degrees for the same great results.
How To Preheat Your Oven Properly
Always preheat your oven before putting the corn inside. A fully heated oven ensures even cooking from the start. Give your oven at least 10 to 15 minutes to reach the target corn oven temperature. This small step makes a big difference in the final result.
Step-by-Step Instructions For Oven-Baked Corn
Now that you know the time and temperature, let us walk through the actual process of baking corn on the cob. These steps work for both husked and unhusked corn.
Step 1: Prepare The Corn
Start by peeling back the husk if the corn is still in it. Remove all the silk threads. You can leave the husk on for a more rustic approach, but husked corn bakes more evenly. Rinse the ears under cool water and pat them dry with a paper towel.
Step 2: Season The Corn
This is where you can get creative. The simplest approach is to brush each ear with melted butter and sprinkle with salt and pepper. But you can also try these flavor boosters:
- Garlic powder and paprika for a smoky flavor
- Chili powder and lime juice for a spicy kick
- Fresh herbs like thyme or rosemary
- Grated Parmesan cheese for a savory twist
- Honey and cinnamon for a sweet dessert-style corn
Seasoning before baking lets the flavors soak into the corn kernels as they cook. This is a simple trick that elevates your corn on the cob recipe from basic to delicious.
Step 3: Wrap And Place On A Baking Sheet
For moist results, wrap each ear individually in aluminum foil. Place the wrapped ears on a baking sheet. If you prefer a charred exterior, skip the foil and place the corn directly on the sheet. Use a wire rack if you have one for even airflow.
Step 4: Bake And Check For Doneness
Put the baking sheet in the preheated oven. Set a timer based on the timing guidelines from earlier. At the halfway point, carefully remove the tray and turn each ear of corn. This helps them cook evenly on all sides.
Check for doneness by piercing a kernel. It should be tender and release a little juice when pressed. The internal temperature of cooked corn should be between 170 and 180 degrees Fahrenheit.
Step 5: Rest And Serve
Let the corn rest for 3 to 5 minutes after removing it from the oven. This brief rest allows the juices to settle, making each bite more flavorful. Serve immediately with extra butter, herbs, or your favorite toppings.
Tips For Perfectly Juicy Corn Every Time
Getting perfectly cooked corn on the cob is easier when you follow a few pro tips. These small details make a big impact on the final result.
Choose Fresh Corn Whenever Possible
Fresh corn tastes noticeably better than corn that has been sitting in the fridge for days. Look for ears with bright green husks and plump, milky kernels. When you pierce a kernel, it should release a thin white liquid. That is a sign of peak freshness for your summer corn dishes.
Soak Corn In The Husk For Extra Moisture
If you are baking corn in the husk, soak the ears in water for 15 to 30 minutes before baking. This prevents the husk from burning and adds extra steam that keeps the corn juicy. It is a simple step that makes a noticeable difference in your oven-baked corn.
Do Not Overcook The Corn
Overcooked corn becomes tough and starchy. It loses its natural sweetness and the kernels lose their pop. Set a timer and check the corn early. It is always better to pull it out a little early and let carryover heat finish the job.
Use Quality Butter And Seasonings
Good butter makes a real difference. Use unsalted butter so you can control the salt level. Spread it generously over the hot corn right after baking. The heat melts the butter and helps it soak into every kernel.
Add A Pinch Of Sugar
This might sound unusual, but a tiny pinch of sugar enhances the natural sweetness of the corn. It does not make the corn taste sweet in an obvious way. Instead, it brings out the corn’s own flavor. This is one of the best-kept secrets for great corn on the cob.
Common Mistakes To Avoid When Baking Corn
Even experienced cooks make mistakes when preparing corn on the cob. Knowing what to avoid saves time and improves results.
Skipping The Preheating Step
Putting corn into a cold oven leads to uneven cooking. The outside may burn while the inside stays raw. Always preheat your oven and wait for it to signal that it is ready before adding the corn.
Using Too Much Foil
Wrapping corn tightly in multiple layers of foil traps too much steam. The corn ends up boiling instead of roasting, which removes the nice roasted flavor and slightly crispy texture. Use a single layer of foil or skip it entirely for better results.
Overcrowding The Baking Sheet
Crowding the pan blocks airflow around each ear of corn. This leads to uneven cooking and soggy spots. Give each ear plenty of space on the baking sheet. If you are cooking a large batch, use two sheets or bake in multiple rounds.
Forgetting To Turn The Corn
Corn bakes more evenly when you turn it halfway through cooking. Without turning, one side may char while the other side stays pale and undercooked. Make it a habit to rotate each ear at the 15-minute mark.
Not Letting The Corn Rest
Cutting into hot corn right out of the oven releases too much steam and juice. The kernels lose some of their tenderness. A short rest period of 3 to 5 minutes helps the corn hold its shape and stay juicy.
Fun Variations And Flavor Ideas
Once you master the basic how long to cook corn on the cob in oven method, you can start experimenting with flavors. Here are some delicious variations to try.
Mexican Street Corn Style
After baking, brush the corn with a mix of mayo, sour cream, and lime juice. Sprinkle with cotija cheese, chili powder, and fresh cilantro. This style, often called elote, is a crowd favorite at summer gatherings.
Honey Garlic Corn
Mix melted butter with minced garlic and a drizzle of honey. Brush this onto the corn before baking. The result is a sweet and savory combination that pairs beautifully with grilled meats.
Herb Butter Corn
Blend softened butter with chopped fresh parsley, basil, and a squeeze of lemon. Spread this herb butter on hot corn right after it comes out of the oven. The fresh herbs add a bright, aromatic flavor.
Spicy Cajun Corn
Toss the corn with Cajun seasoning and a drizzle of olive oil before baking. The bold spices create a side dish that stands out on any table. Serve it alongside fried chicken or grilled sausages for a complete meal.
Sweet Dessert Corn
For a unique twist, brush corn with butter and sprinkle with cinnamon sugar before baking. This turns corn on the cob into a sweet treat that kids and adults both love. It works wonderfully as a dessert option at outdoor dinners.
How To Store And Reheat Leftover Corn
If you have leftover baked corn on the cob, you can store it for later. Let the corn cool to room temperature, then wrap it tightly in plastic wrap or foil. Place it in the refrigerator, where it will keep for up to 3 days.
To reheat, wrap the corn in foil and warm it in the oven at 350°F for about 10 minutes. You can also reheat it in the microwave, but the oven method keeps the texture closer to fresh-baked. Avoid boiling leftover corn, as it makes the kernels mushy.
Nutritional Benefits Of Corn On The Cob
Baked corn on the cob is not just delicious. It is also a nutritious side dish. Corn is a good source of fiber, which supports healthy digestion. It contains B vitamins that help with energy production. Corn also provides antioxidants like lutein and zeaxanthin, which are beneficial for eye health.
When you bake corn instead of boiling it, more nutrients stay in the kernels. Boiling can leach water-soluble vitamins into the cooking water. Baking preserves more of the natural goodness. So oven-roasted corn is not only tastier but also healthier in many ways.
A single ear of corn has about 100 calories, making it a light and satisfying side dish. It pairs well with grilled chicken, BBQ ribs, fish, or veggie burgers. Corn on the cob fits easily into a balanced and wholesome meal.
Expert Insights On Oven-Baked Corn
Professional chefs and home cooking experts agree on a few key principles for the best oven-baked corn. First, always start with fresh corn. The fresher the ear, the better the texture and sweetness. Second, do not be afraid of high heat. A hot oven creates Maillard reactions on the surface of the kernels, adding depth and complexity to the flavor.
Third, seasoning should go on before baking, not just after. The heat helps the flavors penetrate the corn. Fourth, let the corn rest after baking. This small pause makes the corn easier to handle and improves the mouthfeel of each bite.
Finally, experts recommend pairing baked corn with acidic elements like lime juice or a vinegar-based glaze. The acidity cuts through the richness of the butter and balances the natural sweetness of the corn. This combination is what separates good corn from truly memorable corn.
Key Takeaways
- Standard bake time is 25 to 35 minutes: Most corn on the cob cooks perfectly in the oven within this range at 400°F.
- Husked corn bakes faster than corn in the husk: Shucked corn takes about 25 to 30 minutes, while corn in the husk needs 30 to 40 minutes.
- Internal temperature matters: Corn is done when it reaches 170 to 180°F in the center.
- Foil wrapping keeps corn moist: Wrapping ears in foil locks in steam and prevents drying out.
- Season before baking: Butter, salt, pepper, and herbs added before cooking boost flavor significantly.
- Let corn rest after baking: Allowing 3 to 5 minutes of rest time helps juices settle and improves texture.
- Oven-roasted corn pairs with many dishes: It works great as a side dish for grilled meats, barbecues, and summer dinners.
Conclusion
Baking corn on the cob in the oven is one of the simplest and most satisfying ways to prepare this classic summer vegetable. The key to success lies in getting the time and temperature right. Most ears of corn need 25 to 35 minutes at 400°F, but always check for doneness by testing a kernel for tenderness.
Whether you prefer plain buttered corn, smoky charred corn, or bold flavored corn with herbs and spices, the oven gives you excellent results every time. The tips and variations in this guide give you the flexibility to make oven-baked corn your own.
Now that you know exactly how long to cook corn on the cob in oven, you can confidently put this method to work in your kitchen. Grab some fresh ears of corn, preheat your oven, and enjoy the simple pleasure of perfectly baked corn on the cob. Your family and guests will love it.
Frequently Asked Questions
Can you cook corn on the cob in the oven without foil?
Yes, you can bake corn without foil. Unwrapped corn at 425°F takes about 20 to 25 minutes and develops a nice charred exterior. Just make sure to turn the ears halfway through for even cooking. The corn may dry out slightly without foil, so brushing it with extra butter helps retain moisture.
What temperature is best for corn on the cob in the oven?
400°F is the most recommended temperature for baking corn on the cob. It provides a good balance of even cooking and slight caramelization. If you prefer a softer, more steamed result, 375°F works well. For a charred, grilled-style finish, raise the heat to 425°F or 450°F.
How do you know when corn on the cob is done?
Pierce a kernel with a fork or knife. If it is tender and releases juice, the corn is done. You can also check the internal temperature, which should be 170 to 180°F. The kernels should look plump and slightly golden on the edges when fully cooked.
Can you freeze cooked corn on the cob?
Yes, you can freeze cooked corn. Let it cool completely, then wrap each ear tightly in plastic wrap and foil. Place the wrapped ears in a freezer bag and freeze for up to 6 months. To reheat, unwrap and warm in the oven at 350°F for about 10 to 15 minutes.
How long does cooked corn on the cob last in the fridge?
Cooked corn on the cob stays fresh in the refrigerator for up to 3 days. Store it wrapped tightly in plastic wrap or foil inside an airtight container. Reheat gently in the oven or microwave before serving for the best texture and flavor.
Is it better to boil or bake corn on the cob?
Baking corn on the cob in the oven brings out a deeper, roasted flavor that boiling cannot match. Boiled corn is tender and classic, but it can sometimes taste bland. Baking allows the natural sugars to caramelize, creating a sweeter and more complex flavor profile. For the best taste, oven-baked corn is the winner.