How To Bake Chicken In A Dutch Oven For Juicy Results
Baking chicken in a Dutch oven is one of the simplest and most reliable ways to get juicy, tender meat with crispy skin. This guide walks you through every step, from picking the right chicken to mastering temperature and timing. You will learn proven tips that turn a basic dinner into a restaurant-quality meal.
Key Takeaways
- A Dutch oven locks in moisture: The heavy lid traps steam, keeping chicken juicy and tender throughout baking.
- Bone-in, skin-on chicken works best: It stays moist longer and develops a crispy, golden crust in the oven.
- Temperature control is key: Baking at 400°F to 425°F delivers crispy skin without drying out the meat.
- Seasoning and marinating matter: A simple blend of herbs, garlic, and olive oil elevates the flavor dramatically.
- Resting the chicken after baking: Letting it sit for 5 to 10 minutes redistributes juices for maximum flavor.
- One-pot cooking saves time: You can add vegetables to the Dutch oven for a complete meal in a single dish.
- Internal temperature matters: Always check that chicken reaches 165°F to ensure it is safe and perfectly cooked.
📑 Table of Contents
- Why A Dutch Oven Is The Best Tool For Baking Chicken
- Choosing The Right Chicken For Dutch Oven Baking
- Essential Ingredients And Seasonings For Perfect Chicken
- Step-By-Step Guide To Baking Chicken In A Dutch Oven
- Tips For Juicy, Flavorful Results Every Time
- Serving Ideas And Meal Pairings
- How To Store And Reheat Leftover Dutch Oven Chicken
- Conclusion
Why A Dutch Oven Is The Best Tool For Baking Chicken
If you want juicy baked chicken, a Dutch oven is the single best tool you can use. It is a heavy, thick-walled pot with a tight-fitting lid. The cast iron or enameled steel construction holds heat evenly and traps moisture inside. This combination creates a mini oven within your oven.
When you bake chicken in a Dutch oven, the heavy lid keeps steam from escaping. That steam continuously bathes the chicken in its own juices. The result is meat that stays moist and tender, even if you forget to set a timer. Regular baking sheets and pans simply cannot do this.
Another great reason to use a Dutch oven is versatility. You can sear the chicken on the stovetop first and then transfer it to the oven. This gives you a crispy, caramelized crust without needing to flip the chicken. It is a hands-off method that produces restaurant-quality results at home.
Dutch ovens also work beautifully for Dutch oven chicken recipes that include vegetables, potatoes, or herbs. Everything cooks together in one pot. Cleanup is easy, and you get a full, flavorful meal with very little effort. Whether you are a beginner or a seasoned cook, this tool belongs in every kitchen.
The Science Behind Dutch Oven Baking
Here is why a Dutch oven works so well. The thick walls absorb heat slowly and release it evenly. This prevents hot spots that can burn one side of the chicken while leaving the other undercooked. The lid creates a sealed environment that recirculates moisture back onto the food.
When chicken bakes in this sealed environment, the internal temperature rises gently and consistently. The proteins cook slowly, which helps them retain more liquid. In a regular open pan, heat escapes quickly, and the chicken dries out faster. The Dutch oven essentially braises the chicken while baking it.
This method also works well for oven-baked chicken thighs, drumsticks, and whole birds. Dark meat benefits especially from the moist heat because it has more fat and connective tissue. Even lean breast meat stays juicy when baked this way.
Choosing The Right Chicken For Dutch Oven Baking
Not all chicken cuts work equally well in a Dutch oven. The best choice is bone-in, skin-on chicken. The bone adds flavor to the meat during baking, and the skin crisps up beautifully under the lid. Boneless, skinless chicken can work too, but it dries out faster and needs closer attention.
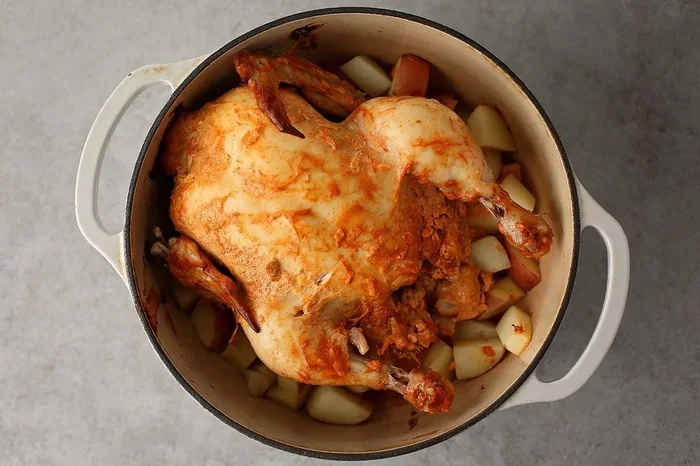
For a family dinner, a whole Dutch oven chicken is stunning. A 3 to 4-pound bird fits perfectly in most 5.5-quart or 6-quart pots. You can also use chicken thighs, drumsticks, or a mix of pieces. Thighs are forgiving and stay juicy even if you slightly overcook them.
If you prefer breast meat, buy bone-in, skin-on chicken breasts whenever possible. They are more forgiving than boneless breasts. You can also butterfly a whole breast to create a thicker piece that holds moisture better. Avoid thin-cut chicken tenders for this method. They will dry out quickly.
Fresh chicken works best for Dutch oven baking. Frozen chicken can be used, but it will add extra cooking time. Always thaw chicken completely in the refrigerator before baking. This ensures even cooking and reduces the risk of bacteria growth.
Bone-In vs. Boneless: What Should You Choose?
Bone-in chicken has several advantages. The bone insulates the meat, slowing down cooking and keeping it juicy longer. It also adds collagen to the cooking liquid, creating a richer flavor. When you pull the meat off the bone, it has a more satisfying texture.
Boneless chicken cooks faster and is easier to eat. However, it loses moisture more quickly. If you choose boneless cuts, reduce the baking time by about 5 to 10 minutes. Use a meat thermometer to avoid overcooking. The internal temperature should reach 165°F at the thickest point.
| Cut Type | Cooking Time | Juiciness | Best For |
|---|---|---|---|
| Bone-in, skin-on thighs | 35-45 minutes | Very juicy | Beginners, weeknight meals |
| Bone-in, skin-on breasts | 30-40 minutes | Juicy with care | Crispy skin lovers |
| Boneless, skinless breasts | 20-25 minutes | Can dry out | Quick, low-fat meals |
| Whole chicken (3-4 lbs) | 50-70 minutes | Very juicy | Special dinners, meal prep |
| Drumsticks and wings | 25-35 minutes | Juicy and crispy | Crowd-pleasing snacks |
Essential Ingredients And Seasonings For Perfect Chicken
The beauty of baking chicken in a Dutch oven is that you need very few ingredients. The pot does most of the work. But a simple seasoning blend makes a huge difference. Start with olive oil, salt, black pepper, and garlic powder. These basics create a flavorful crust on every piece.
Fresh herbs take your chicken to the next level. Thyme, rosemary, and oregano pair wonderfully with chicken. Add a lemon, halved, to the pot for brightness. The lemon steams inside the Dutch oven and infuses the meat with a subtle citrus flavor. It also tenderizes the surface of the chicken slightly.
Butter is another secret weapon. A tablespoon of butter placed on top of each breast or rubbed over thighs adds richness and helps the skin crisp up. You can also mix softened butter with herbs and garlic, then spread it under the skin for an incredibly juicy result.
For a more adventurous flavor, try these additions:
- Smoked paprika for a warm, smoky depth
- Honey or maple syrup for a subtle glaze
- Dijon mustard for a tangy kick
- Red pepper flakes for gentle heat
- Onion and celery for a savory base
- White wine or chicken broth for extra moisture
Simple Seasoning Blend For Dutch Oven Chicken
Here is a foolproof seasoning mix you can use every time. Combine 1 teaspoon of salt, 1/2 teaspoon of black pepper, 1 teaspoon of garlic powder, 1 teaspoon of smoked paprika, and 1/2 teaspoon of onion powder. Mix it with 2 tablespoons of olive oil. Rub this all over the chicken before it goes into the pot.
This blend works on every cut of chicken. It is simple enough for a Tuesday dinner but impressive enough for guests. You can double or triple the recipe and store it in a jar for quick weeknight meals. The key is to season generously. Chicken needs more salt than you think, especially when baking in a Dutch oven.
Step-By-Step Guide To Baking Chicken In A Dutch Oven
Now that you have your chicken and seasoning ready, it is time to bake. Follow these steps for perfectly cooked Dutch oven chicken every single time. The process is straightforward, but a few small details make all the difference.
Step 1: Preheat your oven to 425°F. A hot oven is essential for crispy skin. While the oven heats, pat the chicken dry with paper towels. Dry skin crisps up much better than wet skin. Remove any excess moisture by pressing gently with a towel on both sides.
Step 2: Season the chicken generously. Use your seasoning blend or whatever spices you prefer. Rub the oil and seasoning mixture all over the chicken pieces. Do not skip this step. Seasoning on the surface creates flavor and helps the skin turn golden brown.
Step 3: Heat the Dutch oven on the stovetop. Add a tablespoon of olive oil over medium-high heat. Once the oil shimmers, place the chicken pieces skin-side down. Sear them for 3 to 4 minutes until the skin turns golden brown and crispy. This step locks in juices and adds incredible flavor.
Step 4: Transfer the pot to the oven. Place the lid on the Dutch oven and put it in the preheated oven. Bake for 30 to 40 minutes depending on the size of the pieces. Check at the 30-minute mark. The chicken is done when the internal temperature reaches 165°F.
Step 5: Let the chicken rest. Remove the pot from the oven and leave the lid on. Let it sit for 5 to 10 minutes. This resting period allows the juices to redistribute throughout the meat. When you cut into it, the chicken will be moist and tender instead of dry.
Baking Times For Different Chicken Cuts
Baking time varies depending on the size and type of chicken piece you are using. Here is a quick reference guide to help you plan your meal. Always use a meat thermometer to confirm doneness.
- Chicken thighs (bone-in): 35 to 45 minutes at 425°F
- Chicken drumsticks: 25 to 35 minutes at 425°F
- Chicken breasts (bone-in): 30 to 40 minutes at 425°F
- Whole chicken (3-4 lbs): 50 to 70 minutes at 425°F
- Chicken wings: 20 to 25 minutes at 425°F
These times are guidelines. Altitude, oven accuracy, and the size of the pieces all affect cooking time. The most reliable method is to check the internal temperature with a digital thermometer. Insert it into the thickest part of the meat, avoiding the bone.
Tips For Juicy, Flavorful Results Every Time
Even with a great recipe, small mistakes can ruin your chicken. Follow these Dutch oven baking tips to avoid common pitfalls and get perfect results every time.
Do not skip the searing step. Searing on the stovetop before baking creates a flavorful crust that locks in moisture. It also adds a depth of flavor you cannot get from oven-only baking. Use medium-high heat and give each piece enough time to develop a golden-brown color.
Keep the lid on during baking. The lid traps steam, which keeps the chicken moist. Removing the lid too early can dry out the meat. If you want extra crispy skin, remove the lid for the last 5 to 10 minutes of baking. This gives you the best of both worlds.
Do not crowd the pot. Leave space between each piece of chicken. Overcrowding traps too much steam and prevents the skin from crisping. If you are baking a whole chicken or a large batch, use a bigger Dutch oven or bake in two batches.
Add vegetables for a complete meal. Potatoes, carrots, onions, and garlic all roast beautifully in a Dutch oven alongside chicken. Toss them with olive oil, salt, and pepper, and place them around the chicken. The vegetables absorb the chicken juices and become incredibly flavorful.
Use chicken broth or wine for extra moisture. Pour half a cup of chicken broth or white wine into the bottom of the pot before baking. This creates a flavorful steaming liquid that keeps the chicken moist. It also makes an excellent base for a quick pan sauce after baking.
Common Mistakes To Avoid
Even experienced cooks make mistakes when baking chicken in a Dutch oven. Here are the most common errors and how to avoid them.
- Using a cold Dutch oven: Always preheat the pot on the stovetop before searing. A cold pot leads to uneven cooking and soggy skin.
- Over-seasoning with salt: Salt draws moisture out of the chicken. Use enough for flavor, but do not go overboard. Season just before baking for the best results.
- Opening the lid too often: Every time you lift the lid, you release steam and heat. This slows cooking and dries out the chicken. Trust the process and check only once or twice.
- Baking at too low a temperature: Low heat steams the chicken instead of roasting it. Use 400°F to 425°F for crispy skin and juicy meat.
- Cutting into the chicken immediately: This releases all the juices onto the cutting board instead of staying in the meat. Always let it rest for at least 5 minutes.
Expert Tips From Professional Cooks
Professional chefs have a few tricks that elevate Dutch oven chicken from good to extraordinary. One tip is to brine the chicken overnight. A simple brine of 1/4 cup salt dissolved in 4 cups of water adds moisture and seasoning deep into the meat. Rinse and dry the chicken before seasoning and baking.
Another chef trick is to reverse sear the chicken. Bake it at a lower temperature of 375°F until it reaches an internal temperature of 160°F. Then, remove the lid, increase the heat to 450°F, and bake for another 5 to 10 minutes. This creates an incredibly crispy skin while keeping the inside perfectly juicy.
Many cooks also recommend letting the chicken come to room temperature before baking. Take it out of the refrigerator 20 to 30 minutes before it goes into the oven. This helps the chicken cook more evenly and reduces the overall baking time. It is a small step that makes a noticeable difference.
Serving Ideas And Meal Pairings
Baked Dutch oven chicken pairs beautifully with a wide range of sides. The rich, juicy meat works well with both light and hearty accompaniments. Here are some ideas to build a complete meal around your chicken.
For a healthy weeknight dinner, serve the chicken over a bed of roasted vegetables. Zucchini, bell peppers, cherry tomatoes, and red onion all roast alongside the chicken beautifully. Add a scoop of quinoa or brown rice for a balanced plate.
If you are in the mood for comfort food, pair the chicken with mashed potatoes and gravy. The pan juices from the Dutch oven make an excellent base for a simple gravy. Just whisk in a little flour and chicken broth, and simmer until thickened. It is creamy, rich, and absolutely delicious.
For a lighter option, serve the chicken on a mixed green salad. Arugula, spinach, and romaine all work well. Top it with a lemon vinaigrette and some crumbled feta cheese. The bright, tangy flavors complement the rich, savory chicken perfectly.
Sandwiches are another fantastic way to use leftover Dutch oven chicken. Shred the meat and pile it onto a crusty roll with your favorite sauce. Add some lettuce, tomato, and pickles for a gourmet chicken sandwich. You can also use the leftover chicken in tacos, wraps, or salads for easy lunches the next day.
For a rustic, family-style dinner, serve the entire Dutch oven at the table. Place it in the center of the table with the chicken and vegetables still in the pot. Let everyone serve themselves. It creates a warm, communal dining experience that is perfect for gatherings and holidays.
How To Store And Reheat Leftover Dutch Oven Chicken
Leftover baked chicken stays fresh in the refrigerator for up to 4 days. Store it in an airtight container to keep it from drying out. You can also store the chicken with some of the pan juices. The liquid adds moisture and flavor when you reheat it.
To reheat, place the chicken in a Dutch oven or oven-safe dish. Cover it with foil and warm it at 325°F for 15 to 20 minutes. The foil traps steam and prevents the chicken from drying out. For a crispy skin refresh, remove the foil for the last 5 minutes and increase the heat slightly.
You can also freeze baked chicken for up to 3 months. Wrap each piece tightly in plastic wrap and then foil, or store it in a freezer-safe bag. Thaw it in the refrigerator overnight before reheating. Properly stored, Dutch oven chicken tastes almost as good the second time around as it does fresh.
Conclusion
Baking chicken in a Dutch oven is one of the easiest and most rewarding cooking methods you can master. The heavy pot traps moisture, creates crispy skin, and delivers juicy, flavorful meat with minimal effort. Whether you are cooking for a family dinner or meal prepping for the week, this method never disappoints.
Follow the steps in this guide, use quality ingredients, and pay attention to temperature and timing. You will get juicy Dutch oven chicken every time. The simple seasoning blend, the searing technique, and the rest period all work together to create something truly special. Once you start baking chicken this way, you will never go back to a regular baking sheet again.
Grab your Dutch oven, pick up some chicken, and give this method a try tonight. Your kitchen will smell incredible, and your family will thank you. Baked chicken in a Dutch oven is comfort food at its finest, and it is waiting for you to make it.
Frequently Asked Questions
Can I use a enameled Dutch oven instead of cast iron for baking chicken?
Absolutely. Enameled Dutch ovens work just as well for baking chicken. They are lighter than cast iron and easier to clean. The enamel coating prevents rust and eliminates the need for seasoning. Both types retain heat beautifully and deliver juicy results.
How do I know when baked chicken is fully cooked?
The most reliable way is to use a meat thermometer. Insert it into the thickest part of the chicken, avoiding the bone. The internal temperature should read 165°F. If you do not have a thermometer, cut into the thickest part and check that the juices run clear, not pink.
Can I bake frozen chicken in a Dutch oven?
It is not recommended to bake frozen chicken directly in a Dutch oven. It will cook unevenly, and the outside may dry out before the inside reaches a safe temperature. Always thaw chicken completely in the refrigerator before baking for the best and safest results.
Do I need to add liquid to the Dutch oven when baking chicken?
You do not need to add liquid, but it helps. A splash of chicken broth or white wine creates extra steam and adds flavor. The chicken also releases its own juices as it bakes. Adding liquid is especially helpful when cooking leaner cuts like chicken breast.
What temperature should I bake chicken in a Dutch oven?
Bake at 400°F to 425°F for crispy skin and juicy meat. This high heat creates a beautiful golden crust on the outside while keeping the inside tender. If you prefer slower, more gentle cooking, you can bake at 375°F for a longer time.
Can I put vegetables in the Dutch oven with the chicken?
Yes, and they taste amazing together. Root vegetables like potatoes, carrots, and onions work especially well. Toss them with olive oil, salt, and pepper, and arrange them around the chicken. Everything cooks together, and the vegetables absorb the chicken juices for incredible flavor.