How To Prepare Crispy Chicken Tenders In The Oven Today
Discover how to make perfectly crispy chicken tenders in the oven with minimal effort and maximum flavor. This guide walks you through every step, from choosing the right chicken to achieving a golden-brown crust that stays crunchy. You will learn pro tips, common mistakes to avoid, and easy variations that make this dish a family favorite. Whether you are a beginner or a seasoned cook, this method guarantees juicy, delicious results every single time.
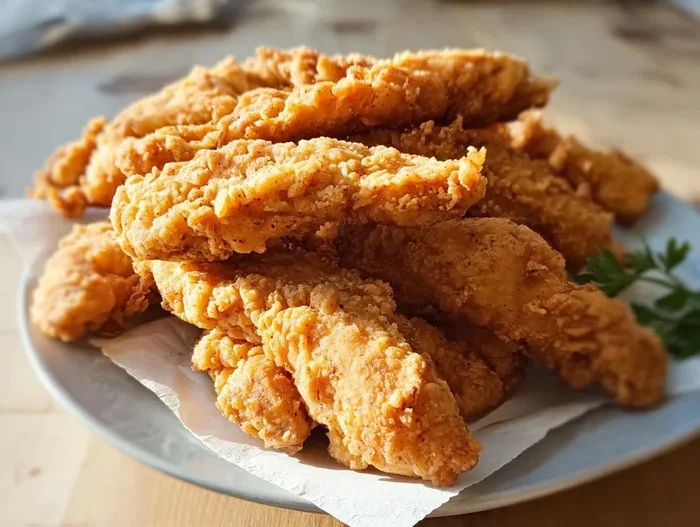
There is something magical about crispy chicken tenders in the oven. They come out golden brown, perfectly crunchy on the outside, and juicy on the inside. Best of all, you do not need a deep fryer or a ton of oil to make them. Whether you are feeding a family, prepping meals for the week, or just craving a comfort food classic, baked chicken tenders are the answer.
Many people think that crispy chicken can only come from a deep fryer. That is simply not true. With the right technique, your oven-baked chicken tenders can rival anything from a fast-food restaurant. The key lies in the breading, the temperature, and a little patience. This guide will show you exactly how to pull it off every time.
We are going to cover everything from selecting the right chicken to nailing the perfect crispy coating. You will find practical tips, easy variations, and common mistakes to avoid. By the end of this article, you will feel confident enough to make homemade chicken tenders whenever the craving strikes. Let us get started.
Key Takeaways
- Oven-baked chicken tenders are healthier: You get the same crispy texture without the extra oil from deep frying.
- Prep time is short: Most recipes take under 15 minutes to prep and about 20-25 minutes to bake.
- The secret to crispiness: A double-dipping method with buttermilk and breadcrumbs creates a thick, crunchy coating.
- Temperature matters: Baking at 425°F ensures the outside turns golden while the inside stays juicy.
- Resting is essential: Letting the tenders rest for a few minutes after baking keeps them moist and flavorful.
- Customization is easy: Swap breadcrumbs, add spices, or use different dipping sauces to match your taste.
- Meal prep friendly: You can bread the tenders ahead of time and bake them whenever you are ready.
📑 Table of Contents
- Why Oven-Baked Chicken Tenders Are a Game Changer
- Ingredients You Will Need for Perfect Chicken Tenders
- Step-by-Step Guide to Making Crispy Chicken Tenders in the Oven
- Common Mistakes That Prevent Crispy Chicken Tenders
- Expert Tips for the Best Crispy Chicken Tenders Ever
- Variations to Keep Your Chicken Tenders Exciting
- How to Store and Reheat Leftover Chicken Tenders
- Frequently Asked Questions
- Conclusion
Why Oven-Baked Chicken Tenders Are a Game Changer
Switching from fried to baked is one of the simplest upgrades you can make in the kitchen. Oven-baked chicken delivers incredible flavor without the guilt of excess oil. Here is why so many home cooks are making the switch.
Health Benefits of Baking Instead of Frying
Deep frying adds a significant amount of fat and calories to your food. A serving of fried chicken tenders can contain anywhere from 200 to 400 extra calories just from the oil absorbed during cooking. When you bake chicken tenders, you skip that entirely. You still get a satisfying crunch, but with a fraction of the fat.
Baking also lets you control the ingredients more closely. You choose the oil, the breadcrumb type, and the seasoning. This means no mystery ingredients or preservatives. Your healthy chicken tenders are made with real food you can pronounce.
Cost Savings at Home
Buying breaded chicken tenders from the store adds up quickly. A bag of frozen tenders might seem affordable, but the quality and sodium content often leave much to be desired. Making your own crispy baked chicken at home costs a fraction of the price. A whole chicken breast, some breadcrumbs, and a few pantry staples are all you need.
Over time, the savings are substantial. A family of four can save dozens of dollars each month by preparing homemade chicken tenders instead of ordering takeout or buying pre-packaged options.
Consistency and Quality You Can Trust
When you make chicken tenders from scratch, you control the texture and flavor completely. No more wondering what is in your food or dealing with unevenly cooked pieces. Every tender comes out the same way — crispy on the outside, moist on the inside, and packed with flavor.
Once you master the basic method, you can experiment with different coatings and seasonings. The versatility of oven-baked chicken tenders is one of the biggest reasons they have become a staple in home cooking.
Ingredients You Will Need for Perfect Chicken Tenders
The beauty of crispy chicken tenders in the oven is that you need very few ingredients. Keeping it simple lets the natural flavor of the chicken shine through. Here is what you will need for a standard batch.
Core Ingredients for the Tenders
- Chicken breast: Use boneless, skinless chicken breasts or tenderloins for the best results. Thinner cuts cook more evenly and stay juicy.
- Buttermilk: This is the secret weapon. Buttermilk chicken tenders stay tender because the acidity in the buttermilk gently breaks down the proteins. It also helps the breading stick better.
- Panko breadcrumbs: Panko creates a lighter, crunchier coating than regular breadcrumbs. It is the go-to choice for crispy chicken coating that stays crispy even after baking.
- All-purpose flour: A light dredge in flour helps the buttermilk coating adhere to the chicken. Do not skip this step.
- Eggs: Beaten eggs act as a binding agent between the flour and breadcrumb layers. They create a thick, even coating.
- Olive oil or cooking spray: A light coating of oil helps the breading brown and crisp up in the oven. A spray bottle works great for even coverage.
Seasonings and Spices
The seasoning mix is where you can really make the recipe your own. Here are some classic combinations that work beautifully for homemade chicken tenders:
- Garlic powder and onion powder: These add a savory depth that pairs well with any dipping sauce.
- Paprika and smoked paprika: Paprika gives a warm color and mild sweetness. Smoked paprika adds a subtle barbecue-like flavor.
- Salt and black pepper: Do not underestimate these basics. Proper seasoning is the foundation of great crispy baked chicken.
- Italian seasoning blend: A quick shortcut that combines oregano, basil, thyme, and rosemary in one sprinkle.
- Cayenne pepper or chili flakes: Add a pinch if you like a little heat. Even a small amount transforms the flavor profile.
Dipping Sauces to Complement Your Tenders
No plate of baked chicken tenders is complete without a great dipping sauce. Here are some easy options you can whip up in minutes:
- Classic honey mustard: Mix equal parts honey and Dijon mustard with a splash of mayonnaise. Sweet, tangy, and perfect.
- Ranch dressing: Store-bought works fine, but a homemade ranch with fresh herbs tastes incredible.
- Spicy sriracha mayo: Combine mayonnaise with sriracha sauce and a squeeze of lime juice. Great for those who enjoy a kick.
- Barbecue sauce: A classic pairing that gives your tenders a smoky, sweet flavor boost.
Step-by-Step Guide to Making Crispy Chicken Tenders in the Oven
Now for the part you have been waiting for. The actual cooking process. Making crispy chicken tenders in the oven is straightforward, but the order of steps matters. Follow this method and you will get consistent, perfect results every time.
Step 1: Prepare the Chicken
Start by slicing your chicken breasts into strips about 1 to 1.5 inches wide. Uniform thickness is important because it ensures every tender cooks at the same rate. If you buy chicken tenderloins, they are already the perfect size and you can skip the slicing step.
Pat the chicken strips dry with paper towels. Moisture is the enemy of a crispy coating. The drier the surface, the better the breading will stick. Season the strips lightly with salt and pepper before moving to the next step.
Step 2: Set Up Your Breading Station
This is the most important setup in the entire process. You will need three shallow dishes arranged in a line:
- Dish one: Flour mixed with salt, pepper, and garlic powder.
- Dish two: Whisked eggs mixed with a splash of buttermilk.
- Dish three: Panko breadcrumbs mixed with your chosen spices and a pinch of salt.
Some cooks like to add a fourth dish with pure breadcrumbs for a thicker coating. This double-dipping method creates an extra-crunchy chicken tender breading that holds up beautifully in the oven.
Step 3: Coat Each Tender
Take one chicken strip and dredge it in the flour mixture, shaking off any excess. Next, dip it into the egg and buttermilk mixture, letting the excess drip off. Finally, press it firmly into the panko breadcrumbs, coating all sides evenly. For extra crunch, repeat the egg and breadcrumb steps once more.
Place the coated tender on a clean plate or baking sheet lined with parchment paper. Repeat with the remaining strips. This process takes about 10 to 15 minutes for a batch of six to eight tenders.
Step 4: Preheat and Bake
Preheat your oven to 425°F (220°C). This high temperature is crucial for getting a crispy exterior while keeping the inside moist. While the oven heats up, line a baking sheet with parchment paper or a wire rack set over a baking sheet.
Lightly spray or brush the coated tenders with olive oil or cooking spray. This helps the breading brown and crisp up. Place the tenders on the rack or baking sheet, leaving space between each piece so air can circulate freely.
Bake for 18 to 22 minutes, flipping halfway through. The tenders are done when the internal temperature reaches 165°F (74°C) and the coating is deep golden brown. Use a meat thermometer for the most accurate results.
Step 5: Rest and Serve
Let the crispy chicken tenders rest on the baking sheet for about 3 to 5 minutes after removing them from the oven. This resting period allows the juices to redistribute throughout the meat. Cutting into them immediately can cause them to dry out.
Serve hot with your favorite dipping sauces. Pair them with a side salad, sweet potato fries, or a simple coleslaw for a complete meal. These tenders are best enjoyed fresh, but they also reheat well in the oven the next day.
Common Mistakes That Prevent Crispy Chicken Tenders
Even with a great recipe, small mistakes can ruin your oven-baked chicken tenders. Here are the most common pitfalls and how to avoid them.
Skipping the Dredging Steps
Some people go straight from buttermilk to breadcrumbs and wonder why the coating slides off. The flour step is essential. It creates a rough surface for the egg to grip onto, which then locks the breadcrumbs in place. Do not skip any of the three steps in your chicken tender breading process.
Overcrowding the Baking Sheet
It is tempting to fit as many tenders as possible on one sheet. But overcrowding traps steam and prevents the coating from crisping up. The tenders will steam instead of bake, resulting in a soggy exterior. Give each piece enough space, and if you need to bake in batches, do it.
Using the Wrong Oven Temperature
Baking at too low a temperature will leave your baked chicken tenders pale and soft. Too high, and the outside burns before the inside cooks through. 425°F is the sweet spot for oven-baked chicken tenders. It is hot enough to crisp the breading quickly while cooking the chicken through evenly.
Not Using a Wire Rack
Placing tenders directly on a flat baking sheet causes the bottom to sit in moisture. A wire rack allows hot air to circulate around the entire tender, producing an evenly crispy coating on all sides. If you do not have a rack, try propping the tenders up on a bed of chopped onions or aluminum foil balls.
Forgetting to Flip Halfway
Flipping the tenders halfway through baking ensures both sides get equally golden and crispy. If you only bake them on one side, you will get uneven browning and texture. Set a timer and remember to turn them gently with tongs.
Expert Tips for the Best Crispy Chicken Tenders Ever
Take your homemade chicken tenders from good to restaurant-quality with these expert-backed tips. These small adjustments make a huge difference in the final result.
Use a Wire Rack for Even Crisping
A wire rack is the single best tool upgrade you can make for oven-baked chicken tenders. It elevates the chicken off the baking sheet, allowing hot air to flow underneath. This eliminates soggy bottoms and produces a uniformly crispy coating. If you do not have a wire rack, a cooling rack placed on top of a baking sheet works just as well.
Chill the Breaded Tenders Before Baking
This is a restaurant trick that works beautifully at home. After coating the tenders, place them on a baking sheet and refrigerate for 15 to 30 minutes. The cold temperature helps the breading set and adhere to the chicken. When they hit the hot oven, the coating is less likely to slide off and more likely to puff up into a crispy shell.
Double-Dip for Extra Crunch
For an extra-thick, crunchy chicken coating, dip the tenders in the egg mixture and breadcrumbs twice. The first coat creates a base layer, and the second coat adds thickness and crunch. This method is especially effective with panko breadcrumbs, which create larger, more irregular pieces that fry up beautifully in the oven.
Add a Touch of Cornstarch to the Breading
Mix a tablespoon of cornstarch into your panko breadcrumbs. The cornstarch absorbs moisture from the chicken during baking and helps create an ultra-crispy exterior. This is a secret used by many professional kitchens to achieve that perfect crunch without deep frying.
Brush with Butter After Baking
Right when the tenders come out of the oven, brush them lightly with melted butter or olive oil. This adds richness and shine to the coating. It also helps the breading stay crispy for longer, even as the tenders cool slightly on the plate.
Experiment with Different Breading Options
Do not limit yourself to plain panko. Try crushed Ritz crackers for a buttery flavor, tortilla chips for a Mexican-inspired twist, or crushed cornflakes for a gluten-free alternative. Each option gives your crispy baked chicken a unique texture and taste profile.
Variations to Keep Your Chicken Tenders Exciting
Once you master the basic crispy chicken tenders in the oven recipe, you can get creative with different flavors and styles. These variations keep the dish interesting and let you customize to your family’s preferences.
Honey Garlic Chicken Tenders
Add minced garlic and a drizzle of honey to your breadcrumb mixture before coating the tenders. The result is a sweet and savory flavor that pairs wonderfully with a dipping sauce. This variation is a hit with kids and adults alike.
Ranch Seasoned Chicken Tenders
Mix ranch seasoning powder directly into your panko breadcrumbs. The tangy, herbaceous flavor transforms ordinary tenders into something extraordinary. Serve with ranch dressing on the side for dipping, and you have a crowd-pleaser.
Spicy Buffalo Chicken Tenders
Toss the baked tenders in a mixture of melted butter and hot sauce immediately after they come out of the oven. The heat from the sauce combines with the crispy coating for a flavor explosion. Serve with blue cheese dressing and celery sticks for the classic buffalo wing experience.
Italian-Style Chicken Tenders
Use Italian seasoning in your breadcrumbs and add grated Parmesan cheese for an extra layer of flavor. These tenders work beautifully with a side of marinara sauce for dipping. They also make excellent additions to a sub sandwich or salad the next day.
Korean-Style Crispy Chicken Tenders
Coat the tenders in a mixture of panko, gochugaru (Korean chili flakes), and sesame seeds. After baking, toss them in a sweet and spicy glaze made from soy sauce, honey, and rice vinegar. These tenders bring a bold, umami-rich flavor that is incredibly addictive.
How to Store and Reheat Leftover Chicken Tenders
Leftover baked chicken tenders are perfectly safe to eat and can taste great the next day if you store and reheat them correctly.
Storage Tips
Let the tenders cool completely before storing them. Place them in an airtight container and refrigerate for up to 3 to 4 days. For longer storage, freeze the tenders in a single layer on a baking sheet, then transfer them to a freezer bag. They will keep in the freezer for up to 3 months.
Reheating for Maximum Crispiness
The oven is the best way to reheat crispy chicken tenders. Preheat to 375°F and place the tenders on a wire rack. Heat for 8 to 10 minutes, or until warmed through and the coating is crispy again. Avoid using the microwave, as it will make the breading soggy and soft.
Frequently Asked Questions
Can I use frozen chicken for this recipe?
Yes, you can use frozen chicken tenders, but thaw them completely first for the best results. Thawing in the refrigerator overnight is the safest method. Cooking frozen chicken directly can lead to uneven cooking, with the outside overcooked while the inside remains raw.
How do I know when chicken tenders are fully cooked?
The most reliable way is to use a meat thermometer. Insert it into the thickest part of the tender, and make sure the internal temperature reaches 165°F (74°C). The chicken should also be white all the way through with no pink remaining, and the juices should run clear.
Can I make the breading ahead of time?
Absolutely. You can prepare the breadcrumb mixture and store it in an airtight container for up to a week. Some people even bread the tenders a day in advance and keep them in the refrigerator before baking. Just make sure to let them come to room temperature for about 15 minutes before they go into the oven.
What is the best oil to use for crispy chicken tenders?
Light olive oil and avocado oil work best because they have high smoke points and a neutral flavor. You can also use cooking spray for an ultra-thin, even coating. Avoid using butter for spraying, as it burns easily at high temperatures.
Are oven-baked chicken tenders healthier than fried ones?
Yes, oven-baked chicken tenders are significantly healthier than their fried counterparts. Baking eliminates the need for excess oil, reducing both calories and fat content. You also avoid the potential health risks associated with repeated deep frying, such as trans fats and acrylamide formation.
Can I use whole wheat breadcrumbs instead of panko?
You can, but the texture will be slightly different. Whole wheat breadcrumbs produce a denser, heavier coating compared to the light, airy crunch of panko. If you want a healthier option without sacrificing too much texture, try using panko-style whole wheat breadcrumbs or crushed whole wheat crackers.
Conclusion
Crispy chicken tenders in the oven are easier to make than you probably think. With a few simple ingredients, the right technique, and a hot oven, you can create a dish that is crispy, juicy, and absolutely delicious. No deep fryer required. No complicated steps. Just honest, satisfying food that the whole family will love.
The beauty of this recipe lies in its simplicity and versatility. You can stick with a classic coating or experiment with bold flavors like spicy buffalo, honey garlic, or Korean-style glaze. Every variation turns out wonderfully because the foundation is the same — good chicken, proper breading, and the right oven temperature.
Start with the basic method outlined in this guide. Once you are comfortable, branch out and make the recipe your own. Try different seasonings, swap breadcrumbs, or invent your own dipping sauces. The more you cook homemade chicken tenders, the more confident you will become.
Remember, the key to perfect oven-baked chicken tenders is patience and attention to detail. Do not skip the dredging steps, do not overcrowd the pan, and always let your tenders rest after baking. Follow these principles and you will never go back to store-bought frozen tenders again.
Now it is your turn. Preheat that oven, gather your ingredients, and make a batch of crispy baked chicken today. Your kitchen will smell incredible, and you will have a meal that is healthier, tastier, and far more satisfying than anything you can buy at a restaurant. Enjoy every bite.