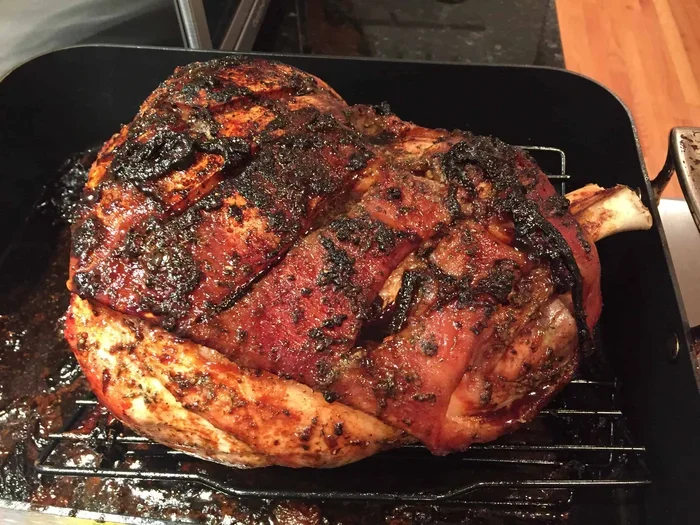
Should I Cover Pork Shoulder In Oven For Better Results
Should I cover pork shoulder in oven? The answer is simple: it depends on the texture you want. Covering pork shoulder traps steam for a juicy, pull-apart meat, while leaving it uncovered builds a crispy, flavorful bark. Learn the right method to get perfect oven-roasted pork shoulder every time.
You’ve got a beautiful pork shoulder ready for the oven. The big question is: should I cover pork shoulder in oven? This simple decision changes everything about your final dish.
Covering pork shoulder traps steam. That steam keeps the meat moist and tender. But leaving it uncovered lets the surface dry out and form a crispy bark. So, which method should you choose?
The truth is, both approaches work. The best method depends on your time, your oven, and the texture you love. In this guide, you’ll learn exactly when to cover, when to uncover, and how to get perfect results every time. I’ll share easy steps, common mistakes, and expert tips. By the end, you’ll know exactly how to handle your next pork shoulder roast.
Key Takeaways
- Cover for moisture: Wrapping pork shoulder in foil keeps it juicy during the long roast.
- Uncover for bark: Leaving the meat uncovered in the last hour creates a delicious crust.
- Low and slow wins: Cook at 300°F for tender results that fall apart.
- Use a meat thermometer: Pull the pork shoulder at 195°F for perfect shredding.
- Rest before cutting: Let the roast rest 30 minutes to redistribute juices.
- Foil or Dutch oven lid? Both work; choose based on your oven and pan setup.
📑 Table of Contents
Should I Cover Pork Shoulder In Oven? Why It Matters
Covering pork shoulder in the oven is all about moisture control. When you wrap the meat, you create a mini steam chamber. The steam bathes the surface and prevents the juices from escaping. This leads to a very tender, fall-apart texture.
The Science of Moisture and Heat
Think of a pork shoulder as a bundle of tough connective tissue and fat. During a long cook, collagen breaks down into gelatin. That gelatin gives the meat a silky, moist feel. But if the oven air is too dry, the surface dries out before the inside is ready. Covering the pork shoulder slows down moisture loss. It keeps the internal environment humid.
Many barbecue experts use this technique for low-and-slow cooking. They wrap the meat in heavy-duty foil or place it in a Dutch oven with a tight lid. This method is often called the “Texas crutch.” It speeds up the cook slightly and guarantees juicy results.
When You Want a Juicy Pull-Apart Pork
If your goal is shredded pork for sandwiches or tacos, covering the meat is a great idea. The steam helps the fibers separate easily. You get tender strands that pull apart with a fork. This works especially well for a pork butt or bone-in shoulder roast.
Covering also helps when you’re cooking at a lower temperature, around 275°F to 300°F. The gentle heat combined with trapped moisture prevents the meat from drying out over several hours. It’s a foolproof way to serve a crowd.
Covered vs. Uncovered: The Great Pork Shoulder Debate
Should you always cover your pork shoulder? Not necessarily. The uncovered method has its own charm. When you leave the meat exposed, the dry oven air slowly evaporates the surface moisture. This dehydration is exactly what forms a deep, flavorful bark. The bark is the dark, crusty exterior that barbecue lovers crave.
Leaving the pork shoulder uncovered also lets fat render slowly on the surface. That fat bastes the meat naturally. The result is a rich, roasted flavor with a slightly crispy exterior. Many people prefer this method for a traditional roast dinner presentation.
Here is a quick comparison to help you decide.
| Method | Texture | Best For | Cook Time |
|---|---|---|---|
| Covered (foil or lid) | Juicy, tender, pull-apart | Shredded pork, sandwiches | Slightly faster |
| Uncovered (no wrap) | Crispy bark, roasted flavor | Sliced roast, dinner plates | Slightly slower |
| Hybrid (covered then uncovered) | Moist inside, crispy outside | Best of both worlds | Balanced |
The hybrid approach is my favorite. I cover the pork shoulder for most of the cook. Then I remove the foil or lid for the last 45 minutes. This gives me juicy meat with a beautiful crust. It’s the ultimate oven-roasted pork shoulder method.
Step-by-Step: How to Cover Pork Shoulder in the Oven
Now that you know the why, let’s look at the how. Covering pork shoulder in the oven is easy. You just need the right tools and a little timing.
Choosing the Right Pan and Foil
Start with a heavy, oven-safe roasting pan or a deep baking dish. A Dutch oven works perfectly too. The heavy walls hold heat evenly and prevent hot spots.
Use heavy-duty aluminum foil if you’re wrapping the meat directly. Regular foil tears easily and leaks steam. Double up the foil for a tight seal. You can also use a disposable aluminum pan with a lid. Many people prefer the lid because it’s easier to remove and replace.
Place the pork shoulder fat-side up in the pan. Add a small amount of liquid to the bottom if you like. This can be apple cider, broth, or even beer. The liquid creates extra steam and adds flavor. Just don’t submerge the meat.
Temperature and Timing Guide
Set your oven to 300°F for a slow, gentle roast. This temperature is ideal for breaking down collagen without drying out the meat. Some cooks go as low as 275°F for an even more tender result.
Keep the pork shoulder covered for the first 4 to 5 hours of cooking. The exact time depends on the size of the roast. A 6- to 8-pound shoulder usually takes about 10 to 12 hours total at 300°F. Use a meat thermometer to check progress.
When the internal temperature reaches 165°F to 170°F, you can remove the cover. This is the point where the meat is fully cooked but still needs time to become tender. Continue roasting uncovered if you want a bark. Or keep it covered if you prefer a softer texture.
The final target temperature for pulled pork is 195°F to 205°F. At this point, the collagen has fully melted. The meat will be incredibly tender and easy to shred.
Common Mistakes to Avoid
Overwrapping and Steaming the Meat
One mistake people make is wrapping the pork shoulder too tightly. You want the foil to create a loose tent, not a sealed vacuum. A tight seal can actually steam the meat too much. It washes away the flavorful bark before it has a chance to form.
Another error is using too much liquid in the pan. A little bit helps, but too much can cause the meat to boil instead of roast. You want gentle steam, not a bubbling bath. Keep the liquid level below one-third of the pan’s height.
Skipping the Rest Period
After you pull the pork shoulder from the oven, never cut it immediately. The meat needs to rest for at least 30 minutes. During resting, the juices redistribute throughout the fibers. If you cut too soon, the juices run out and the meat dries out.
Resting also carries over cooking. The internal temperature can rise another 5°F to 10°F. This carryover cooking helps finish the tenderizing process. I like to wrap the rested pork shoulder in a clean towel and place it in a cooler. This keeps it warm for hours without overcooking.
Expert Tips for Juicy, Flavorful Pork Shoulder
The Foil-Pan Technique
Many pitmasters use a two-stage method. First, they roast the pork shoulder uncovered for a few hours to develop the bark. Then they cover it with foil and return it to the oven to finish cooking gently. This technique gives you the best of both worlds. The bark stays intact while the inside becomes meltingly tender.
You can also wrap the meat in butcher paper instead of foil. Butcher paper breathes better than foil. It absorbs some moisture but still protects the meat from drying out. This creates a softer bark that many people prefer.
Adding Liquid Without Diluting Flavor
If you add liquid to the pan, choose something with flavor. Apple cider vinegar, Worcestershire sauce, or chicken broth all work well. Avoid plain water, which adds no flavor and can make the meat taste boiled.
Some cooks like to add whole onions, garlic cloves, or bay leaves to the pan. These aromatics infuse the steam with subtle flavors. The steam carries those flavors to the surface of the pork shoulder. It’s a simple way to boost taste without extra seasoning.
Let the Pork Shoulder Come to Room Temperature
Before you put the pork shoulder in the oven, take it out of the fridge for about 30 minutes. This lets the meat cook more evenly. A cold center can lead to an overcooked exterior and an undercooked interior. Room-temperature meat also reduces the total cooking time slightly.
Pat the surface dry with paper towels before applying your dry rub. A dry surface helps the rub adhere better. It also promotes faster bark formation. This small step makes a big difference in the final texture.
Quick Tips for Perfect Pork Shoulder Every Time
- Start with a good dry rub. Use a mix of salt, pepper, paprika, garlic powder, and brown sugar. Apply it at least 1 hour before cooking, or overnight for deeper flavor.
- Use a reliable meat thermometer. Don’t guess the doneness. Insert the probe into the thickest part of the shoulder, avoiding bone.
- Don’t peek too often. Every time you open the oven door, you lose heat and steam. Keep the oven closed as much as possible.
- Let the pork shoulder rest. Wrap it in foil and a towel after cooking. Rest for 30 to 60 minutes before shredding.
- Save the pan juices. The liquid at the bottom of the pan is full of flavor. Use it to make a simple gravy or mix it into pulled pork.
- Experiment with uncovered time. Try removing the foil for the last hour and see how the bark develops. Adjust based on your preference.
Conclusion
So, should you cover pork shoulder in oven? The answer is: it depends on your goal. If you want juicy, easy-to-shred meat, cover it for most of the cook. If you love a crispy bark and rich roasted flavor, leave it uncovered. For the best results, use the hybrid method. Cover the pork shoulder early, then uncover it near the end to develop that perfect crust.
Both methods produce delicious oven-roasted pork shoulder. The key is to cook it low and slow, monitor the internal temperature, and let it rest properly. With these tips, you’ll serve a pork shoulder that wows your family and friends. Don’t be afraid to experiment. Every roast teaches you something new. Next time you fire up the oven, you’ll know exactly what to do. Happy roasting!
Frequently Asked Questions
Should I cover pork shoulder in oven for the first few hours?
Yes, covering the pork shoulder for the first 4 to 5 hours traps moisture and keeps the meat juicy. This is especially helpful for larger cuts that need a long cook. You can uncover it later to develop a bark if you like.
What is the best way to cover pork shoulder in the oven?
The best way is to use heavy-duty aluminum foil or a tight-fitting Dutch oven lid. A loose tent of foil works well too. Avoid wrapping the meat tightly, as this can create too much steam and soften the bark.
Can I leave pork shoulder uncovered the entire time?
Yes, you can leave it uncovered for the full cook. This method produces a deep, crispy bark and a richer roasted flavor. It takes a bit longer and requires careful monitoring to prevent the surface from drying out too much.
How do I know when to uncover the pork shoulder?
Uncover the pork shoulder when the internal temperature reaches 165°F to 170°F. At this point, the meat is cooked through but still needs time to become tender. If you want a bark, leave it uncovered for the final 45 minutes to 1 hour.
Does covering pork shoulder make it more tender?
Covering pork shoulder helps retain moisture, which contributes to a tender texture. The trapped steam keeps the meat from drying out during the long cook. Combined with a low oven temperature, this method produces fall-apart tender results.
What temperature should I cook pork shoulder in the oven?
The ideal oven temperature is 300°F for a slow, even cook. You can go as low as 275°F for extra tenderness. Avoid temperatures above 325°F, as they can dry out the meat before the collagen fully breaks down.