How Long To Cook A Hen In The Oven For Juicy Results
Learn exactly how long to cook a hen in the oven with this complete guide. You’ll discover the perfect oven temperature, time per pound, and pro tips for juicy, crispy skin. Whether you’re roasting a small spring hen or a large Thanksgiving bird, this step-by-step plan guarantees tender, flavorful meat every time.
If you’ve ever wondered how long to cook a hen in the oven, you’re not alone. A whole hen can look intimidating, but the process is simpler than you think. The key is understanding weight, temperature, and timing. With the right approach, you’ll get a juicy roasted hen with crispy skin that impresses everyone at the table.
Roasting a whole hen is a classic comfort food. It fills the kitchen with amazing aromas. Whether it’s a small spring hen for a weeknight dinner or a larger bird for a holiday feast, this guide covers everything. You’ll learn the exact whole hen cooking time, the best oven temperature for hen, and simple tricks to keep the meat moist. Let’s dive in.
Key Takeaways
- Cooking time depends on weight: Plan for about 20 minutes per pound at 350°F, adjusting for starting temperature and size.
- Use a meat thermometer: The target internal temperature is 165°F in the thickest thigh. Never rely on time alone.
- Rest the hen for 15 to 20 minutes: This allows juices to redistribute and carryover cooking to finish the job.
- Dry brine or herb butter adds huge flavor: Seasoning the bird ahead of time makes a noticeable difference in juiciness.
- Crispy skin starts with a dry bird and high heat: Pat the skin dry, use a high initial temperature, and tent only when needed.
- A frozen hen needs extra time and care: Always thaw completely for the best whole hen cooking time and even cooking.
📑 Table of Contents
- How Long To Cook A Hen In The Oven – The Quick Answer
- Picking The Perfect Hen For Roasting
- Prep Work That Sets You Up For Success
- Oven Temperature, Time, And Weight Guide
- How To Get Juicy Meat And Crispy Skin
- Resting, Carving, And Serving Your Hen
- Troubleshooting Common Problems
- Final Thoughts And Key Takeaways
How Long To Cook A Hen In The Oven – The Quick Answer
The short answer to how long to cook a hen in the oven depends on its weight. A general rule is 20 minutes per pound at 350°F (175°C). But that’s just a starting point. The real magic happens when you pair time with the right temperature and a few smart techniques.
Here’s a quick reference for common sizes:
- 3-pound hen: About 1 hour to 1 hour 10 minutes.
- 5-pound hen: Around 1 hour 40 minutes to 2 hours.
- 7-pound hen: Roughly 2 hours 20 minutes to 2 hours 40 minutes.
These times assume a starting oven temperature of 350°F. You’ll always check the internal temperature. The target is 165°F (74°C) in the thickest part of the thigh. Never rely on the clock alone. A meat thermometer is your best friend. It takes the guesswork out of roasting and guarantees food safety.
Why Weight Matters So Much
Every hen is different. The breed, how it was raised, and even the cavity stuffing can change cooking time. A free-range hen might cook faster than a conventionally raised bird because the meat is denser. Always weigh your hen before cooking. This gives you a reliable starting point for your whole hen cooking time. A kitchen scale is inexpensive and incredibly useful.
Picking The Perfect Hen For Roasting
Not all hens are created equal. Choosing the right bird sets you up for success before you even turn on the oven.
Spring Hen vs. Full-Sized Hen
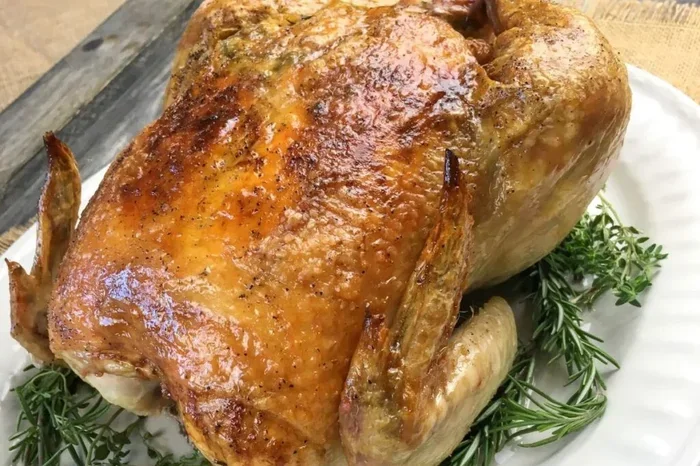
A spring hen is a young bird, usually under 5 months old. It weighs between 2 and 4 pounds. The meat is tender and cooks faster. A full-sized hen is older and can weigh 5 to 8 pounds. It has more dark meat and needs a longer roast. Both make great juicy roasted hen results when handled properly. The cooking method stays the same; only the time changes.
Fresh vs. Frozen
You can roast a frozen hen, but it’s not ideal. A frozen bird takes much longer to cook, and the outside can dry out before the inside is safe. Always thaw a frozen hen in the refrigerator for 24 hours per 4 to 5 pounds. If you’re short on time, use the cold water method. Submerge the bird in its packaging in cold water, changing the water every 30 minutes. A 5-pound hen will thaw in about 2 to 3 hours. Pat it completely dry before seasoning.
What to Look for at the Store
Pick a hen that feels heavy for its size. The skin should be smooth and intact. Avoid birds with loose skin or odd odors. A bone-in, free-range hen often has more flavor than a factory-farmed one. Look for organic or pasture-raised labels if you want the best quality. The color of the skin should be a pale, creamy yellow, which signals a healthy, well-fed bird.
Prep Work That Sets You Up For Success
Prepping your hen properly is half the battle. Skip this step and you risk dry meat.
Dry Brine for Juicy Meat
Dry brining is a game-changer. Salt the hen generously at least 4 hours before cooking, or even overnight. The salt draws out moisture, which then gets reabsorbed. This seasons the meat deeply and helps the skin crisp up. Simply pat the hen dry with paper towels, rub it all over with salt, and place it uncovered on a tray in the fridge. The uncovered time in the fridge also helps dry the surface, which is key for crispy skin.
Stuffing and Aromatics
Don’t stuff the cavity with bread dressing if you want even cooking. Instead, fill it with aromatics. A halved lemon, a garlic head, an onion quartered, and fresh herbs like thyme and rosemary work beautifully. These add flavor to the meat from the inside out. They also keep the bird moist during the slow roast. The aromatics steam inside the cavity and baste the bird naturally.
Trussing and Rack Placement
Tie the legs together with kitchen twine. Tuck the wing tips under the body. This helps the hen cook evenly and looks pretty on the plate. Place the hen breast-side up on a wire rack set inside a roasting pan. The rack allows hot air to circulate under the bird. It prevents the bottom from sitting in grease and getting soggy. Use a roasting pan with a low rack so the bird isn’t too close to the heating element.
Expert Insight: Why Professional Chefs Start Hen At High Heat
Many chefs begin the roast at a higher temperature, around 425°F, for the first 15 to 20 minutes. This initial blast of heat kick-starts the Maillard reaction, which creates that golden, crispy skin. After the sear, they drop the temperature to around 350°F or 375°F for gentle, even cooking. This two-stage method gives you the best of both worlds: crispy exterior and juicy interior.
Oven Temperature, Time, And Weight Guide
This is the heart of the article. The right temperature and time make all the difference between a dry bird and a juicy roasted hen.
Roasting A 3-Pound Hen
A small hen cooks quickly. Preheat your oven to 400°F for the first 20 minutes to get a jump on crispy skin. Then drop the temperature to 350°F and roast until the internal temperature hits 165°F. Total time is about 1 hour to 1 hour 10 minutes. A spring hen like this is perfect for a family of four.
Roasting A 5-Pound Hen
This is the most common size. Start at 425°F for 15 minutes to sear the skin. Then reduce to 375°F and roast for about 1 hour 45 minutes. The higher initial heat kick-starts the Maillard reaction, which creates that golden, crispy skin. Use a meat thermometer to check the thigh temperature. This size bird is ideal for a Thanksgiving side dish or a Sunday dinner.
Roasting A 7-Pound Hen
Larger hens need more time. Start at 425°F for 20 minutes, then lower to 350°F. Roast for roughly 2 hours 30 minutes to 2 hours 50 minutes. The breast meat can dry out if you go too hot too long, so keep an eye on it. A foil tent over the breast during the last 30 minutes can protect it. This size bird feeds a crowd and makes great leftovers.
Time Per Pound Chart
Here’s a simple comparison table for quick reference. All times assume a starting oven temperature of 350°F after an initial high-heat sear.
| Hen Weight | Start Temp | Reduce To | Approx. Total Time | Internal Temp Target |
|---|---|---|---|---|
| 3 lbs | 400°F (200°C) | 350°F (175°C) | 1 hr 10 min | 165°F (74°C) |
| 5 lbs | 425°F (220°C) | 375°F (190°C) | 1 hr 45 min | 165°F (74°C) |
| 7 lbs | 425°F (220°C) | 350°F (175°C) | 2 hr 40 min | 165°F (74°C) |
| 8 lbs | 425°F (220°C) | 325°F (160°C) | 3 hr 10 min | 165°F (74°C) |
These times are for a bone-in hen starting from refrigerator temperature. If your hen is frozen, add at least 50% more cooking time. Always let the meat rest before carving. The whole hen cooking time can vary based on your specific oven’s accuracy.
What If You Use A Frozen Hen?
Roasting a frozen hen is risky. The outside dries out while the inside thaws. If you must do it, increase the oven temperature to 425°F for the first hour to combat the cold mass. Then drop to 350°F. Use a probe thermometer to monitor the thickest part of the thigh. It may take 50% longer than a thawed bird. I strongly recommend thawing first for better juicy roasted hen results. A slow, even cook is always safer.
How To Get Juicy Meat And Crispy Skin
Everyone wants a hen with crackling skin and tender meat. These tips make it happen every time.
The Resting Period Is Non-Negotiable
Once the hen hits 165°F, pull it out. Let it rest for 15 to 20 minutes before you touch it. This is called carryover cooking. The temperature will rise another 5 to 10 degrees. The juices redistribute throughout the meat. If you cut too soon, they run out onto the cutting board instead of staying in the bird. Tent the hen loosely with foil during this time. This simple step is the difference between juicy and dry meat.
Basting And The Foil Tent Trick
Basting every 30 to 40 minutes keeps the hen moist. Use a spoon to scoop up the pan drippings and pour them over the breast and thighs. If the skin is getting too dark too fast, loosely tent the breast with a sheet of aluminum foil. Remove the foil for the last 15 minutes to let the skin crisp up again. This simple move prevents burnt skin while protecting tender breast meat. The drippings also add a layer of flavor you can’t get any other way.
Herb Butter Under The Skin
For an extra flavor boost, separate the skin from the breast meat with your fingers. Slide a compound butter made with minced garlic, lemon zest, and fresh herbs under the skin. It melts directly onto the meat as it roasts. The result is incredibly juicy and aromatic. This is a restaurant trick that works every time. You can also add a pat of butter under the skin of the thighs for extra richness.
Quick Tip: Crispy Skin Secrets
Quick Tip: Pat the hen completely dry with paper towels before seasoning. Moisture is the enemy of crispy skin. You can also leave the uncovered hen in the fridge overnight. The dry air in the refrigerator helps the skin dehydrate, which leads to a better crunch when it hits the hot oven. This one extra step makes a huge difference in your crispy skin results.
Resting, Carving, And Serving Your Hen
The final steps matter just as much as the roast itself. A beautiful presentation makes the meal feel special.
Carving Like A Pro
Place the rested hen on a cutting board. Use a sharp knife or a meat fork to hold the bird steady. Remove the legs first by cutting through the joint between the thigh and the body. Then separate the drumstick from the thigh. For the wings, cut through the joint closest to the body. To carve the breast, slice horizontally along the breastbone and then cut thin slices off each side. This preserves the juicy meat and looks beautiful on the plate. A meat fork helps stabilize the bird while you work.
Making Gravy From Pan Drippings
Don’t throw away the pan drippings. They are liquid gold. Pour off the excess fat, leaving the browned bits. Add a splash of chicken broth or white wine to the hot pan. Scrape up the fond with a wooden spoon. Simmer for a few minutes and strain. You’ll have a rich, savory gravy that pairs perfectly with the dark meat and mashed potatoes. The drippings capture all the flavor from the roast, so they’re worth saving.
Serving Suggestions
Roasted hen shines with simple sides. Think roasted root vegetables, buttery mashed potatoes, or a bright green salad. The juices from the bird can be drizzled over steamed green beans or roasted Brussels sprouts. For a holiday meal, serve with cranberry sauce and stuffing. The whole hen cooking time you invested in pays off when you see everyone coming back for seconds. A squeeze of fresh lemon over the carved meat brightens all the flavors.
Storing And Reheating Leftovers
Leftover hen stays good in the fridge for up to 3 days. Store it in an airtight container. To reheat, place the meat in a baking dish with a splash of broth and cover with foil. Warm it at 325°F for 15 to 20 minutes. This keeps the meat moist. You can also shred the leftover meat for sandwiches or salads. The bone-in hen gives you plenty of versatile leftovers that taste even better the next day.
Troubleshooting Common Problems
Even with a great recipe, things can go wrong. Here’s how to fix them and avoid them next time.
The Hen Is Done Too Fast
If your hen is browning too quickly, lower the oven temperature by 25°F and tent the breast with foil. You can also move the pan to a lower rack. The goal is gentle, even heat. A slow roast at a lower temperature is more forgiving than a high-heat blast. Trust the thermometer over the clock.
The Breast Meat Is Dry
Dry breast meat is the most common complaint. It happens when the oven is too hot or the bird cooks too long. Next time, start checking the temperature 15 minutes before the estimated finish time. Use a meat thermometer in the thickest part of the breast, avoiding the bone. If it reads 160°F, pull it out. The carryover cooking will bring it to a safe 165°F. This small habit prevents dry meat every time.
The Skin Is Not Crispy
If the skin is soft or flabby, the oven wasn’t hot enough at the start. Always preheat the oven and use the high-heat blast for the first 15 to 20 minutes. Make sure the hen is patted dry. Also, don’t cover the entire bird with foil for the whole cook. Only tent the breast if needed, and remove the foil for the final stretch to let the skin crisp. A dry surface is the secret to crispy skin.
Common Mistakes To Avoid
Here are a few errors that ruin an otherwise perfect juicy roasted hen:
- Skipping the dry brine or overnight seasoning.
- Roasting at a steady low temperature without a high-heat start.
- Using a pan without a wire rack, causing soggy bottoms.
- Not letting the hen rest before carving.
- Guessing doneness instead of using a thermometer.
- Overcrowding the pan with too many aromatics that block air flow.
Avoid these and you’ll have a showstopper bird every time. The oven temperature for hen and proper resting are the two biggest factors you can control.
Final Thoughts And Key Takeaways
Now you know exactly how long to cook a hen in the oven. The secret is a combination of weight-based timing, the right oven temperature, and a few simple prep tricks. A juicy roasted hen doesn’t require fancy equipment. It just needs patience, a reliable thermometer, and a little attention.
Remember to always start with a dry bird, season generously, and let it rest. The difference between a good roast and a great one is in the details. Whether you’re cooking for a family dinner or a special occasion, this guide gives you the confidence to roast a whole hen like a pro. Get in the kitchen, fire up the oven, and enjoy the process. A perfectly roasted hen is one of the most satisfying meals you can make, and now you have all the tools to nail it every single time.
Key Takeaways
- Cooking time depends on weight: Plan for about 20 minutes per pound at 350°F, adjusting for starting temperature and size.
- Use a meat thermometer: The target internal temperature is 165°F in the thickest thigh. Never rely on time alone.
- Rest the hen for 15 to 20 minutes: This allows juices to redistribute and carryover cooking to finish the job.
- Dry brine or herb butter adds huge flavor: Seasoning the bird ahead of time makes a noticeable difference in juiciness.
- Crispy skin starts with a dry bird and high heat: Pat the skin dry, use a high initial temperature, and tent only when needed.
- A frozen hen needs extra time and care: Always thaw completely for the best whole hen cooking time and even cooking.
Frequently Asked Questions
How long does it take to cook a 4-pound hen in the oven?
A 4-pound hen typically takes about 1 hour 30 minutes to 1 hour 45 minutes at 375°F after an initial high-heat sear. Always check the internal temperature with a meat thermometer to ensure it reaches 165°F in the thickest part of the thigh.
What is the best oven temperature for roasting a whole hen?
The best approach is to start at 400°F to 425°F for 15 to 20 minutes to crisp the skin, then reduce the temperature to 350°F to 375°F for the remainder of the cook. This two-stage method gives you crispy skin and juicy meat.
Should I cover my hen with foil while roasting?
You don’t need to cover the whole hen, but tenting the breast with foil during the last 30 to 45 minutes can prevent it from drying out. Remove the foil for the final 15 minutes to let the skin crisp up again.
How do I know when the hen is done without a thermometer?
The most reliable way is to use a meat thermometer. If you don’t have one, pierce the thickest part of the thigh with a knife. The juices should run clear, not pink. However, a thermometer is far more accurate and takes the guesswork out of cooking.
Can I cook a frozen hen directly in the oven?
Yes, but it’s not recommended. A frozen hen takes much longer to cook and the outside can dry out before the inside reaches a safe temperature. Always thaw the hen first in the refrigerator for best results and even cooking.
What should I serve with a roasted whole hen?
Roasted hen pairs beautifully with mashed potatoes, roasted root vegetables, steamed green beans, or a fresh salad. The pan drippings make a rich gravy that elevates any side dish. For a holiday meal, serve with cranberry sauce and stuffing for a classic combination.