How To Set Time On Ge Oven With Step By Step Guide
Learning how to set time on GE oven is simple when you follow the right steps. This guide walks you through clock setting, timer functions, and troubleshooting for all GE oven models. You will master your GE oven control panel and keep your kitchen appliance running perfectly in no time.
Your GE oven is one of the most important kitchen appliances you own. It helps you cook meals, bake desserts, and warm up leftovers every single day. But a small thing can throw off your whole routine. If the clock on your GE oven is wrong, it messes up your timer, your cook times, and even your schedule.
That is why knowing how to set time on GE oven matters so much. Whether you just bought a new GE oven or your old one lost its clock settings, this guide has you covered. We will walk you through every step in plain, simple language. You will learn how to set the clock, use the timer, fix common problems, and explore advanced features. By the end, you will feel confident managing all the time functions on your GE oven.
How to set time on GE oven is a skill every home cook should have. It takes just a few minutes once you know where the buttons are and what they do. So grab a cup of coffee, pull up a chair, and let us get your GE oven clock set perfectly.
Key Takeaways
- Know Your Panel: Understanding the GE oven button layout makes clock setting effortless.
- Follow Simple Steps: Setting the time on a GE oven takes just a few minutes with our guide.
- Use the Timer Wisely: The GE oven timer function helps you track cooking times with ease.
- Fix Common Issues: Learn quick GE oven clock troubleshooting tips for everyday problems.
- Explore Advanced Features: Discover stopwatch, time zone, and clock format options on your GE oven.
- Maintain Settings: Regular care keeps your GE oven digital clock accurate and reliable.
📑 Table of Contents
Understanding Your GE Oven Control Panel
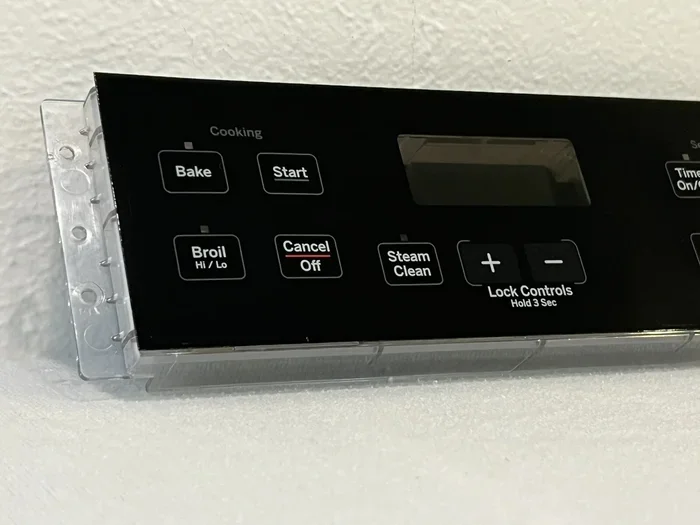
Before you learn how to set time on GE oven, you need to know what you are working with. Every GE oven has a control panel. This is the front area where you press buttons and set your cooking preferences. The layout might look different depending on your model, but the basic idea is the same across all GE ovens.
The Digital Display
Most modern GE ovens have a GE oven digital display. This screen shows the time, the temperature, and any active settings. If your GE oven has a digital display, you are in luck. Setting the clock is very straightforward. You will see numbers light up when you press the right buttons.
Older GE oven models might have a simpler dial or a small LCD screen. These still work well for GE oven clock setting. The steps are a little different, but the goal is the same. You want the display to show the correct time.
The Button Layout
The GE oven button layout usually includes a few key buttons. Look for buttons labeled Clock, Time, Timer, or a gear icon. Some GE ovens use a touchpad system. Others have physical buttons that you press in. Either way, the process for how to set time on GE oven follows a similar pattern.
Here are the common buttons you will find:
- Clock or Time Button: This is the main button for setting the time.
- Up and Down Arrows: These adjust the hours and minutes.
- Start or Confirm Button: This saves your new time setting.
- Timer Button: This activates the timer function separately.
- Clear Button: This resets your current input if you make a mistake.
Take a moment to look at your GE oven control panel. Find each of these buttons. Knowing where they are makes the whole process much faster and easier.
How To Set Time On GE Oven – Step By Step
Now that you know your way around the GE oven control panel, it is time to set the clock. Follow these simple steps to get your GE oven digital clock showing the right time. These steps work for most GE oven models.
Step 1: Find the Clock Button
Press the Clock or Time button on your GE oven. The display should change. You might see the hours blinking. This means the oven is ready for you to enter a new time. If nothing happens, try pressing and holding the Clock button for a few seconds.
Step 2: Set the Hours
Use the Up or Down arrows to adjust the hours. Press Up to go forward. Press Down to go back. Keep pressing until the display shows the correct hour. If your GE oven uses a 24-hour format, make sure you are setting the time correctly. For example, 3 PM would be 15:00 in 24-hour mode.
Step 3: Move to the Minutes
After setting the hours, press the Clock or Time button again. The minutes should start blinking now. Use the arrows to adjust the minutes to the correct value. Go slow and check the display carefully.
Step 4: Save Your Settings
Once the hours and minutes are correct, press the Start or Confirm button. The display should stop blinking and show the new time. Your GE oven clock setting is now saved. That is all it takes to set the time on most GE ovens.
Step 5: Check AM or PM
Some GE oven models show AM or PM on the display. Make sure your time is set correctly for morning or afternoon. If the AM or PM indicator is wrong, your cook times will be off. Double-check this before you start cooking.
How to set time on GE oven does not need to be scary or confusing. It is just a few simple button presses. Once you do it the first time, you will remember the steps easily.
Setting The Timer Function On Your GE Oven
The GE oven timer function is different from the clock. The clock shows the current time. The timer counts down from a set amount of time. This is very useful when you are cooking or baking and need to track how long food stays in the oven.
How to Use the GE Oven Timer
To set the timer, look for the Timer button on your control panel. Press it and the display will let you enter a countdown time. Use the arrows to set the minutes and seconds you want. Then press Start or Confirm to begin the countdown.
When the timer reaches zero, most GE ovens will sound an alarm. This is called the GE oven timer alarm. It is a loud beep that tells you your food is ready. The alarm will keep going until you press the Clear button or turn off the timer.
Timer vs Clock: What Is the Difference?
It is easy to confuse the timer and the clock on your GE oven. Here is a quick way to remember the difference:
- The Clock shows what time it is right now. It runs continuously.
- The Timer counts down from a set time. It stops when it reaches zero.
Both features are helpful in the kitchen. You can use the clock to know the time of day. You can use the timer to track your cooking progress. Learning both makes you more efficient in the kitchen.
Can You Use the Timer and Clock at the Same Time?
Yes, most GE ovens let you use the timer and clock at the same time. The clock keeps running in the background while the timer counts down. This is very convenient when you are baking something and need to know the current time too.
Some GE ovens also have a GE oven stopwatch feature. This works like a regular stopwatch. You start it, and it counts up instead of down. It is great for tracking how long a dish has been cooking. Check your oven manual to see if your model has this feature.
GE Oven Clock Troubleshooting Tips
Sometimes things go wrong with your GE oven clock setting. The clock might flash, show the wrong time, or stop working altogether. Do not worry. Most of these problems are easy to fix. Here are some common GE oven clock troubleshooting tips.
The Clock Is Showing the Wrong Time
If your GE oven digital clock shows the wrong time, the easiest fix is to reset it. Follow the same steps we covered earlier. Press the Clock button, adjust the hours and minutes, and save. Sometimes a power outage or a brief electrical surge can reset your clock. Setting it again solves the problem quickly.
The Display Is Flashing or Blank
A flashing or blank display on your GE oven can be alarming. But it is usually not a serious problem. The most common cause is a power interruption. Try unplugging your GE oven for 30 seconds. Then plug it back in. The display should come back on and show the default time. You can then set the clock again.
If the display stays blank after a power reset, check your circuit breaker. A tripped breaker can cut power to your oven. Reset the breaker and see if the display comes back.
The Clock Will Not Change
If your GE oven clock reset does not work, the buttons might be stuck or unresponsive. Try pressing each button gently. Sometimes crumbs or spills around the control panel can make buttons hard to press. Clean the panel with a damp cloth and try again.
Another reason the clock might not change is that the oven is in a locked mode. Some GE ovens have a child lock or control lock feature. Check your manual to see how to unlock the controls. Once unlocked, you should be able to set the time again.
The Timer Alarm Is Not Working
If the GE oven timer alarm is not sounding, check the volume setting. Some GE ovens let you adjust the alarm volume. Press the Timer or Settings button and look for a volume option. Turn it up and try setting the timer again.
Also make sure the timer is actually set correctly. Sometimes the time is entered but the timer is not started. Look for a Start or Begin button on the screen and press it to activate the countdown.
What If Nothing Works?
If you have tried all these steps and your GE oven clock not working issue persists, it might be a hardware problem. The control board or the display itself could be faulty. In this case, it is best to contact GE customer support or a qualified technician. Do not try to open the oven and fix it yourself. That can be dangerous and might void your warranty.
Advanced Time And Timer Features On GE Ovens
Many GE ovens come with extra time-related features that go beyond the basic clock and timer. These features can make your cooking experience even better. Let us look at some of the advanced options you might find on your GE oven kitchen appliance.
Time Zone and Clock Format
Some GE ovens let you choose between 12-hour and 24-hour time formats. This is helpful if you prefer one style over the other. Look for a Settings or Preferences menu on your control panel. Navigate to the Clock Format option and select your preferred style.
The GE oven time zone setting is less common but can be found on some smart GE oven models. These ovens connect to Wi-Fi and sync with the internet clock. This means your GE oven time adjustment happens automatically. You never have to set the clock manually again if your oven supports this feature.
Delayed Start and Programmable Cooking
Advanced GE ovens often include a delayed start feature. This lets you set the oven to begin cooking at a future time. You set the start time and the cook time separately. The oven waits until the clock reaches the start time and then begins heating.
This is great for meal prep. You can set your oven to start preheating before you wake up in the morning or before you get home from work. It saves time and makes your cooking routine smoother.
Memory Functions
Many GE ovens can remember your preferred clock settings and timer presets. This means you do not have to set everything from scratch every time. The oven stores your preferences and recalls them when needed. Check your model manual to learn how to save and recall time settings on your specific GE oven.
Keeping Your GE Oven Clock Accurate
Over time, your GE oven clock settings might drift slightly. This is normal with all digital clocks. To keep your clock accurate, check it once a month against your phone or a wall clock. If it is off by a minute or two, reset it. Small adjustments keep your GE oven digital display reliable and your cooking on track.
Maintaining Your GE Oven Clock Settings
Taking care of your GE oven helps keep the clock and timer working well for years. A little regular maintenance goes a long way. Here are some simple tips to keep your GE oven time adjustment features in top shape.
- Keep the Control Panel Clean: Wipe the panel regularly with a soft, damp cloth. Avoid using harsh chemicals that can damage the buttons.
- Check the Power Supply: Power surges can reset your clock. Consider using a surge protector for your oven to prevent this.
- Replace the Battery if Needed: Some GE oven models have a backup battery for the clock. If the clock resets after a power outage, the battery might need replacing. Check your manual for battery replacement instructions.
- Update Firmware on Smart Models: If you have a smart GE oven, keep the software updated. Manufacturers often release updates that fix clock and timer bugs.
- Refer to Your Owner Manual: Every GE oven model is slightly different. Your owner manual has the most accurate instructions for your specific appliance.
Following these simple maintenance steps keeps your GE oven clock troubleshooting needs to a minimum. Your oven will stay reliable and accurate with just a little regular care.
Conclusion
Learning how to set time on GE oven is one of the easiest and most useful skills you can build. It takes just a few minutes and makes a big difference in your daily cooking routine. You now know how to set the clock, use the timer, troubleshoot common issues, and explore advanced features on your GE oven.
Remember to check your GE oven digital clock regularly and keep the control panel clean. These small habits keep everything running smoothly. If you ever run into a problem you cannot fix, reach out to GE customer support for help. They are always ready to assist you with your GE oven kitchen appliance.
Now that you have this guide, you can set the time on your GE oven with confidence. Try it today and enjoy the peace of mind that comes with knowing your oven is set correctly. Happy cooking!
Frequently Asked Questions
Why Does My GE Oven Clock Reset After a Power Outage?
This happens because the clock loses power during an outage. Most GE ovens need you to set the time again after the power comes back. If this happens often, check if your oven has a backup battery. Replacing the battery can prevent the clock from resetting each time the power goes out.
Can I Set the Time on My GE Oven Using the Smart App?
Yes, if you have a smart GE oven model that connects to Wi-Fi. You can use the GE app on your phone to adjust the clock and timer settings remotely. Check your oven manual or the GE website to see if your model supports smart features.
How Do I Switch Between 12-Hour and 24-Hour Time on My GE Oven?
Go to the Settings or Preferences menu on your GE oven control panel. Look for the Clock Format option. Select either 12-hour or 24-hour mode and save your choice. The display will update to show the new format right away.
What Should I Do If the Timer Alarm Is Too Loud on My GE Oven?
Check if your GE oven has a volume control for the timer alarm. Press the Timer or Settings button and look for a volume option. Turn the volume down to a comfortable level. If your model does not have volume control, you can press the Clear button to stop the alarm when it goes off.
How Often Should I Check My GE Oven Clock for Accuracy?
It is a good idea to check your GE oven clock once a month. Compare it to your phone or a wall clock. If it is off by more than a couple of minutes, reset it. Regular checks keep your cooking times accurate and your kitchen routine running smoothly.
Is It Safe to Use a GE Oven With a Blank Display?
No, you should not use a GE oven with a blank display. A blank screen usually means there is a power issue or a hardware problem. Try unplugging the oven for 30 seconds and plugging it back in. If the display does not come back, contact GE customer support or a professional technician before using the oven again.