The Best Way To Cook Porterhouse Steak In Your Oven
Cooking a porterhouse steak in the oven is the easiest way to get a restaurant-quality meal at home. The reverse sear method gives you a perfect crust and even doneness from edge to edge. You will learn how to pick the right cut, season it well, and nail the ideal internal temperature. This guide covers every step, from prep to plating, so your steak turns out juicy and flavorful.
There is nothing quite like a thick, juicy porterhouse steak cooked right in your own oven. Whether you are a beginner in the kitchen or a seasoned home cook, learning the best way to cook porterhouse steak in oven will change your dinners forever. This big, beautiful cut of beef combines the tender filet mignon and the rich strip steak in one impressive piece. And the good news? You do not need a fancy grill or a professional kitchen to make it shine.
Oven cooking gives you more control than any other method. You can set the exact temperature, watch the process closely, and avoid the guesswork that comes with open-flame grilling. In this guide, we walk you through every single step. From choosing the right steak at the butcher counter to pulling it off the heat at just the right moment, you will find everything you need here.
The method we share is simple, reliable, and backed by years of cooking experience. You will learn how to get a beautiful brown crust on the outside while keeping the inside perfectly pink and juicy. Let us dive in and find out how to make the best porterhouse steak you have ever tasted.
Key Takeaways
- Reverse Sear Method: Cooking low and slow in the oven first, then searing on the stove, gives the most even result.
- Internal Temperature Matters: Use a meat thermometer to hit 130°F for medium-rare, the sweet spot for porterhouse.
- Resting Is Non-Negotiable: Letting your steak rest for 5-10 minutes keeps all those juices locked in.
- Cast Iron Is King: A cast iron skillet gives the best crust when you finish your steak on the stovetop.
- Thickness Is Key: Aim for a steak at least 1.5 inches thick for the best oven cooking results.
- Simple Seasonings Win: Salt, pepper, garlic, and butter are all you need for an amazing porterhouse.
📑 Table of Contents
- Why the Oven Is the Best Way to Cook Porterhouse Steak
- Choosing the Right Porterhouse Steak
- The Reverse Sear Method Step by Step
- Cooking Times and Temperatures at a Glance
- Common Mistakes to Avoid When Cooking Porterhouse in the Oven
- Serving Your Perfect Oven-Cooked Porterhouse
- Expert Insights on Oven Steak Cooking
- Key Takeaways
- Frequently Asked Questions
- Conclusion
Why the Oven Is the Best Way to Cook Porterhouse Steak
Many people think steak belongs on a grill. And sure, grilling is great in the summer. But when it comes to cooking a porterhouse steak in oven, you get advantages that a grill simply cannot match. The oven provides steady, even heat that wraps around the meat gently. This means no hot spots, no flare-ups, and no burnt edges.
When you use the oven, you control the environment completely. You decide the temperature, the cooking time, and how done you want the steak. This level of control is especially important for a thick porterhouse, which can be tricky on a hot grill. The oven lets you cook it slowly and evenly, which is the secret to a perfect steak every single time.
Consistent Heat for Even Cooking
A grill has direct flames that can cook the outside much faster than the inside. This often leads to a gray band of overcooked meat just below the crust. The oven avoids this problem entirely. The surrounding heat cooks the steak more uniformly, so the edge-to-edge temperature stays consistent. For a thick cut like porterhouse, this even cooking makes a huge difference in every bite.
Better Crust with a Simple Finish
Here is a little secret from professional chefs. You can get an amazing crust by finishing your steak in a screaming hot skillet on the stove. This two-step process, known as the reverse sear, is the crown jewel of oven-cooked steak. You cook the steak gently in the oven first, then give it a quick sear in cast iron with a little butter. The result is a deep brown crust that rivals anything you would get from a grill.
Choosing the Right Porterhouse Steak
Not all porterhouse steaks are created equal. Before you even think about turning on the oven, you need to pick the right piece of meat. The quality of your steak determines everything that happens after. A great cut with good marbling will reward you with incredible flavor and tenderness.
Look for Marbling
Marbling refers to the thin white lines of fat running through the meat. Do not be scared of this fat. It is what makes your steak juicy and flavorful. When you cook the steak, the fat melts and bastes the meat from the inside. Look for a porterhouse with fine, even marbling throughout. Avoid steaks with large pockets of fat or very little marbling, as these tend to dry out during cooking.
Thickness Matters More Than You Think
The best porterhouse steaks for oven cooking are at least 1.5 inches thick. Anything thinner and the steak will overcook before you get a good crust. A thicker cut gives you a bigger margin of error. You can sear it hard without burning the outside, and the center stays perfectly pink. If you can find a 2-inch porterhouse, that is even better. This thickness is the sweet spot for the reverse sear method.
Fresh vs. Frozen
Fresh steak from a good butcher is always ideal. But if you buy frozen, make sure you thaw it properly. The safest way is to move it from the freezer to the refrigerator 24 hours before cooking. Never thaw steak on the counter. Room temperature thawing lets bacteria grow on the surface, which can ruin your steak and make you sick. A properly thawed steak cooks more evenly and tastes much better.
The Reverse Sear Method Step by Step
The reverse sear is the gold standard for cooking porterhouse steak in oven. It sounds fancy, but the process is surprisingly simple. You cook the steak at a low temperature first, then finish it with a quick sear on the stovetop. This method gives you the most control and the most consistent results.
Step 1: Prep the Steak
Take your porterhouse out of the refrigerator about 30 to 45 minutes before cooking. Let it sit on the counter at room temperature. This small step matters a lot. A cold steak going straight into the oven cooks unevenly, with the center still cold while the outside overcooks. Room temperature steak cooks from edge to edge in a much more uniform way.
While the steak rests on the counter, pat it dry with paper towels. Dry meat gets a better crust. Moisture on the surface creates steam, which prevents browning. So do not skip this step. It is one of the easiest ways to improve your steak dramatically.
Step 2: Season Generously
Keep your seasoning simple for the best results. Kosher salt and freshly cracked black pepper are all you need for a great porterhouse. Sprinkle both sides generously, making sure to cover the edges too. The salt helps draw out moisture initially, but as the steak cooks, it gets reabsorbed and seasons the meat deeply.
Some people like to add garlic powder or a touch of smoked paprika. That is fine if you enjoy those flavors. But for a classic porterhouse, simple salt and pepper let the natural beef flavor shine through. Less is more when you start with a high-quality cut.
Step 3: Low and Slow in the Oven
Preheat your oven to 250°F. Place a wire rack on top of a baking sheet. Set the seasoned porterhouse on the rack and put it in the oven. The wire rack allows air to circulate all around the steak, which helps it cook evenly and promotes a better crust later.
Cook the steak until it reaches an internal temperature of about 110°F to 115°F for medium-rare. Use an instant-read meat thermometer inserted into the thickest part of the steak. This low-temperature phase usually takes 20 to 30 minutes depending on the thickness. Do not rush this step. Patience is the key to a perfectly cooked porterhouse.
Step 4: The Hot Sear
While the steak finishes in the oven, place a cast iron skillet on the stove over high heat. Let it get ripping hot. This usually takes about 3 to 5 minutes. A hot pan is essential for a good crust. Add a tablespoon of high-smoke-point oil, like avocado oil or grapeseed oil, to the skillet.
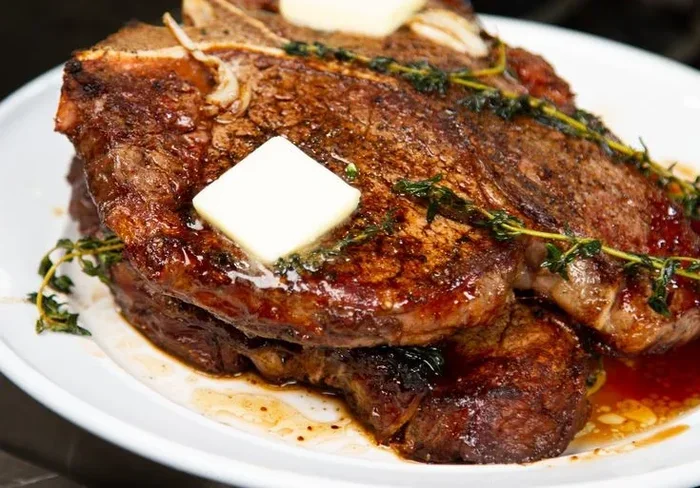
Carefully place the porterhouse in the hot pan. You should hear a loud sizzle immediately. Sear each side for about 1 to 2 minutes. Also sear the fatty edges, which only takes about 30 seconds per side. After searing, add a tablespoon of butter, a couple of crushed garlic cloves, and a sprig of fresh thyme to the pan. Baste the steak with the melted butter using a spoon for about 30 seconds. This adds incredible flavor and a beautiful finish.
Step 5: Rest the Steak
This is the step most people skip, and it is the biggest mistake you can make. Transfer the steak to a cutting board and let it rest for at least 5 to 10 minutes. During cooking, the juices get pushed toward the center of the steak. Resting allows those juices to redistribute throughout the meat. If you cut into it right away, all those flavorful juices run out onto the board instead of staying in the steak.
While the steak rests, its internal temperature will continue to rise by about 5 degrees. This carryover cooking is important to account for. If you pull the steak at 125°F, it will reach about 130°F during resting, which is the perfect medium-rare temperature.
Cooking Times and Temperatures at a Glance
Every oven and every steak is slightly different, so the times below are guidelines. Always rely on a meat thermometer rather than the clock. Temperature is the only reliable way to know your steak is done right.
| Doneness | Pull Temp (Oven) | Final Temp After Rest | Oven Time (1.5 inch) |
|---|---|---|---|
| Rare | 110°F | 120°F | 15-20 minutes |
| Medium-Rare | 115°F | 125°F | 20-25 minutes |
| Medium | 125°F | 135°F | 25-30 minutes |
| Medium-Well | 135°F | 145°F | 30-35 minutes |
| Well Done | 145°F | 155°F | 35-40 minutes |
For a porterhouse, we strongly recommend medium-rare. This temperature brings out the best flavor and texture in this particular cut. The tender filet side and the more flavorful strip side both shine at this level of doneness. If you prefer your steak more done, go ahead, but know that a porterhouse is best enjoyed when it still has some pink in the center.
Quick Tips for Perfect Timing
- Always use a meat thermometer. It takes the guesswork out of cooking entirely.
- Check the temperature early and often once you get close to your target.
- Remember that the steak temperature rises about 5 degrees during resting.
- A 2-inch thick steak will take longer than a 1.5-inch steak. Adjust your timing accordingly.
- If your oven runs hot or cold, adjust the temperature by 10 to 15 degrees as needed.
Common Mistakes to Avoid When Cooking Porterhouse in the Oven
Even experienced home cooks make mistakes with oven steak. Knowing what to avoid saves you from a tough, dry, or unevenly cooked piece of meat. Here are the most common errors and how to fix them.
Skipping the Room Temperature Rest
Putting a cold steak straight into the oven is the number one mistake. The cold center means the outside overcooks before the inside is done. Always take the steak out 30 to 45 minutes before cooking. This small habit makes a massive difference in the final result.
Not Drying the Surface
Moisture is the enemy of a good crust. If the surface of your steak is wet, it will steam instead of sear. Pat the steak thoroughly with paper towels before seasoning. This simple step takes seconds but pays off big time in flavor and texture.
Using the Wrong Pan for the Sear
Do not use a nonstick pan for searing steak. Nonstick pans cannot handle the extreme heat needed for a good crust. A cast iron skillet or a heavy stainless steel pan works best. These pans hold heat incredibly well and create that beautiful brown sear you are looking for.
Cutting Into the Steak Too Early
We know it is tempting. That sizzling steak looks amazing right out of the pan. But cutting into it too early releases all those precious juices. Trust the process and let the steak rest. You will be rewarded with a juicier, more flavorful bite every time.
Over-Salting or Using the Wrong Salt
Table salt is too fine and can make your steak taste overly salty if you use too much. Stick with kosher salt. It has the right crystal size to distribute evenly and draw out moisture at just the right rate. And remember, you can always add more salt, but you cannot take it away.
Serving Your Perfect Oven-Cooked Porterhouse
Now that your porterhouse is cooked to perfection, it is time to think about how to serve it. A great steak deserves great sides, and the right presentation makes the whole experience feel special.
Slicing the Right Way
A porterhouse has two different types of meat separated by a T-shaped bone. The filet side is more tender, while the strip side has more beefy flavor. Slice against the grain on each side separately. Cutting against the grain shortens the muscle fibers, making each bite more tender. The filet side slices more easily, while the strip side benefits from thinner, shorter slices.
Perfect Pairings
Classic sides like roasted garlic mashed potatoes, grilled asparagus, or a simple mixed green salad all work beautifully with porterhouse. A bold red wine like a Cabernet Sauvignon or a Malbec complements the rich beef flavor wonderfully. If you want something lighter, try a side of roasted cherry tomatoes and creamed spinach.
Adding a Finishing Touch
Before serving, consider adding a small pat of compound butter on top of each slice. Mix softened butter with minced garlic, fresh herbs like rosemary and parsley, and a pinch of flaky sea salt. As it melts over the hot steak, it adds an extra layer of richness that takes your meal to the next level.
Expert Insights on Oven Steak Cooking
Professional chefs have been perfecting the art of oven-cooked steak for decades. Here are some insights that separate a good steak from a great one.
The Importance of Carryover Cooking
Chef Michael Symon once said that carryover cooking is the most overlooked technique in home kitchens. The residual heat inside the steak continues to cook the meat even after it leaves the oven or the pan. This is why pulling the steak 5 degrees below your target temperature is essential. Understanding carryover cooking alone will transform your steak results.
Why Dry Aging Matters
If you have access to dry-aged porterhouse, take advantage of it. Dry aging concentrates the beef flavor and tenderizes the meat naturally. The process removes moisture, which means less steam during cooking and a better crust. A dry-aged porterhouse cooked in the oven is an unforgettable dining experience right in your own kitchen.
The Role of Butter Basting
Butter basting during the final sear adds richness and helps create a beautiful golden color on the steak. The milk solids in butter brown quickly and add a nutty, caramelized flavor. Combined with garlic and thyme, this technique gives your porterhouse a restaurant-quality finish with minimal effort.
Key Takeaways
- Reverse Sear Method: Cooking low and slow in the oven first, then searing on the stove, gives the most even result.
- Internal Temperature Matters: Use a meat thermometer to hit 130°F for medium-rare, the sweet spot for porterhouse.
- Resting Is Non-Negotiable: Letting your steak rest for 5-10 minutes keeps all those juices locked in.
- Cast Iron Is King: A cast iron skillet gives the best crust when you finish your steak on the stovetop.
- Thickness Is Key: Aim for a steak at least 1.5 inches thick for the best oven cooking results.
- Simple Seasonings Win: Salt, pepper, garlic, and butter are all you need for an amazing porterhouse.
Frequently Asked Questions
What is the best temperature to cook porterhouse steak in the oven?
The best oven temperature for porterhouse steak is 250°F for the reverse sear method. This low temperature cooks the steak gently and evenly before you finish it with a hot sear on the stovetop. This approach gives you the most control over the final doneness and produces the most consistent results.
How long should I cook a porterhouse steak in the oven?
Cooking time depends on the thickness of your steak and your target doneness. A 1.5-inch porterhouse typically takes 20 to 30 minutes at 250°F. A 2-inch steak may take 30 to 40 minutes. Always use a meat thermometer to check the internal temperature rather than relying on time alone, as every oven and every cut is slightly different.
Do I need to sear the steak after taking it out of the oven?
Yes, the sear is an essential part of the reverse sear method. After the oven phase, a hot cast iron skillet gives the steak a beautiful brown crust and adds incredible flavor. Sear each side for 1 to 2 minutes with a little oil and finish with butter, garlic, and thyme for the best results.
What is the difference between porterhouse and T-bone steak?
Porterhouse and T-bone are actually the same cut, but the porterhouse has a larger portion of tenderloin. The USDA requires a porterhouse to have a tenderloin that is at least 1.25 inches wide at its widest point. A T-bone has a smaller tenderloin section. For oven cooking, porterhouse is the better choice because the larger filet side stays more tender and juicy.
Can I cook a frozen porterhouse steak in the oven?
It is not recommended to cook a frozen porterhouse steak in the oven without thawing it first. Frozen steak cooks unevenly, with the outside overcooking before the center thaws. Always thaw your steak in the refrigerator for 24 hours before cooking for the best and safest results.
How do I know when my porterhouse steak is done?
The only reliable way to know your steak is done is by using an instant-read meat thermometer. For medium-rare, aim for an internal temperature of 130°F after resting. Other doneness levels range from 120°F for rare to 155°F for well done. Checking the temperature takes just a second and takes all the guesswork out of cooking the perfect porterhouse.
Conclusion
Cooking the best porterhouse steak in your oven is easier than you might think. The reverse sear method gives you restaurant-quality results with minimal effort and maximum flavor. By following the steps outlined in this guide, you will master the art of oven-cooked steak and impress everyone at your dinner table.
Remember the key principles: start with a quality thick-cut steak, bring it to room temperature, season simply, cook low and slow, finish with a hot sear, and always let it rest. These steps work together to create a steak that is juicy, tender, and full of beefy flavor every single time.
Now it is your turn. Grab a beautiful porterhouse from your local butcher, preheat that oven, and put these techniques to work. Once you taste the difference that proper cooking makes, you will never go back to guesswork again. The best way to cook porterhouse steak in oven is the method you trust, practice, and perfect over time. Enjoy the journey, and savor every bite of that incredible steak.