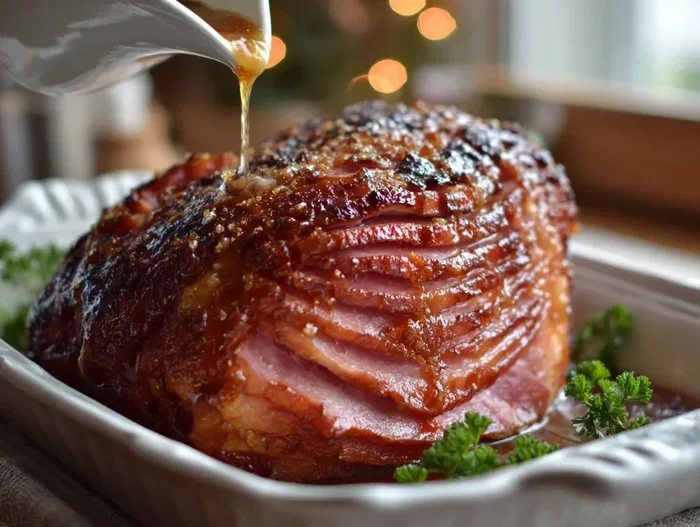
How to Bake a Ham in the Oven for a Showstopping Meal
Baking a ham in the oven is easier than you think, and the results are always impressive. This guide walks you through every step of how to bake a ham in the oven, from choosing the right cut to applying the perfect glaze. You will learn exact temperatures, timing, and pro tips that guarantee a tender, showstopping centerpiece for any meal. Whether it is a holiday dinner or a weekend family feast, this method delivers consistent, mouthwatering results.
There is something magical about pulling a perfectly baked ham out of the oven. The kitchen fills with a warm, savory aroma, and the golden glaze glistens under the light. If you have ever wondered how to bake a ham in the oven like a pro, you are in the right place.
This guide covers everything you need to know. We will walk through choosing the right ham, preparing it, making a delicious glaze, and nailing the bake time and temperature. By the end, you will feel confident enough to make this your signature dish for holidays, gatherings, or any special weekend meal. Let us get started.
Key Takeaways
- Choose the right ham: Bone-in hams offer more flavor, while boneless hams are easier to slice and serve.
- Score the ham properly: Cutting diamond shapes helps the glaze penetrate and creates a beautiful presentation.
- Bake at 325°F: This low-and-slow temperature keeps the ham moist and tender throughout cooking.
- Use a meat thermometer: The internal temperature should reach 140°F for a perfectly cooked, safe ham.
- Apply glaze in the last 20 minutes: This prevents burning and gives you a caramelized, glossy finish.
- Rest the ham before slicing: Letting it sit for 15 minutes keeps the juices locked inside every slice.
- Store leftovers properly: Baked ham keeps well in the fridge for up to 5 days and freezes for up to 3 months.
📑 Table of Contents
- Why Baking Ham in the Oven Works So Well
- Choosing the Right Ham for Your Oven
- Preparing Your Ham Before It Goes in the Oven
- Making the Perfect Ham Glaze
- Baking Temperature and Time: The Complete Guide
- Resting, Slicing, and Serving Your Baked Ham
- Storing and Reheating Leftover Ham
- Common Mistakes to Avoid When Baking Ham
- Expert Tips for the Perfect Oven-Baked Ham
- Conclusion
Why Baking Ham in the Oven Works So Well
Many people assume that cooking a ham requires a slow cooker or a deep fryer. But the oven method is honestly the best way to go. It gives you full control over heat, glaze timing, and texture. The dry, even heat of an oven wraps the ham in a beautiful crust while keeping the inside juicy.
When you bake a ham in the oven, you also get that classic roasted flavor that no other method can match. The fat renders slowly, basting the meat from the inside. This creates a tender bite every single time. Plus, oven baking frees up your stovetop and counter space for sides and desserts.
Another big advantage is presentation. A glazed ham straight from the oven looks absolutely stunning on a serving platter. It becomes the centerpiece of your table without much effort. Whether you are hosting a Christmas dinner or a casual Sunday lunch, an oven-baked ham always delivers a wow factor.
The Science Behind Oven-Baked Ham
When you apply steady heat at 325°F, the proteins in the pork ham slowly break down. This process, called denaturation, is what makes the meat tender. The collagen in the connective tissue melts into gelatin, which keeps every bite moist and rich.
The glaze also plays a role. Sugar caramelizes at high temperatures, creating that beautiful brown coating. Applying the glaze late in the cooking process prevents it from burning while still giving you that sticky, sweet exterior. This is why knowing the right timing matters so much.
Choosing the Right Ham for Your Oven
Not all hams are created equal. The type of ham you pick affects everything from cooking time to flavor. Understanding your options makes the whole process much smoother.
Bone-In vs. Boneless Ham
A bone-in ham carries more flavor. The bone adds richness to the meat as it cooks, and many people consider it the traditional choice for holiday meals. These hams also tend to look more impressive on the table.
A boneless ham, on the other hand, is much easier to handle. You can slice it evenly without fighting around a bone. It also fits more easily into standard roasting pans. For beginners, a boneless ham is often the simpler choice when learning how to bake a ham in the oven.
Spiral Ham vs. Whole Ham
A spiral ham comes pre-sliced in a helical pattern. It is convenient and practically self-basting. You just pop it in the oven and let it cook. Many grocery stores carry fully cooked spiral hams that only need warming up.
A whole ham, sometimes called a fresh ham, requires more work but offers a more personalized result. You can control the seasoning, the glaze, and the thickness of each slice. Whole hams are ideal for experienced cooks who want to put their own stamp on the dish.
Size Matters: Picking the Right Weight
Plan for about 1/3 to 1/2 pound of ham per person. A 6 to 8 pound ham feeds about 12 to 16 guests comfortably. If you are cooking for a smaller group, a 3 to 4 pound ham works perfectly. Always check the label for whether the ham is fully cooked or raw, as this changes your approach.
| Ham Type | Best For | Cooking Time (per lb) | Flavor Profile |
|---|---|---|---|
| Bone-In Whole Ham | Holiday feasts, large gatherings | 18-20 min/lb | Rich, deep pork flavor |
| Boneless Ham | Easy slicing, smaller groups | 20-22 min/lb | Mild, uniform texture |
| Spiral Ham | Convenience, presentation | 10-12 min/lb (warming) | Sweet, smoky, classic |
| Fresh (Raw) Ham | Experienced cooks, custom flavor | 22-25 min/lb | Lean, savory, customizable |
Preparing Your Ham Before It Goes in the Oven
Proper preparation sets the stage for a perfect result. Skipping this step can lead to dry meat or uneven flavor. Take your time here, and the oven does the rest for you.
Trimming and Scoring the Ham
Start by removing any excess fat, leaving about a quarter-inch layer. Too much fat can make the ham greasy, but too little will dry it out. Next, score the surface in a diamond pattern. Use a sharp knife and cut about a quarter-inch deep.
Scoring does two important things. First, it allows the glaze to seep into the meat, creating pockets of flavor. Second, it gives you those beautiful crosshatch lines that make a baked ham look professional. For the best results, make the scores evenly spaced and consistent in depth.
Soaking the Ham (If Needed)
If you bought a fresh or country-style ham, you may need to soak it overnight. This step draws out excess salt and prepares the meat for a balanced flavor. Place the ham in a large pot of cold water and refrigerate it for 12 to 24 hours. Change the water a couple of times for the best results.
Most supermarket hams are already fully cooked and do not need soaking. Check the label carefully. If it says “fully cooked” or “ready to eat,” you can skip straight to seasoning.
Seasoning the Ham
Before adding any glaze, season the ham generously. A simple rub of brown sugar, mustard powder, and a pinch of cloves works wonders. You can also add whole cloves pressed into the scored diamonds for a classic look and aroma.
Some cooks like to rub the ham with a little olive oil first. This helps the dry seasoning stick to the surface. Let the seasoned ham sit at room temperature for about 30 minutes before it goes in the oven. This promotes even cooking throughout.
Making the Perfect Ham Glaze
The glaze is what transforms a good ham into a great one. It adds sweetness, shine, and a caramelized crust that everyone loves. The best part is that you can customize it to suit your taste.
Classic Brown Sugar Glaze
This is the most popular glaze for oven-baked ham. Mix together brown sugar, Dijon mustard, and a splash of apple cider vinegar. Spread it generously over the scored ham before baking. The result is a sweet, tangy coating with a beautiful amber color.
For extra depth, add a teaspoon of smoked paprika or a pinch of cinnamon. These warm spices complement the pork beautifully. You can also drizzle a little honey into the glaze for a touch of floral sweetness.
Honey Mustard Glaze
If you prefer a sweeter profile, a honey mustard glaze is hard to beat. Combine honey, yellow mustard, and a splash of pineapple juice. Brush it on during the last 20 minutes of baking. The honey caramelizes quickly, creating a glossy, sticky finish.
This glaze pairs especially well with boneless ham, where the mild flavor lets the sweetness shine through. It is also a favorite among kids, making it a great choice for family gatherings.
Savory Herb Glaze
Not everyone loves a sweet ham. A savory herb glaze is a wonderful alternative. Mix olive oil, garlic, fresh rosemary, thyme, and a squeeze of lemon juice. Brush this onto the ham during the last 15 minutes of baking.
The herbs infuse the ham with a fragrant, earthy aroma. This style works beautifully with a bone-in ham, where the rich pork flavor can stand up to the bold seasonings. It also pairs wonderfully with roasted vegetables on the same pan.
Baking Temperature and Time: The Complete Guide
Getting the temperature and timing right is the most important part of how to bake a ham in the oven. Too high a temperature dries out the meat. Too low, and you risk serving it undercooked. Follow these guidelines for foolproof results every time.
The Ideal Oven Temperature
Set your oven to 325°F. This moderate temperature allows the ham to cook evenly without drying out the outer layers. It also gives the glaze time to set properly without burning. Most oven-baked ham recipes call for this temperature, and for good reason.
If you are in a rush, you can increase the heat to 350°F, but you will need to watch the ham more closely. Higher temperatures can cause the glaze to caramelize too quickly, which may lead to a bitter taste. Stick with 325°F for the best balance of flavor and texture.
Calculating Cooking Time
The general rule is about 18 to 20 minutes per pound for a bone-in ham and 20 to 22 minutes per pound for a boneless ham. These times apply when the ham is fully cooked and you are simply reheating and glazing it.
For a fresh, raw ham, the cooking time extends to about 22 to 25 minutes per pound. Always use a meat thermometer to check the internal temperature. The USDA recommends an internal temperature of 140°F for reheating fully cooked hams and 145°F for fresh hams.
When to Apply the Glaze
Apply the first layer of glaze about 30 minutes before the ham is done. This gives the sugar time to melt and start caramelizing. Add a second coat of glaze during the last 15 minutes for a thicker, more flavorful crust.
Basting the ham with its own juices or pan drippings also helps. Use a spoon to spoon the hot liquid over the ham every 15 minutes. This keeps the surface moist and builds layers of flavor. The repeated basting and glazing create that deep, lacquered finish that makes a baked ham look and taste incredible.
Resting, Slicing, and Serving Your Baked Ham
Many people skip the resting step, but it makes a huge difference. When you pull the ham out of the oven, the juices inside are under pressure. Cutting too soon releases those juices onto the cutting board instead of keeping them in the meat.
Let the ham rest for at least 15 minutes before slicing. Tent it loosely with aluminum foil to keep it warm. During this time, the internal temperature will continue to rise slightly, bringing the ham to its perfect serving temperature.
How to Slice a Baked Ham
For a bone-in ham, start by cutting slices along the bone. Work parallel to the bone, making thin, even cuts. Then turn the ham and slice crosswise to free each piece. This technique gives you clean, neat slices every time.
For a boneless ham, simply cut against the grain in uniform slices about a quarter-inch thick. A sharp serrated knife works best. If the ham feels slightly firm, let it sit for a few more minutes. The meat will soften as it cools slightly, making slicing easier.
Serving Ideas and Side Dishes
A baked ham pairs beautifully with many sides. Classic options include scalloped potatoes, green bean casserole, and honey-glazed carrots. For a lighter meal, serve it alongside a fresh salad and crusty bread.
Leftover ham is incredibly versatile. Use it in sandwiches, omelets, soups, and pasta dishes. You can also dice it and add it to fried rice or a breakfast hash. The flavorful pork ham elevates almost any dish it touches.
Storing and Reheating Leftover Ham
Do not let leftover ham go to waste. Proper storage keeps it fresh and safe to eat for several days. Wrap the ham tightly in plastic wrap or aluminum foil, or place it in an airtight container.
Refrigerated leftover ham stays good for up to 5 days. If you want to keep it longer, freeze it for up to 3 months. Wrap it well to prevent freezer burn, and thaw it overnight in the refrigerator before reheating.
To reheat, wrap the ham slices in foil and warm them in the oven at 275°F for about 10 to 15 minutes. This gentle reheating method keeps the ham moist without overcooking it. Avoid microwaving if possible, as it can make the meat rubbery and tough.
Using the Ham Bone
Do not throw away the ham bone. It makes an incredible base for soup stock or bean broth. Simmer the bone with vegetables, herbs, and water for several hours. The result is a rich, savory broth that adds deep flavor to soups, stews, and risottos. This is a great way to get every last bit of flavor from your oven-baked ham.
Common Mistakes to Avoid When Baking Ham
Even experienced cooks make mistakes with baked ham. Knowing what to avoid saves you time, money, and a lot of frustration.
Skipping the thermometer. Guessing the doneness of your ham leads to overcooking or undercooking. A meat thermometer takes the guesswork out completely. Insert it into the thickest part of the meat, avoiding the bone.
Adding the glaze too early. Sugar burns at high temperatures. If you add the glaze too soon, it will turn dark and bitter. Always wait until the last 20 to 30 minutes to apply the glaze.
Cutting into the ham too soon. We mentioned this earlier, but it is worth repeating. Resting the ham allows the juices to redistribute. Skipping this step results in dry, less flavorful slices.
Overcooking the ham. A fully cooked ham only needs to be reheated. Monitor the internal temperature closely and pull the ham out as soon as it reaches 140°F. Overcooked ham becomes tough and loses its juiciness.
Expert Tips for the Perfect Oven-Baked Ham
Here are some pro tips that make a real difference in your results.
First, bring the ham to room temperature before baking. This takes about 30 to 45 minutes out of the refrigerator. A room-temperature ham cooks more evenly, reducing the risk of a cold center.
Second, use a roasting pan with a rack. The rack allows hot air to circulate around the ham, cooking it more evenly. It also keeps the ham out of the pooling juices, preventing a soggy bottom.
Third, save the pan drippings. They are loaded with flavor and make an excellent base for a gravy or sauce. Simply deglaze the pan with a splash of chicken broth or apple juice, scrape up the browned bits, and simmer until slightly thickened.
Fourth, experiment with different glaze flavors. Try a maple-bourbon glaze, a pineapple-cherry glaze, or even a coffee-rubbed ham. The oven-baked ham format is incredibly versatile, so do not be afraid to get creative.
Conclusion
Learning how to bake a ham in the oven opens up a world of delicious possibilities. From choosing the right cut to applying the perfect glaze, every step matters. Follow the tips in this guide, and you will serve a ham that is juicy, flavorful, and beautifully presented every single time.
This method works for holidays, family dinners, or any occasion that calls for a showstopping main course. The oven gives you control, consistency, and incredible results. Once you master this technique, baked ham will become a go-to recipe in your kitchen.
So preheat your oven, pick out a great ham, and get ready to impress your guests. With the right approach, baking a ham in the oven is one of the most rewarding things you can do in the kitchen. Enjoy the process, savor the aroma, and dig into a meal that everyone will remember.
Frequently Asked Questions
How long does it take to bake a ham in the oven?
It generally takes about 18 to 20 minutes per pound at 325°F for a fully cooked ham. A 7-pound ham will take roughly 2 to 2.5 hours total, including glazing time. Always use a meat thermometer to confirm the internal temperature reaches 140°F.
Fresh or raw hams take longer, about 22 to 25 minutes per pound. Check the label on your ham to determine whether it is fully cooked or needs to be cooked from raw. This small detail changes your entire cooking timeline.
What temperature should I bake a ham at?
The ideal temperature for baking ham is 325°F. This moderate heat cooks the meat evenly and prevents it from drying out. Higher temperatures like 350°F work in a pinch but require closer monitoring to avoid burning the glaze.
Consistent low heat is the secret to a tender, juicy result. It gives the fat time to render slowly and the glaze time to set properly without scorching. This temperature is recommended by most professional chefs and baking guides.
Do I need to cover the ham with foil while baking?
You do not need to cover the ham with foil for the entire bake. Leaving it uncovered allows the glaze to caramelize and the surface to develop a beautiful golden crust. However, if the ham is browning too quickly, you can loosely tent it with foil during the last 30 minutes.
Some cooks cover the ham for the first half of baking to keep it moist, then uncover it for glazing. This two-step approach works well for larger, bone-in hams. Experiment to find what works best for your oven and ham size.
How do I know when the ham is done?
The most reliable way is to use a meat thermometer. Insert it into the thickest part of the ham, avoiding the bone. A fully cooked ham should reach an internal temperature of 140°F, while a fresh ham needs to reach 145°F.
Visual cues also help. The ham should have a deep golden-brown glaze, and the juices should run clear when you pierce the thickest part. The meat should feel firm but still yield slightly when pressed. When in doubt, trust the thermometer.
Can I make the glaze ahead of time?
Yes, you can prepare the glaze a day or two in advance. Store it in an airtight container in the refrigerator. Before applying, gently warm it so it spreads easily over the ham. This saves time on baking day and lets the flavors meld together.
Make sure the glaze is at room temperature when you put it on the ham. Cold glaze can cause the oven temperature to drop temporarily, which may affect cooking time. A quick microwave warming of 30 seconds does the trick.
What is the best ham to buy for oven baking?
A fully cooked bone-in ham is the best choice for most home cooks. It offers rich flavor, is forgiving to bake, and looks impressive on the table. Spiral hams are also excellent because they are pre-sliced and practically self-basting.
If you want more control over flavor and presentation, choose a fresh or raw ham. These require more effort but let you customize every aspect of the bake. Look for hams from local butchers for the freshest quality and best results.
=== META TITLE ===
How to Bake a Ham in the Oven | Easy Step-by-Step Guide
=== URL SLUG ===
how-to-bake-a-ham-in-the-oven