How To Make Ribs In The Oven With Foil For Perfect Results
Making ribs in the oven with foil is the easiest way to get tender, juicy barbecue ribs at home. This simple oven ribs recipe uses the foil method to lock in moisture and create fall-off-the-bone ribs without a smoker. You will learn how to prep, season, and bake ribs perfectly every single time.
There is nothing quite like a rack of ribs on the table. They look impressive, they taste amazing, and they bring everyone together. But many people think you need a smoker or a grill to get great ribs. That is simply not true. You can make incredible ribs right in your own oven using nothing more than foil, a little patience, and a great rub.
This guide will walk you through every step of making ribs in the oven with foil. Whether you are a beginner or a seasoned home cook, you will find useful tips here. We will cover everything from choosing the right ribs to knowing when they are perfectly done. By the end, you will feel confident enough to make this dish anytime you want.
Key Takeaways
- Foil wrapping keeps ribs moist: The foil traps steam and juices, making your ribs incredibly tender.
- Low and slow is the key: Baking ribs at a low temperature ensures they cook evenly and become tender.
- You need very few tools: Just a baking sheet, foil, and your favorite rib rub.
- Timing matters a lot: Most ribs take 2.5 to 3.5 hours in the oven using the foil method.
- A meat thermometer is essential: It tells you exactly when your ribs are done and safe to eat.
- Resting is non-negotiable: Letting ribs rest after baking makes them juicier and easier to slice.
- You can add a glaze at the end: A sweet barbecue glaze adds flavor and a beautiful finish.
📑 Table of Contents
- Why Oven Ribs With Foil Work So Well
- What You Will Need For This Recipe
- How To Prep Your Ribs The Right Way
- The Oven Ribs Cooking Process Step By Step
- Tips For The Best Tender Ribs Every Time
- How To Know When Ribs Are Done
- Common Mistakes To Avoid
- Serving And Storing Your Oven Ribs
- Final Thoughts On Making Ribs In The Oven With Foil
Why Oven Ribs With Foil Work So Well
The foil method is one of the best ways to bake ribs at home. It is simple, forgiving, and produces consistent results. Here is why it works so well.
The Science Behind Foil Ribs
When you wrap ribs in foil, you create a small oven inside your oven. The foil traps heat and moisture around the meat. This steam helps break down the connective tissue in the ribs. As that tissue melts, the ribs become tender and juicy.
Without foil, ribs can dry out in the oven. The dry heat can evaporate the juices before the meat has time to become tender. Foil prevents that from happening. It keeps everything locked in and allows the ribs to cook low and slow without losing moisture.
Foil Ribs vs Other Methods
There are several ways to cook ribs. Let us compare them quickly so you understand why the oven foil method stands out.
- Grilling: Great flavor from smoke and char, but it requires constant attention and good weather.
- Smoking: Produces the deepest flavor, but it takes hours and special equipment.
- Boiling: Fast and easy, but ribs can become waterlogged and lose their texture.
- Oven with foil: Easy to control, hands-off, and produces tender, juicy ribs with minimal effort.
As you can see, the oven foil method offers the best balance of convenience and results. You get tender, flavorful ribs without needing outdoor equipment or constant monitoring.
What You Will Need For This Recipe
Before you start, make sure you have everything ready. Having all your tools and ingredients prepared makes the process smooth and stress-free.
The Ribs
You can use several types of pork ribs for this recipe. The most common choices are baby back ribs and spare ribs. Baby back ribs are smaller and leaner. They cook a bit faster and tend to be more tender. Spare ribs are larger and fattier. They have a richer flavor but take a little longer to cook.
You can also use St. Louis-style ribs, which are spare ribs trimmed into a neat rectangular shape. Any of these options will work beautifully for oven ribs with foil.
The Rub And Seasonings
A good rib rub is the foundation of great flavor. You can buy a pre-made barbecue rub or make your own. A simple homemade rub usually includes brown sugar, paprika, garlic powder, onion powder, salt, pepper, and a touch of cumin. These ingredients create a sweet, smoky, savory crust on the ribs.
Some people also like to add chili powder or mustard powder for extra depth of flavor. Feel free to experiment and find the combination you love best.
The Tools
- A baking sheet or roasting pan: Something large enough to hold the rack of ribs.
- Heavy-duty aluminum foil: This keeps the ribs sealed and moist during cooking.
- A meat thermometer: This is the most important tool for checking doneness.
- Paper towels: For patting the ribs dry before seasoning.
- Barbecue sauce: Optional, but highly recommended for glazing at the end.
How To Prep Your Ribs The Right Way
Proper prep work makes a huge difference in the final result. Taking the time to prepare your ribs correctly ensures even cooking and maximum flavor.
Step One: Remove The Membrane
Turn the rack of ribs over so the bone side faces up. You will see a thin, papery membrane covering the bones. This membrane does not soften during cooking. It can make the ribs chewy and unpleasant to eat. So it is important to remove it.
Use a butter knife to loosen one corner of the membrane. Once you have a grip, use a paper towel for better traction and pull the membrane off. It should come away in one piece. This step might take a little practice, but it is worth the effort.
Step Two: Pat Dry And Season
Use paper towels to pat the ribs dry on both sides. Dry meat absorbs the rub better and develops a tastier crust. Sprinkle your rub generously over all sides of the ribs. Press it into the meat with your hands so it sticks well.
Let the seasoned ribs sit at room temperature for about 30 minutes before cooking. This allows the flavors to penetrate the meat and helps the ribs cook more evenly in the oven.
Step Three: Wrap In Foil
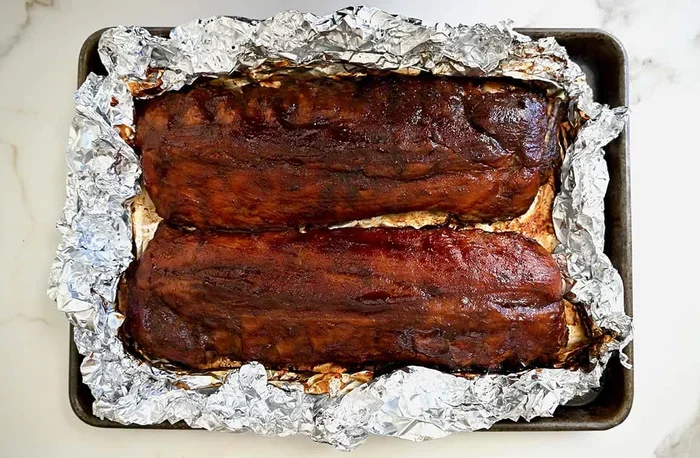
Place the ribs bone-side down on a large sheet of heavy-duty foil. Bring the long sides of the foil up and over the ribs. Fold the edges together to create a tight seal. You want the foil to wrap snugly around the ribs without leaving gaps. This seal keeps all the moisture and steam trapped inside.
The Oven Ribs Cooking Process Step By Step
Now comes the fun part. The actual cooking process is simple, but timing and temperature are key. Follow these steps for the best results.
Preheat Your Oven
Set your oven to 275°F (135°C). This low temperature is the secret to tender oven ribs. It gives the meat enough time to cook slowly and become fall-apart tender without drying out. Avoid the temptation to increase the heat. Higher temperatures will cook the outside too quickly while leaving the inside tough.
Place The Ribs In The Oven
Put the foil-wrapped ribs on a baking sheet with the seam side facing up. This prevents any steam from escaping. Place the baking sheet on the middle rack of the oven. The middle position ensures even heat distribution around the ribs.
Cook For The Right Amount Of Time
For baby back ribs, plan on about 2.5 to 3 hours. For spare ribs or larger cuts, cook for 3 to 3.5 hours. These times are approximate. The real indicator of doneness is the internal temperature and how the meat feels, not just the clock.
Here is a simple timeline to follow:
- 0 to 1 hour: The ribs are slowly heating through. The fat begins to render and baste the meat from the inside.
- 1 to 2 hours: The connective tissue starts breaking down. The ribs become more flexible and tender.
- 2 to 3 hours: The meat pulls back from the bones slightly. This is a great sign that the ribs are nearing done.
- 3 to 3.5 hours: The ribs should be fully cooked, tender, and juicy.
Unwrap And Glaze
After the initial cooking time, carefully remove the ribs from the oven. Open the foil slowly to release the steam. Be careful, as the steam is very hot. Pour off any excess liquid that has collected in the foil. This liquid is full of flavor, but too much will make the ribs soggy.
Now is the time to brush your favorite barbecue sauce onto the ribs. Place the ribs back in the oven, this time uncovered, for another 15 to 20 minutes. This glaze step caramelizes the sauce and gives the ribs a beautiful, sticky finish.
Tips For The Best Tender Ribs Every Time
Even with a simple recipe, small details can make a big difference. Use these tips to elevate your oven ribs from good to outstanding.
Choose Quality Meat
The quality of your ribs matters more than you might think. Look for ribs with a good amount of marbling. The fat between the muscles keeps the meat moist during cooking. Avoid ribs that look dry or have very little fat. A well-marbled rack will always produce better results.
Do Not Skip The Resting Time
Once the ribs come out of the oven, let them rest for 10 to 15 minutes before cutting. Resting allows the juices to redistribute throughout the meat. If you cut too soon, the juices will run out, and the ribs will be less juicy.
Use A Meat Thermometer
This is the single most important tool for perfect ribs. Insert the thermometer into the thickest part of the meat, avoiding the bone. The internal temperature should reach at least 195°F to 203°F (90°C to 95°C). At this range, the collagen in the meat has fully broken down, and the ribs are tender and ready to eat.
The 3-2-1 Method For Smoking Ribs Adapted To The Oven
The 3-2-1 method is popular for smoking ribs. It involves smoking for 3 hours, wrapping in foil for 2 hours, and unwrapping with sauce for 1 hour. You can adapt this for the oven by baking the ribs wrapped in foil for 2.5 hours and then unwrapping them with sauce for the final 20 minutes. This gives you a similar approach with great results.
Add Wood Chips For Extra Flavor
If you want to add a smoky flavor to your oven ribs, try soaking wood chips in water for 30 minutes. Spread the soaked chips on a baking sheet and place it below the ribs in the oven. The steam from the chips will carry a subtle smoky flavor to the meat. Hickory and applewood chips work especially well with pork ribs.
How To Know When Ribs Are Done
Knowing when ribs are done can be tricky. Many people rely on time alone, but time is only a rough guide. Here are the best ways to check if your ribs are ready.
The Bend Test
Pick up one end of the rack of ribs with tongs or oven mitts. Watch how the ribs bend. When they are done, they will bend and crack slightly on the surface. The surface should crack but not completely fall apart. This is a great visual indicator that the meat is tender and the collagen has broken down.
The Toothpick Test
Insert a toothpick or skewer into the thickest part of the meat. If it goes in with very little resistance, the ribs are done. This test is simple and very reliable. If the toothpick meets a lot of resistance, give the ribs more time in the oven.
The Internal Temperature Test
This is the most accurate method. As mentioned earlier, aim for an internal temperature of 195°F to 203°F. This temperature range ensures the ribs are fully cooked, safe to eat, and beautifully tender. Always check the temperature in the thickest part of the meat, not near the bone.
Common Mistakes To Avoid
Even experienced cooks can make mistakes when baking ribs. Here are some common errors and how to avoid them.
Cooking At Too High A Temperature
This is the most common mistake. High heat will cook the outside of the ribs quickly while leaving the inside tough and chewy. Always cook ribs at a low temperature, around 275°F. Patience is the key to tender ribs.
Using Too Much Sauce Too Early
Barbecue sauce contains sugar, which burns easily at high temperatures. If you add the sauce too early or too much, it can turn black and bitter. Always apply the glaze in the last 15 to 20 minutes of cooking, when the ribs are uncovered.
Not Removing The Membrane
We mentioned this earlier, but it is worth repeating. The membrane on the bone side of ribs does not cook down. It creates a chewy, unpleasant texture. Always remove it before seasoning and cooking.
Cutting Into The Ribs Too Soon
It can be tempting to cut into the ribs the moment they come out of the oven. Resist this urge. Cutting too early releases all the juices, and the ribs lose their moisture. Let them rest for at least 10 minutes before slicing.
Overwrapping The Ribs In Foil
While foil is essential for moisture, wrapping the ribs too tightly can trap too much liquid. The ribs can end up steaming instead of baking, which affects the texture. Wrap the ribs snugly but not so tightly that liquid pools around the meat.
Serving And Storing Your Oven Ribs
Your ribs are done, and they look and smell amazing. Now it is time to serve them. Here are some ideas for the best presentation and storage.
How To Serve Ribs
Place the ribs on a large cutting board. Use a sharp knife or kitchen shears to cut between the bones and separate them into individual portions. Serve with classic sides like coleslaw, cornbread, baked beans, or roasted vegetables.
For extra flavor, drizzle any remaining barbecue sauce over the ribs just before serving. You can also set out extra sauce on the side for dipping.
Storing Leftover Ribs
Cooked ribs store well in the refrigerator. Place them in an airtight container and they will keep for up to 4 days. Reheat leftover ribs in the oven at 300°F for about 15 minutes. This gentle reheating keeps them moist without drying them out.
You can also freeze cooked ribs for up to 3 months. Wrap them tightly in foil and place them in a freezer-safe bag. Thaw overnight in the refrigerator before reheating.
Final Thoughts On Making Ribs In The Oven With Foil
Making ribs in the oven with foil is one of the simplest and most rewarding things you can do in the kitchen. You do not need a smoker, a grill, or years of experience. With a good rack of ribs, a simple rub, and some aluminum foil, you can create restaurant-quality barbecue ribs at home.
The secret is low and slow cooking. Give the ribs time to break down and become tender. Use a meat thermometer to check for doneness. And never rush the process. Great ribs are worth the wait.
Try this method the next time you are craving barbecue ribs. Once you see how easy and delicious it is, you will never go back to complicated methods. The oven foil technique gives you tender, juicy, flavorful ribs with minimal effort. It is the perfect recipe for any occasion, from a quiet weeknight dinner to a weekend gathering with family and friends.
So gather your ingredients, preheat the oven, and get ready to enjoy some of the best ribs you have ever tasted. Happy cooking.
Frequently Asked Questions
Can I use any type of ribs for this oven recipe?
Yes, you can use baby back ribs, spare ribs, or St. Louis-style ribs. Baby back ribs cook faster and are more tender, while spare ribs are larger and richer in flavor. Any type of pork ribs will work well with the foil method in the oven.
Do I need to flip the ribs while they cook?
No, you do not need to flip the ribs. The foil wraps around the ribs and creates an even cooking environment on all sides. The trapped steam circulates inside the foil, ensuring the ribs cook uniformly without any flipping required.
Can I skip the foil and just bake the ribs uncovered?
You can, but the results will be different. Without foil, the ribs will be exposed to direct dry heat, which can cause them to dry out. The foil method traps moisture and creates steam that keeps the ribs tender and juicy throughout the cooking process.
What temperature should I use to cook ribs in the oven?
The ideal oven temperature is 275°F (135°C). This low temperature allows the ribs to cook slowly and become tender without drying out. Higher temperatures will cook the outside too quickly while leaving the inside tough and chewy.
How do I know if the ribs are done without a meat thermometer?
You can use the bend test. Pick up one end of the ribs with tongs. If the surface cracks slightly and the ribs bend easily, they are done. You can also insert a toothpick into the thickest part of the meat. If it goes in with little resistance, the ribs are ready to eat.
Can I make ribs in the oven with foil ahead of time?
Yes, you can prepare and cook the ribs ahead of time. Let them cool completely, wrap them tightly, and store them in the refrigerator for up to 4 days. Reheat them in the oven at 300°F for about 15 minutes to keep them moist and tender.