How to Cook Chicken in the Oven for Tender Juicy Meat
Cooking chicken in the oven is one of the easiest and most reliable ways to prepare a delicious meal. This guide covers everything you need to know about how to cook a chicken in the oven, from choosing the right cut to nailing the perfect internal temperature. Whether you prefer boneless chicken breasts or bone-in thighs, you will find practical tips and a foolproof chicken recipe inside.
There is something deeply satisfying about pulling a golden, aromatic chicken out of the oven. The smell fills the kitchen, the skin crackles, and you know you are about to eat something truly good. Yet so many people feel nervous about making oven-baked chicken. They worry it will turn out dry, bland, or overcooked.
The truth is, how to cook a chicken in the oven is simpler than most people think. With the right temperature, a bit of seasoning, and some basic knowledge, you can produce tender, juicy meat that rivals any restaurant. This guide walks you through every step, from picking the right cut to slicing and serving your finished dish.
Whether you are a complete beginner or someone who wants to refine your technique, you will find plenty of actionable advice here. I have tested dozens of methods, and the approach shared below consistently delivers the best results. Let us get started.
Key Takeaways
- Oven-baked chicken is simple and forgiving: Once you know the basics of temperature and timing, you can make juicy roasted chicken almost every time.
- Choosing the right cut matters: Bone-in, skin-on pieces give more flavor, while boneless breasts cook faster but need careful attention to stay moist.
- Resting the chicken is non-negotiable: Letting the poultry rest after baking keeps the juices locked in for tender, succulent meat.
- Seasoning ahead of time makes a big difference: A simple herb butter or lemon garlic rub transforms a basic chicken recipe into something extraordinary.
- An instant-read thermometer is your best friend: It removes all guesswork and ensures your chicken is safe and perfectly cooked every time.
- Avoid common mistakes like overcooking and skipping the rest: These small errors are the biggest reasons people end up with dry chicken.
📑 Table of Contents
- Why Oven-Baked Chicken Is the Best Choice
- Choosing the Right Chicken for Your Recipe
- Essential Seasonings and Flavor Combinations
- Step-by-Step Guide to Cooking Chicken in the Oven
- Temperature and Timing Guide for Perfect Chicken
- Common Mistakes to Avoid and Pro Tips
- Serving Suggestions and Meal Ideas
- Storing and Reheating Leftover Chicken
- Conclusion
Why Oven-Baked Chicken Is the Best Choice
When you think about roasted chicken, the oven is almost always the first method that comes to mind. And for good reason. Baking chicken in the oven gives you hands-off cooking, beautiful browning, and even heat distribution. You do not need to stand over a hot stove flipping pieces or monitoring a grill.
One of the biggest advantages of oven-baking is consistency. Once you learn the basic chicken recipe framework, you can repeat it with confidence every single time. The oven provides a stable environment where the heat surrounds the poultry evenly, cooking it from all sides at once.
Another benefit is versatility. You can cook a whole bird, bone-in pieces, or boneless cuts using the same basic method. Want crispy skin? The oven delivers that beautifully. Prefer a more gentle, moist result? You can adjust the temperature and time accordingly. This flexibility is why so many home cooks rely on the oven for their baking chicken needs.
From a health perspective, oven-baking is also one of the better cooking methods. You do not need to add excess oil or fat. The chicken renders its own juices during cooking, and the fat drips away from the meat. This makes oven-baked chicken a lighter, cleaner option compared to deep-frying or pan-searing.
Oven-Baked Chicken vs. Other Methods
Grilling and pan-frying both have their merits, but they come with more variables to manage. Grilling exposes chicken to direct flame, which can cause hot spots and uneven cooking. Pan-frying requires constant attention and adds oil to the equation. The oven, on the other hand, offers a more controlled and predictable cooking experience.
If you are cooking for a crowd, the oven also wins hands down. You can fit a whole chicken or multiple sheet pans of pieces into the oven at once. This makes how to cook a chicken in the oven ideal for family dinners, meal prep, and holiday gatherings.
Choosing the Right Chicken for Your Recipe
The first step to making great oven-baked chicken is selecting the right piece of meat. Different cuts behave differently in the oven, and understanding these differences helps you plan your cook more effectively.
Whole Chicken
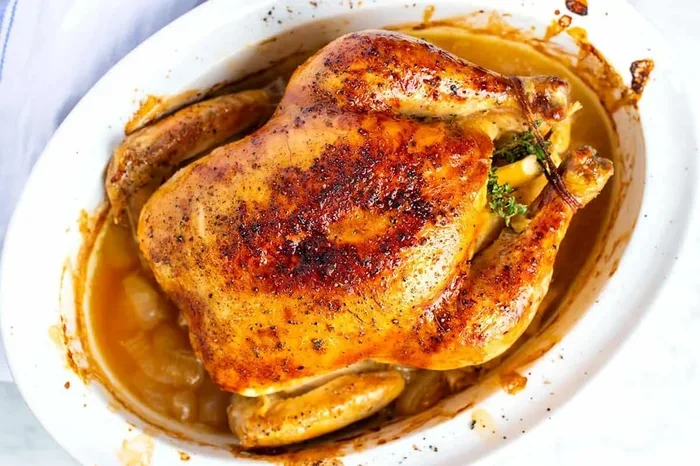
A whole chicken is the classic choice for roasted chicken. It looks impressive, feeds a family, and the bones add rich flavor to the meat. A typical whole bird weighs between 4 and 6 pounds and takes about 1 hour and 15 minutes to cook at 425°F. The key with a whole chicken is to make sure the thickest part of the thigh reaches a safe chicken internal temperature of 165°F.
When buying a whole chicken, look for birds that are plump and have smooth, unbroken skin. Frozen chicken works fine too, but you should thaw it completely in the refrigerator before cooking. Thawing ensures even cooking and reduces the risk of dried-out spots.
Bone-In, Skin-On Pieces
If you want maximum flavor and moisture, bone-in, skin-on chicken pieces are hard to beat. The bone insulates the meat, slowing down cooking and helping it stay juicy. The skin crisps up beautifully in the oven, adding texture and richness to every bite.
Common bone-in cuts include thighs, drumsticks, and wings. Chicken thighs are particularly forgiving because they contain more fat than breasts. Even if you slightly overcook them, they tend to stay moist and tender. Drumsticks are another crowd-pleaser, especially for kids and casual dinners.
Boneless, Skinless Chicken Breasts
Boneless, skinless chicken breasts are the leanest option, but they are also the most likely to dry out. Because there is no bone or skin to protect the meat, breasts cook quickly and can go from perfectly done to overcooked in a matter of minutes.
If you choose to bake boneless breasts, brining them beforehand is a game-changer. Soaking the poultry in a saltwater solution for 30 minutes to a few hours helps the meat retain moisture during cooking. This simple step can transform dry, bland breasts into juicy, flavorful pieces.
Essential Seasonings and Flavor Combinations
Seasoning is where your chicken recipe truly comes to life. A plain, unseasoned chicken can still be safe to eat, but it will not be memorable. The right blend of herbs, spices, and aromatics turns ordinary poultry into something people rave about.
The Classic Herb Butter Approach
One of the most effective ways to add flavor is with herb butter. Simply mix softened butter with minced garlic, fresh thyme, rosemary, salt, and pepper. Then gently loosen the skin of the chicken and spread the butter directly onto the meat underneath. This technique infuses the poultry with rich, savory flavor from the inside out.
The butter also helps the skin crisp up in the oven. As it melts, the fat bastes the meat continuously, creating a beautifully golden, crackling exterior. This method works especially well for whole chickens and bone-in pieces.
Lemon and Garlic
A lemon garlic combination is a timeless favorite for oven-baked chicken. The acidity of the lemon brightens the flavor, while the garlic adds depth and warmth. You can squeeze fresh lemon juice over the chicken, add lemon slices inside the cavity of a whole bird, or mince garlic and mix it with olive oil and herbs.
This combination pairs beautifully with almost any cut. Try it on bone-in thighs for a rustic, Mediterranean-style dish. Use it on breasts for a lighter, fresher flavor profile. No matter how you apply it, lemon and garlic never disappoint.
Spicy and Smoky Rubs
If you prefer bold flavors, a spicy rub can take your baking chicken to the next level. Paprika, cumin, chili powder, smoked paprika, and a touch of brown sugar create a complex, layered flavor. The sugar caramelizes in the oven, forming a slightly sticky, flavorful crust on the outside.
For a quick rub, combine smoked paprika, garlic powder, onion powder, cumin, salt, and black pepper. Coat the chicken generously and let it sit at room temperature for 20 to 30 minutes before baking. This resting period allows the spices to penetrate the surface, resulting in deeper, more pronounced flavor.
Step-by-Step Guide to Cooking Chicken in the Oven
Now that you have your chicken selected and seasoned, it is time to bake. Follow these steps for consistent, delicious results every time you cook how to cook a chicken in the oven.
Step 1: Prep the Chicken
Remove the chicken from the refrigerator about 20 to 30 minutes before cooking. Letting it come to room temperature helps it cook more evenly. Cold chicken going straight into a hot oven can lead to uneven doneness, with the outside overcooking before the inside reaches temperature.
Pat the chicken dry with paper towels. Dry skin crisps up much better than wet skin. If you are using a whole chicken, trim any excess fat around the cavity and remove the neck and giblets if they are still inside.
Step 2: Season Generously
Do not be shy with your seasoning. Salt is the most important flavor enhancer, and most people under-season their chicken. Apply salt and your chosen spices at least 15 minutes before cooking, or even the night before for deeper penetration.
For a whole chicken, rub seasoning both under the skin and on the outside. For pieces, toss them in a bowl with oil and spices to ensure even coverage. If you are using herb butter, now is the time to spread it onto the meat.
Step 3: Choose the Right Pan and Temperature
Place the chicken on a rack set inside a roasting pan or on a sheet pan lined with foil or parchment. Elevating the chicken on a rack allows hot air to circulate around the entire piece, promoting even browning and crispy skin.
The standard temperature for oven-baked chicken is 425°F for bone-in pieces and 400°F for boneless breasts. A whole chicken typically roasts at 425°F. These temperatures strike the right balance between cooking the meat through and browning the skin without drying it out.
Step 4: Bake Until Done
Place the chicken in the preheated oven and bake without opening the door for the first 20 to 25 minutes. Opening the door releases heat and can affect the browning process. Use a timer and trust the process.
For a whole chicken at 425°F, plan on about 1 hour to 1 hour and 20 minutes. Bone-in thighs and drumsticks take roughly 35 to 45 minutes. Boneless breasts need only 20 to 25 minutes. Always use a meat thermometer to check the internal temperature in the thickest part, avoiding the bone.
Step 5: Rest Before Serving
This step is crucial and often skipped. Once the chicken reaches 165°F in the thickest part, remove it from the oven and let it rest for 5 to 10 minutes. During resting, the chicken juices redistribute throughout the meat, making every bite moist and flavorful.
If you cut into the chicken immediately, the juices run out onto the cutting board instead of staying in the meat. A short rest makes a dramatic difference in tenderness and juiciness. Tent the chicken loosely with foil during this time to keep it warm.
Temperature and Timing Guide for Perfect Chicken
Getting the temperature and timing right is the foundation of great oven-baked chicken. Here is a detailed guide to help you nail it every time.
Internal Temperature Chart
The United States Department of Agriculture recommends cooking all poultry to an internal temperature of 165°F. This is the safe minimum that eliminates harmful bacteria. However, many chefs prefer to pull bone-in pieces at 160°F and let carryover cooking bring them up to 165°F during resting. This prevents overcooking and keeps the meat juicier.
For boneless chicken breasts, aim to pull them at 155°F to 160°F. Since they have no bone to insulate them, they continue cooking quickly after removal. Letting them rest for 5 minutes will bring them up to the safe 165°F.
Timing by Cut
Timing varies based on the size of the chicken piece and the oven temperature. Here is a general reference:
- Whole chicken (4 to 5 lbs) at 425°F: 1 hour to 1 hour and 20 minutes
- Bone-in thighs at 425°F: 35 to 45 minutes
- Bone-in drumsticks at 425°F: 30 to 40 minutes
- Bone-in wings at 425°F: 25 to 35 minutes
- Boneless breasts at 400°F: 20 to 25 minutes
- Boneless thighs at 400°F: 18 to 22 minutes
These times are guidelines. Always rely on a thermometer rather than the clock alone. Ovens vary, and the size and thickness of the chicken pieces affect cooking time significantly.
Why Resting Temperature Matters
Carryover cooking is a real phenomenon that affects all poultry. After removing the chicken from the oven, the internal temperature continues to rise by 3 to 5 degrees. This is why pulling the chicken slightly below the target temperature and letting it rest produces the most accurate final result.
If you wait until the thermometer reads 165°F inside the oven and then pull the chicken out immediately, the carryover heat will push it past that mark. The result can be slightly overcooked, drier meat. Pulling early and resting solves this problem elegantly.
Common Mistakes to Avoid and Pro Tips
Even experienced cooks make mistakes when baking chicken. Being aware of these common pitfalls helps you avoid them and consistently produce better results.
Starting with Cold Chicken
One of the most frequent errors is putting refrigerated chicken straight into a hot oven. Cold meat cooks unevenly because the outside overcooks while the inside struggles to reach temperature. Always let your poultry sit at room temperature for 20 to 30 minutes before baking.
Overcooking the Chicken
Overcooking is the number one reason people end up with dry, tough chicken. The difference between a perfectly juicy breast and a dry one can be just a few minutes. Set a timer, check the temperature early, and pull the chicken as soon as it reaches the target.
Another related mistake is relying on visual cues alone. The color of the juices or the firmness of the meat can be misleading. An instant-read thermometer removes all guesswork and takes the stress out of how to cook a chicken in the oven.
Skipping the Dry Skin Step
Moisture is the enemy of crispy skin. If you skip the step of patting the chicken dry before seasoning, you will end up with soft, pale skin instead of that satisfying golden crunch. Take the extra 30 seconds to blot the surface thoroughly with paper towels.
Not Letting the Chicken Rest
Cutting into the chicken the moment it comes out of the oven is a wasted opportunity. The resting period allows the proteins to relax and reabsorb moisture. Without it, you lose a significant amount of juice to the cutting board, leaving the meat drier than it should be.
Pro Tips for Next-Level Results
- Brine your chicken: A simple saltwater brine works wonders for moisture retention, especially with lean breast meat.
- Use a wire rack: It promotes airflow and ensures the bottom of the chicken crisps up evenly.
- Baste halfway through: Spooning the pan juices over the chicken mid-cook adds flavor and helps the skin brown beautifully.
- Add vegetables to the pan: Potatoes, carrots, and onions absorb the chicken juices and become a delicious side dish in one pan.
- Let the chicken come to room temperature before seasoning: Salt applied to room-temperature meat dissolves and penetrates deeper, seasoning the chicken more evenly.
Quick Tips for Juicy Oven Chicken
Here are some quick reminders to keep in mind every time you bake chicken:
- Always preheat the oven before placing the chicken inside.
- Use an instant-read thermometer to check doneness.
- Let the chicken rest for at least 5 minutes after baking.
- Season generously and at least 15 minutes before cooking.
- Pat the skin dry for maximum crispiness.
- Do not overcrowd the pan; leave space between pieces for air circulation.
Serving Suggestions and Meal Ideas
Once your oven-baked chicken is done, the fun part is serving it. There are countless ways to turn a simple roasted chicken into a complete, satisfying meal.
For a classic weeknight dinner, serve sliced chicken over roasted vegetables and a bed of rice or mashed potatoes. The pan drippings make an instant, flavorful sauce when deglazed with a splash of chicken broth or white wine.
Shredded oven chicken works beautifully in tacos, salads, sandwiches, and soups. Make extra and use it for meals throughout the week. Meal prep is one of the biggest practical benefits of baking chicken in the oven, since it stores well in the refrigerator for up to four days.
If you are cooking a whole chicken, carve it at the table for a rustic, family-style presentation. Serve with crusty bread to soak up the juices and a simple green salad on the side. This kind of meal feels special without requiring any advanced cooking skills.
Storing and Reheating Leftover Chicken
Leftover oven-baked chicken keeps well in an airtight container in the refrigerator for up to four days. For longer storage, you can freeze cooked chicken for up to three months. Wrap it tightly in plastic wrap and aluminum foil or place it in a freezer-safe bag.
When reheating, the goal is to warm the chicken without drying it out. The oven works best for this. Heat it at 325°F covered with foil for about 15 to 20 minutes. Adding a splash of broth or water to the pan helps create steam that keeps the meat moist. Avoid microwaving if possible, as it tends to make the chicken rubbery and unevenly heated.
Conclusion
How to cook a chicken in the oven is a fundamental kitchen skill that anyone can master with a little practice and the right guidance. From selecting the right cut to seasoning, baking at the correct temperature, and letting the meat rest, each step plays an important role in the final result.
The beauty of oven-baked chicken lies in its simplicity and versatility. You can keep it classic with a simple salt, pepper, and herb rub, or get creative with bold spice blends and marinades. No matter your approach, following the temperature and timing guidelines ensures safe, juicy, and flavorful poultry every single time.
So the next time you are planning dinner, consider firing up the oven for some roasted chicken. With the tips and techniques shared in this guide, you will be well on your way to making tender, juicy meat that the whole family will love. Happy cooking.
Frequently Asked Questions
What is the best temperature to cook chicken in the oven?
The best temperature for oven-baked chicken is 425°F for bone-in pieces and whole chickens, and 400°F for boneless breasts. These temperatures create a good balance between cooking the meat through and getting crispy, golden skin without drying it out.
How long does it take to cook a whole chicken in the oven?
A whole chicken weighing 4 to 5 pounds typically takes about 1 hour to 1 hour and 20 minutes at 425°F. The exact time depends on the size of the bird and your specific oven. Always use a meat thermometer to confirm the internal temperature reaches 165°F in the thickest part of the thigh.
Should I cover chicken with foil when baking?
Generally, no. Baking chicken uncovered allows the skin to crisp up and brown properly. However, if you notice the top is browning too quickly, you can loosely tent it with foil for the last 10 to 15 minutes of cooking. This prevents burning while still allowing the chicken to finish cooking through.
How do I know when chicken is done without a thermometer?
The most reliable visual cue is that the juices should run clear when you pierce the thickest part of the meat. The meat should also feel firm, not rubbery. However, an instant-read thermometer remains the most accurate method and is highly recommended for food safety.
Can I use frozen chicken in the oven?
Yes, but it is not recommended for best results. Frozen chicken takes significantly longer to cook and is more likely to dry out because the outside overcooks before the inside thaws. For the best tender chicken, always thaw frozen chicken in the refrigerator before baking.
How do I keep chicken breast from drying out in the oven?
Brine the chicken beforehand, cook it at a slightly lower temperature of 400°F, and pull it off the heat as soon as it reaches 155°F to 160°F. Letting it rest for 5 minutes allows carryover cooking to bring it to the safe 165°F without overcooking the meat further.