The Perfect Temperature To Cook London Broil In Oven
Cooking London Broil in the oven is simple when you nail the right temperature. This guide shows you the ideal oven-broiled steak temperature, timing, and techniques to get a perfectly cooked, tender cut of beef every single time. Whether you prefer medium-rare or well-done, we have you covered.
London Broil is one of the most popular beef cuts people reach for when they want a hearty, flavorful meal without spending a fortune. But here is the thing — cooking it in the oven can be tricky. Too hot and it turns out tough. Too cool and it takes forever. The temperature to cook London Broil in oven matters more than most people realize.
In this guide, we walk you through everything you need to know. From the best oven setting to marinating tips and slicing tricks, you will find all the practical advice you need. By the end, you will feel confident cooking a perfect oven-broiled steak right in your own kitchen. Let us get started.
Key Takeaways
- Best Oven Temperature: Cook London Broil at 400°F for a juicy, evenly seared result.
- Use a Meat Thermometer: Aim for 135°F for medium-rare or 145°F for medium doneness.
- Marinate First: A good marinade tenderizes the meat and adds big flavor.
- Rest the Meat: Let London Broil rest for 10 minutes after cooking to keep juices inside.
- Slice Against the Grain: This simple step makes every bite tender and easy to chew.
- Avoid Overcooking: London Broil is a lean cut and dries out fast if left too long.
- Broiler Pan Helps: Using the right pan promotes even heat and better browning.
📑 Table of Contents
What Is London Broil?
London Broil is not actually one specific cut of meat. It is a cooking method that works best with certain beef cuts. Most often, people use top round roast, flank steak, or chuck steak for this dish. These cuts come from the hindquarters or shoulder of the cow, which means they have less fat than ribeye or strip steak.
Because London Broil is a lean cut, it needs careful handling. Lean beef dries out quickly if you are not careful. That is why finding the right broiling temperature is so important. A low-and-slow approach or a hot-and-fast approach can both work — but only if you know what you are doing.
Why Choose London Broil?
There are many reasons people love London Broil. First, it is affordable. You can buy a great cut for a fraction of the price of premium steaks. Second, it is versatile. You can marinate it, season it simply, or use it in sandwiches and salads after cooking. Third, it is a healthy choice. With less fat than many other beef cuts, it fits well into a balanced diet.
Many home cooks also love that London Broil works well with a meat thermometer. Since it is a lean cut, you cannot rely on color alone to judge doneness. A good instant-read thermometer takes the guesswork out completely.
The Best Temperature To Cook London Broil In Oven
The temperature to cook London Broil in oven depends on what you are going for. Most experts agree that 400°F is the sweet spot. At this temperature, the outside gets a nice sear while the inside cooks evenly. You get a beautiful crust without drying out the meat.
Some cooks prefer a lower temperature of 350°F for a slower cook. This works well if your roast is thick. A lower oven temperature gives you more control and reduces the risk of overcooking. However, it does take longer, usually around 25 to 30 minutes per pound.
Temperature Guide for Different Doneness Levels
Your target internal temperature tells you exactly how done your London Broil will be. Here is a simple guide to follow:
- Rare: 120°F to 125°F — very red and cool in the center.
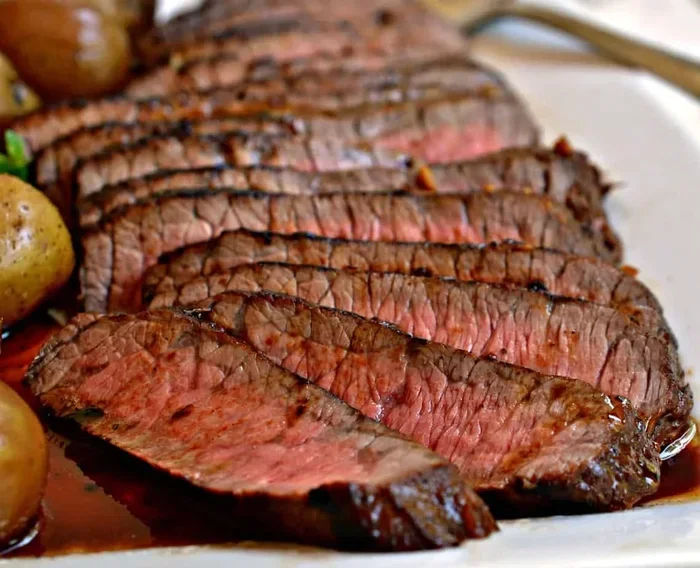
- Medium-Rare: 130°F to 135°F — warm red center, the most popular choice.
- Medium: 140°F to 145°F — pink center with a firm texture.
- Well-Done: 155°F to 160°F — little to no pink, but watch for dryness.
Remember, the USDA recommends cooking beef to at least 145°F for safety. But many steak lovers prefer the flavor and juiciness of medium-rare. Use your own judgment and a reliable kitchen thermometer to hit your target.
Should You Use the Broiler Setting?
Here is a common point of confusion. People often say “London Broil” and think they must use the broiler function on their oven. While broiling works great for thinner cuts like flank steak, a thicker top round roast benefits more from baking at a steady 400°F. The broiler setting uses top-down radiant heat and can scorch the surface if you are not careful.
If you do use the broiler, position the rack about 4 to 6 inches from the heating element. Watch the meat closely. Broiling is fast — usually 6 to 8 minutes per side for a thin cut. It gives you a great sear but requires constant attention.
How to Prepare London Broil for the Oven
Preparation is the secret to a great London Broil. Skipping this step is the number one mistake home cooks make. A little effort before cooking goes a long way toward a tender, flavorful result.
Marinating the Meat
Marinating is almost essential for London Broil. Because this cut is lean and has less marbling, it can turn out tough without help. A good marinade adds moisture and flavor deep into the meat fibers.
Here are some simple marinade ideas you can try tonight:
- Classic Soy Marinade: Soy sauce, olive oil, garlic, and a splash of Worcestershire sauce.
- Citrus Herb Marinade: Lemon juice, olive oil, fresh rosemary, and black pepper.
- Asian-Inspired Marinade: Sesame oil, rice vinegar, ginger, and a touch of honey.
- Beer Marinade: Dark beer, mustard, garlic, and a bit of brown sugar.
Marinate your London Broil for at least 2 hours. Overnight is even better. Place the meat and marinade in a zip-lock bag or a deep dish. Turn it a few times to make sure every side gets covered.
Bringing Meat to Room Temperature
Take your London Broil out of the refrigerator 30 to 45 minutes before cooking. This lets the meat come closer to room temperature. When the starting temperature is more even, the roast cooks more uniformly. You avoid that cold center problem that ruins an otherwise perfect steak.
Do not leave meat out for too long though. Two hours is the maximum safe limit at room temperature. After that, bacteria can start to grow.
Seasoning Tips
If you skip the marinade, simple seasoning still works wonders. A generous sprinkle of kosher salt and coarse black pepper creates a beautiful crust. You can also add garlic powder, onion powder, or smoked paprika for extra depth of flavor.
Apply salt at least 40 minutes before cooking. This gives the salt time to draw out moisture, dissolve, and then get reabsorbed into the meat. The result is a more seasoned, juicier roast from edge to edge.
Step-by-Step Cooking Instructions
Now that your London Broil is prepped, let us get it in the oven. These steps will guide you through the entire process from start to finish.
Step 1: Preheat the Oven
Set your oven to 400°F and let it heat fully. A properly preheated oven ensures even cooking from the moment the meat goes in. Most ovens take about 15 to 20 minutes to reach the target temperature. Use an oven thermometer if you are unsure — many ovens run hot or cold.
Step 2: Choose the Right Pan
A cast iron skillet works beautifully for oven cooking. It holds heat well and gives you a great sear. If you do not have cast iron, a metal baking dish or a broiler pan also works fine. Avoid glass pans, as they do not handle high heat as well and can crack.
Lightly coat the pan with oil or use a piece of aluminum foil to make cleanup easier. Some cooks like to add a rack on top of the baking sheet. This lifts the meat and allows hot air to circulate around it more evenly.
Step 3: Sear the Meat First
Searing is an optional but highly recommended step. Heat a skillet on the stovetop over high heat with a bit of oil. Place the London Broil in the hot pan and let it sear for 2 to 3 minutes on each side. This creates a flavorful crust through the Maillard reaction, which adds depth and richness to the final dish.
After searing, transfer the pan directly into the preheated oven. This one-two approach gives you the best of both worlds — a browned exterior and a perfectly cooked interior.
Step 4: Cook and Monitor Internal Temperature
Place the seared London Broil in the oven and set a timer. For a 1-inch thick cut, expect about 10 to 12 minutes total. For a thicker roast, it may take 15 to 20 minutes. Use a meat thermometer to check the internal temperature in the thickest part of the meat.
Do not rely on the oven timer alone. Every oven is different, and the thickness of your cut varies. The thermometer is your best friend here. Pull the meat out when it is 5°F below your target doneness. The temperature will rise a few degrees while the meat rests.
Step 5: Rest the Meat
This step is non-negotiable. Resting allows the juices inside the meat to redistribute. If you cut right away, all those flavorful juices run out onto the cutting board instead of staying in the steak.
Wrap the London Broil loosely in aluminum foil and let it sit for 10 minutes. This keeps the meat warm without overcooking it. After resting, your roast will be juicier, more flavorful, and much easier to slice.
Step 6: Slice Against the Grain
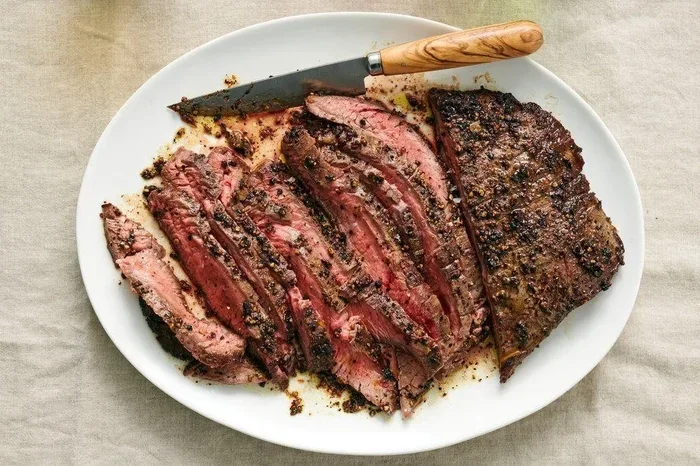
Slicing against the grain is the final secret to tender London Broil. The “grain” refers to the direction of the muscle fibers in the meat. If you slice parallel to the fibers, each bite is chewy and tough. If you slice perpendicular, you cut those fibers short, making every bite much more tender.
Look at the meat closely to find the direction of the grain. Then cut across it at a slight angle, into slices about a quarter-inch thick. This small change makes a huge difference in how the final dish tastes and feels.
Common Mistakes to Avoid
Even experienced cooks sometimes make mistakes with London Broil. Here are the most common ones and how to avoid them.
Skipping the Meat Thermometer
guessing when the meat is done leads to either overcooking or undercooking. A meat thermometer takes all the guesswork away. It is an inexpensive tool that pays for itself in better meals. Keep one in your kitchen drawer and use it every time.
Cooking From Frozen
Never put a frozen London Broil straight into the oven. It will cook unevenly — the outside overcooks while the inside stays frozen. Always thaw the meat in the refrigerator overnight or use the cold water method if you are short on time.
Using Too High a Temperature
Some people crank the oven to 450°F or higher, thinking more heat equals a better sear. But with a lean cut like London Broil, excessive heat dries out the meat before the inside has time to cook. Stick to 400°F for the best balance of crust and juiciness.
Not Letting the Meat Rest
Cutting into London Broil the moment it comes out of the oven is a wasted opportunity. All those juices will spill out, leaving you with a drier steak. Patience pays off here. Give it 10 minutes, and you will taste the difference.
Ignoring the Grain When Slicing
This is the mistake that ruins an otherwise perfect cook. Even if your temperature and timing were spot on, slicing with the grain turns a tender roast into something chewy. Always identify the grain direction and cut across it.
Serving Suggestions and Pairings
London Broil pairs beautifully with a wide range of sides. Because it has a robust beef flavor, it works well with both light and hearty accompaniments.
- Roasted Vegetables: Carrots, potatoes, and Brussels sprouts roasted at 400°F alongside the meat make an easy one-pan meal.
- Mashed Potatoes: A classic pairing that never gets old. The creamy texture complements the seared beef perfectly.
- Fresh Salad: A light mixed greens salad with vinaigrette balances the richness of the meat.
- Grilled Vegetables: Asparagus, bell peppers, and zucchini add color and nutrition to your plate.
- Crusty Bread: Use it to soak up the juices. Your guests will love this simple addition.
For a more complete meal, consider making a simple pan sauce from the juices left in the cast iron skillet. Add a splash of beef broth, a knob of butter, and some fresh herbs. Pour it over the sliced meat and you have a restaurant-quality dish at home.
Storing and Reheating Leftovers
London Broil makes excellent leftovers if stored properly. Let the meat cool to room temperature first, then wrap it tightly in plastic wrap or place it in an airtight container. It keeps well in the refrigerator for up to 3 to 4 days.
When reheating, go slow and low. A low oven temperature of 250°F works best. Wrap the slices in aluminum foil and warm them for about 10 to 15 minutes. This prevents the meat from drying out. You can also reheat slices in a skillet with a splash of beef broth over medium-low heat.
Avoid microwaving London Broil if possible. The microwave tends to make lean beef tough and rubbery. If you must use a microwave, cover the meat with a damp paper towel and heat in short 30-second intervals.
Expert Tips for Perfect London Broil Every Time
Here are some bonus tips from experienced cooks and chefs that will elevate your London Broil game.
- Dry the Surface Before Cooking: Pat the meat dry with paper towels before seasoning. A dry surface sears better and creates a more even crust.
- Use a Resting Rack: Set the meat on a wire rack while resting. This prevents the bottom from getting soggy from trapped steam.
- Add Butter During Resting: Some chefs like to place a small pat of butter on top of the meat while it rests. It adds richness and helps keep the surface moist.
- Experiment with Rubs: If you do not like marinades, try a dry rub instead. Coffee grounds, brown sugar, chili powder, and smoked paprika make an amazing crust.
- Let the Pan Heat Up: Whether searing on the stovetop or baking in the oven, a hot pan is essential for a good crust. Do not rush this step.
The more you cook London Broil, the more intuitive the process becomes. You will start to notice the difference between a 130°F and a 140°F internal temperature just by how the meat feels. Trust your senses and your thermometer, and you will never have a bad London Broil again.
Conclusion
Cooking the perfect London Broil in oven is easier than most people think. The key is getting the right temperature to cook London Broil in oven — and 400°F is your best friend. From marinating to searing, resting to slicing, each step plays an important role in the final result.
Use a meat thermometer to track internal temperature. Aim for 135°F for medium-rare or 145°F for medium. Let the meat rest for 10 minutes after cooking. And always, always slice against the grain. Follow these simple rules and your London Broil will turn out juicy, tender, and full of flavor every single time.
Now it is your turn. Fire up that oven, grab a good cut of beef, and put these tips into action. You will be amazed at how a little knowledge and a little patience can transform an affordable cut of meat into a meal that feels truly special. Happy cooking.
Frequently Asked Questions
What is the best oven temperature for London Broil?
The best oven temperature for London Broil is 400°F. This temperature provides a good balance between a crispy exterior and a juicy, evenly cooked interior. If your roast is thicker than 2 inches, you can lower the temperature to 350°F and cook it a bit longer for more even results.
How long does it take to cook London Broil in the oven?
Cooking time depends on the thickness of the cut and your desired doneness. A 1-inch thick London Broil typically takes 10 to 15 minutes at 400°F. A thicker roast may need 20 to 25 minutes. Always use a meat thermometer to check the internal temperature rather than relying on time alone.
Should I marinate London Broil before cooking?
Yes, marinating is highly recommended. London Broil is a lean cut with less marbling, so a marinade adds moisture and flavor. Marinate for at least 2 hours or overnight for the best results. Acidic ingredients like lemon juice or vinegar help tenderize the meat fibers.
What internal temperature is medium-rare for London Broil?
Medium-rare London Broil should reach an internal temperature of 130°F to 135°F. Remove the meat from the oven when it is about 5°F below your target, as the temperature will continue to rise during the resting period. This carryover cooking ensures a perfect final doneness.
Can I use a broiler instead of an oven to cook London Broil?
Yes, you can use the broiler setting for thinner cuts like flank steak. Position the rack 4 to 6 inches from the heating element and broil for about 6 to 8 minutes per side. Thicker cuts benefit more from baking at 400°F in the oven, as the broiler can scorch the surface before the inside cooks through.
How do I keep London Broil from drying out?
To keep London Broil juicy, do not overcook it. Use a meat thermometer and pull the meat at the right temperature. Let it rest for 10 minutes after cooking to allow juices to redistribute. Marinating before cooking also adds moisture, and slicing against the grain ensures each bite stays tender.
=== CONCLUSION ===
The temperature to cook London Broil in oven is the foundation of a great meal. At 400°F, with the right timing and a reliable meat thermometer, you can achieve restaurant-quality results at home. Remember to marinate, sear, rest, and slice against the grain. These small steps add up to a big difference in flavor and texture.
London Broil is an affordable, versatile, and delicious cut of beef that deserves a spot in your regular rotation. With the tips and techniques shared in this guide, you have everything you need to cook it perfectly every time. Pull out that oven, grab a good cut of meat, and enjoy the process. A great meal starts with the right temperature — and now you have it.