How Long To Broil Chicken Tenders In The Oven Perfectly
How long to broil chicken tenders in the oven depends on thickness, but most tenders need just 5 to 10 minutes per side under high heat. The key is keeping your oven at 500°F to 550°F and watching them closely to avoid burning. This guide covers everything from timing and temperature to tips for crispy, juicy chicken every single time.
Key Takeaways
- Broil Time: Most chicken tenders take 5 to 10 minutes per side at 500°F to 550°F, depending on thickness.
- Oven Rack Position: Always place the rack 4 to 6 inches below the broiler element for even cooking and crispiness.
- Internal Temperature: Chicken tenders are done when they reach 165°F internally, measured with a meat thermometer.
- Frozen vs Fresh: Frozen tenders need extra time, usually 12 to 18 minutes total, while fresh ones cook much faster.
- Flip Once: Flip your tenders halfway through for even browning and juicy results on both sides.
- Rest Before Serving: Let chicken tenders rest for 3 to 5 minutes after broiling to lock in juices.
- Avoid Common Mistakes: Don’t walk away from the oven, and always line your pan with foil for easy cleanup.
📑 Table of Contents
- How Long To Broil Chicken Tenders In The Oven
- The Best Oven Temperature For Broiling Chicken Tenders
- Step-By-Step Guide To Broiling Chicken Tenders
- Frozen vs Fresh Chicken Tenders: Broiling Time Compared
- Tips For Perfectly Crispy Chicken Tenders Every Time
- Common Mistakes To Avoid When Broiling Chicken Tenders
- How To Know When Chicken Tenders Are Done
- Serving Ideas For Broiled Chicken Tenders
- Final Thoughts
How Long To Broil Chicken Tenders In The Oven
Broiling chicken tenders in the oven is one of the fastest ways to get restaurant-quality results at home. But the big question everyone asks is, how long to broil chicken tenders in the oven? The answer isn’t always the same. It depends on a few things like thickness, whether they are frozen or fresh, and how close they sit to the broiler element.
The good news is that broiling is simple. You don’t need to be a seasoned chef to nail it. With the right oven broiling time and a little attention, you can serve up crispy chicken tenders that are golden on the outside and juicy on the inside. This guide walks you through everything you need to know, from timing to temperature to pro tips that make a real difference.
Let’s dive in and make sure your next batch of broiled chicken tenders comes out perfect every time.
The Best Oven Temperature For Broiling Chicken Tenders
Getting the temperature right is the first step toward perfect oven-baked chicken tenders. Most ovens have a broil setting that runs between 500°F and 550°F. That’s exactly the range you want for chicken tenders. The high heat creates a beautiful sear on the outside while cooking the inside quickly.
Here’s what you need to know about broiler settings:
- High Broil (500°F to 550°F): This is the best setting for thin chicken tenders. It gives you a quick, even sear.
- Medium Broil (400°F to 450°F): Use this for thicker tenders that need more time without burning on the outside.
- Low Broil (350°F to 375°F): This works for frozen tenders that need slower, more gentle cooking.
Always preheat your oven on the broil setting for at least 5 minutes before putting your tenders in. This ensures the heat is consistent the moment the chicken hits the pan.
Why Temperature Matters So Much
Broiling is all about high, direct heat. If your oven isn’t hot enough, the chicken will dry out before it gets crispy. Too hot, and the outside burns while the inside stays raw. Finding that sweet spot is what separates good tenders from great ones. High heat cooking is the secret behind perfectly broiled chicken tenders with a satisfying crunch.
Step-By-Step Guide To Broiling Chicken Tenders
Now that you know the temperature, let’s walk through the actual process. Following these steps will help you get consistent results every time you ask yourself, how long to broil chicken tenders in the oven.
Step 1: Prep Your Chicken Tenders
Start by patting your tenders dry with paper towels. Moisture is the enemy of crispiness. If you want extra flavor, season them with salt, pepper, garlic powder, or any chicken tenders seasoning you love. A light coat of olive oil helps the seasoning stick and promotes even browning.
Step 2: Position The Oven Rack
This is a step many people skip, but it matters a lot. Move your oven rack so the tenders sit 4 to 6 inches below the broiler element. Too far away and you lose the crispy effect. Too close and they burn in seconds.
Step 3: Preheat And Broil
Turn on the broil setting and let the oven heat up for 5 minutes. Place your seasoned tenders on a broiling pan or a lined baking sheet. Slide the pan into the oven and set your timer.
Step 4: Flip Halfway Through
For even cooking, flip your tenders once at the halfway mark. This ensures both sides get that golden, crispy finish. Most tenders need a total of 10 to 15 minutes in the oven, depending on thickness.
Step 5: Check The Internal Temperature
Use a meat thermometer to check that the internal temperature reaches 165°F. This is the chicken tenders doneness marker you should never skip. Even if the outside looks perfect, undercooked chicken is a food safety risk.
Frozen vs Fresh Chicken Tenders: Broiling Time Compared
One of the biggest factors that changes your oven broiling time is whether you’re cooking frozen or fresh tenders. Many people buy frozen tenders for convenience, and that’s totally fine. You just need to adjust your approach.
Fresh Chicken Tenders
Fresh tenders are thinner and cook much faster. They usually need about 5 to 10 minutes total at high broil. Here’s a quick breakdown:
- Thin fresh tenders (less than 1/4 inch): 5 to 7 minutes total, flipping once.
- Medium fresh tenders (1/4 to 1/2 inch): 8 to 10 minutes total, flipping once.
- Thick fresh tenders (over 1/2 inch): 10 to 12 minutes total, flipping once.
Frozen Chicken Tenders
Frozen tenders need more time because you’re cooking from frozen. The frozen chicken tenders broiling time is roughly 12 to 18 minutes total. Here’s what to keep in mind:
- Thin frozen tenders: 10 to 12 minutes total.
- Medium frozen tenders: 12 to 15 minutes total.
- Thick frozen tenders: 15 to 18 minutes total.
Always make sure frozen tenders reach 165°F inside before serving. The outside can look done long before the center is fully cooked, so use that thermometer every time.
Quick Comparison Table
| Type | Thickness | Total Broil Time | Flip Once? |
|---|---|---|---|
| Fresh | Thin | 5 to 7 minutes | Yes |
| Fresh | Medium | 8 to 10 minutes | Yes |
| Fresh | Thick | 10 to 12 minutes | Yes |
| Frozen | Thin | 10 to 12 minutes | Yes |
| Frozen | Medium | 12 to 15 minutes | Yes |
| Frozen | Thick | 15 to 18 minutes | Yes |
Note: Times are approximate. Always verify doneness with a meat thermometer.
Tips For Perfectly Crispy Chicken Tenders Every Time
Getting that restaurant-style crunch at home is easier than you think. A few simple chicken tenders tips can transform your results from average to amazing.
Use Panko Breadcrumbs For Extra Crunch
If you’re making your own breaded chicken tenders, swap regular breadcrumbs for panko. Panko is lighter and crispier, which means better texture when broiled. It also browns faster under high heat, giving you that golden color you crave.
Don’t Skip The Wire Rack
Place your tenders on a wire rack set over a baking sheet. This allows air to circulate underneath, so the bottom gets crispy too. Without a rack, the bottom side can get soggy from sitting in its own juices.
Lightly Spray With Oil
A fine mist of cooking spray on the outside of the tenders helps them brown faster and more evenly. It also prevents sticking. Use an oil with a high smoke point like avocado oil or canola oil.
Don’t Overcrowd The Pan
Give each tender space to breathe. When tenders are crowded together, steam builds up and you lose crispiness. Arrange them in a single layer with space between each piece for the best evenly cooked chicken.
Let Them Rest After Broiling
Once your tenders come out of the oven, let them rest on the pan for 3 to 5 minutes. This allows the juices to redistribute, making each bite moist and flavorful. Cutting into them right away lets all those juices run out.
Experiment With Different Seasonings
Broiled chicken tenders are a blank canvas. Try buffalo seasoning for a spicy kick, Italian herbs for a savory twist, or a honey-garlic glaze brushed on during the last two minutes of cooking. The possibilities with chicken tenders recipes are endless.
Common Mistakes To Avoid When Broiling Chicken Tenders
Even experienced cooks make mistakes when broiling chicken. Knowing what to avoid saves time, prevents ruined dinners, and keeps your oven broiling time on track.
Walking Away From The Oven
Broiling is not like baking. It uses intense, direct heat that can go from perfect to burnt in under a minute. Never leave the oven unattended when broiling chicken tenders. Stay nearby and watch them closely.
Not Thawing Frozen Tenders Properly
While you can broil frozen tenders directly, thawing them first leads to more even cooking. If you have time, let them sit in the fridge overnight. If you’re short on time, use the microwave’s defrost setting for a few minutes before broiling.
Using The Wrong Pan
Avoid dark-colored pans when broiling. They absorb too much heat and can cause the bottom of your tenders to burn. Stick to light-colored broiling pans or aluminum foil-lined baking sheets.
Overcooking For Fear Of Undercooking
It’s a common fear, but overcooking is just as bad as undercooking. Dry, rubbery chicken is nobody’s idea of a good meal. Use a meat thermometer, trust the 165°F rule, and pull them out as soon as they hit that mark.
Ignoring The Oven Rack Position
We mentioned this earlier, but it deserves repeating. The rack position directly affects how your tenders cook. Too high and they burn. Too low and they steam instead of broil. Keep that rack in the right spot every time.
How To Know When Chicken Tenders Are Done
Knowing when your broil chicken tenders are ready goes beyond just looking at the clock. Visual cues help, but the only foolproof method is checking the internal temperature.
Here are the signs your tenders are done:
- The thermometer reads 165°F: This is the gold standard for chicken doneness. No guessing needed.
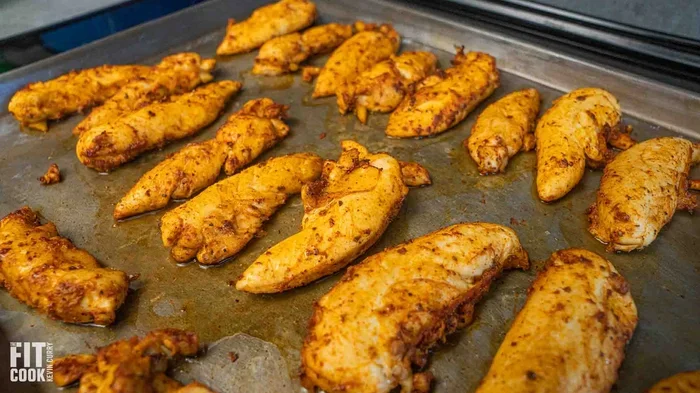
- The outside is golden brown: A crispy, golden exterior usually means the inside is cooked through too.
- The juices run clear: If you cut into the thickest part and the juices are clear, not pink, your tenders are done.
- The meat is firm, not rubbery: Properly cooked tenders should feel firm when pressed but still juicy inside.
Remember, chicken tenders doneness isn’t just about taste. It’s about food safety. Always cook your chicken to the recommended internal temperature to avoid any risk of foodborne illness.
Resting Your Chicken Tenders
Once your tenders hit 165°F, pull them out and let them rest. The residual heat continues to cook the chicken slightly, which is called carryover cooking. This resting period makes the meat juicier and easier to handle. A 3 to 5 minute rest goes a long way toward juicy chicken tenders that fall apart in the best way.
Serving Ideas For Broiled Chicken Tenders
Now that you know exactly how long to broil chicken tenders in the oven, it’s time to think about serving. Great tenders deserve great sides and dips.
- Classic dipping sauces: Ranch, honey mustard, barbecue sauce, or sriracha mayo all pair perfectly with crispy broiled tenders.
- Healthy sides: A fresh garden salad, roasted vegetables, or a light coleslaw balance the richness of fried-style tenders.
- Kid-friendly meals: Serve tenders with sweet potato fries and a side of ketchup for a crowd-pleasing dinner.
- Sandwich option: Place broiled tenders in a bun with lettuce, tomato, and your favorite sauce for a homemade chicken sandwich.
The beauty of broiled chicken tenders is that they’re versatile. They work as a main dish, a snack, or part of a larger meal. Once you master the timing and temperature, you can make them any night of the week.
Final Thoughts
How long to broil chicken tenders in the oven really comes down to a few simple factors: thickness, frozen or fresh, and your oven’s broil setting. For most tenders, you’re looking at 5 to 15 minutes total, with a flip in the middle for even cooking. Keep your oven at 500°F to 550°F, use a broiling pan, and always check that internal temperature of 165°F.
Broiling is one of the fastest and easiest ways to cook chicken tenders at home. With the right oven broiling time and a few pro tips, you’ll get crispy, juicy, flavorful tenders that everyone will love. The next time you’re craving crispy chicken tenders, skip the deep fryer and let your oven do the work.
Now you have all the knowledge to make perfect broiled chicken tenders every single time. Go ahead, fire up that broiler, and enjoy the results!
Frequently Asked Questions
Can I broil frozen chicken tenders without thawing them first?
Yes, you can broil frozen chicken tenders directly from the freezer. Just add a few extra minutes to your oven broiling time. Frozen tenders typically need 12 to 18 minutes total, depending on thickness. Make sure the internal temperature reaches 165°F before serving.
What is the difference between broiling and baking chicken tenders?
Broiling uses direct, high heat from the top element, which creates a crispy exterior quickly. Baking uses indirect, surrounding heat and takes longer. For crispy chicken tenders, broiling is the faster and crunchier option.
How do I prevent my chicken tenders from drying out in the oven?
Don’t overcook them. Use a meat thermometer and pull the tenders at 165°F. Also, let them rest for 3 to 5 minutes after broiling. Brushing them lightly with oil or marinade before cooking helps retain moisture too.
Can I use a glass baking dish instead of a broiling pan?
It’s best to avoid glass dishes when broiling. Glass can absorb too much heat and may crack under the intense broiler temperature. Use a light-colored metal broiling pan or a foil-lined baking sheet instead.
How close should the chicken tenders be to the broiler element?
Position the oven rack so the tenders sit about 4 to 6 inches below the broiler element. This distance gives you the best balance of crispy browning and even cooking without burning.
What temperature should chicken tenders be when done?
Chicken tenders doneness is reached at an internal temperature of 165°F. Always use a meat thermometer to check the thickest part of the tender for food safety and perfect results.