How To Cook Jennie O Turkey Breast In Oven Perfectly
Looking for the perfect way to prepare Jennie O turkey breast in your oven? This complete guide covers everything you need to know. You will learn the ideal oven temperature, seasoning techniques, and cooking times for juicy, flavorful results every time. Whether you are cooking for Thanksgiving or a simple weeknight meal, this turkey breast recipe is easy to follow and delivers consistently delicious outcomes.
Looking for the perfect way to prepare Jennie O turkey breast in your oven? You are in the right place. This guide will show you exactly how to cook Jennie O turkey breast in oven settings for juicy, delicious results every time. Whether you are cooking for a holiday meal or a simple weeknight dinner, this turkey breast recipe is easy to follow and hard to mess up. We will walk you through every step, from prep to plating, so you can feel confident in the kitchen.
Cooking Jennie O turkey breast in the oven is one of the simplest and most rewarding meals you can make. The bird is tender, the flavors are rich, and the process is straightforward even for beginners. By the end of this guide, you will know the ideal oven temperature for turkey breast, the best seasonings to use, and how to check for perfect doneness. Let us get started.
Key Takeaways
- Prep the Turkey Properly: Pat the breast dry, bring it to room temperature, and season generously for the best flavor and texture.
- Use the Right Temperature: Roast at 350 degrees Fahrenheit for even cooking and a juicy interior with a golden exterior.
- Invest in a Kitchen Thermometer: This is the single most important tool for ensuring your turkey breast reaches the safe internal temperature of 165 degrees Fahrenheit.
- Rest Before Slicing: Always let the turkey rest for 15 to 20 minutes after cooking so the juices redistribute and the meat stays moist.
- Save the Pan Drippings: The juices left in the roasting pan make an incredible homemade gravy that elevates your entire meal.
- Works for Meal Prep: Cooked Jennie O turkey breast stores well and can be used in sandwiches, salads, soups, and stir-fries throughout the week.
📑 Table of Contents
How To Cook Jennie O Turkey Breast In Oven: The Complete Guide
Many people think roasting a turkey breast is complicated. It is not. With the right approach, you can produce a moist, flavorful roasted turkey breast that will impress your family and guests. This section covers everything you need to know about how to cook Jennie O turkey breast in oven methods, from choosing the right cut to pulling it out of the oven at the perfect moment.
The beauty of this easy turkey recipe is its flexibility. You can adjust the seasonings, cooking times, and temperatures to suit your preferences. Whether you prefer a bone-in turkey breast or a boneless turkey breast, the principles remain the same. Let us dive into the details.
Why Jennie O Turkey Breast Works So Well
Jennie O turkey breast is a popular choice for home cooks. It is pre-packaged, consistently sized, and affordable. The brand offers both bone-in and boneless options, making it versatile for different recipes. The meat is naturally lean, which means you get a healthier protein without sacrificing flavor. When you cook Jennie O turkey breast in oven settings, the even thickness of the cut helps it roast uniformly.
Oven-baked turkey from Jennie O also works great for meal prep. You can cook one on Sunday and use it throughout the week for sandwiches, salads, and soups. This makes it a perfect meal prep turkey option for busy families. The yield from a single breast typically serves four to six people, depending on portion sizes.
Who This Recipe Works Best For
This recipe is ideal for several situations. It is perfect for Thanksgiving turkey dinners when you want a smaller bird that cooks faster than a whole turkey. It also works great for weeknight dinner turkey meals when you need something wholesome and satisfying. Beginners will appreciate the straightforward process, and experienced cooks will enjoy the consistent results.
If you are hosting a holiday gathering or simply want to prepare healthy meals for the week, Jennie O turkey breast is your go-to protein. The oven method requires minimal hands-on time, so you can focus on other parts of your meal while the turkey roasts.
What You Will Need Before You Start
Essential Ingredients
Here is what you need to gather before you begin:
- One Jennie O turkey breast (bone-in or boneless, depending on your preference)
- Olive oil or melted butter for coating
- Salt and black pepper for basic seasoning
- Garlic powder and onion powder for depth of flavor
- Fresh herbs such as rosemary, thyme, or sage
- Herb butter for extra richness and aroma
- Chicken broth or white wine for the pan (optional)
You do not need a long ingredient list to make great seasoning turkey breast dishes. Simple ingredients often produce the best results. The key is using fresh herbs and quality salt. Avoid pre-mixed seasoning blends that contain too much sodium or fillers.
Equipment and Tools
You will need a few basic kitchen tools to get started:
- A kitchen thermometer (this is the most important tool)
- A roasting pan or oven-safe baking dish
- Aluminum foil for tenting
- A sharp knife for trimming
- A basting brush for coating the bird
- A carving board and sharp carving knife for serving
A kitchen thermometer is non-negotiable when you cook Jennie O turkey breast in oven methods. Guessing the doneness of poultry can lead to dry, overcooked meat or unsafe undercooked meat. A thermometer removes all the guesswork and gives you confidence in your results.
Bone-In vs Boneless: A Quick Comparison
| Feature | Bone-In Turkey Breast | Boneless Turkey Breast |
|---|---|---|
| Cooking Time | 2 to 2.5 hours at 350 degrees | 1.5 to 2 hours at 350 degrees |
| Flavor | More flavorful from the bone | Milder, cleaner taste |
| Ease of Slicing | Requires careful carving around the bone | Easy to slice and serve |
| Moisture Retention | Better due to bone insulation | Can dry out faster if overcooked |
| Best For | Holiday meals and special occasions | Quick weeknight dinners and meal prep |
| Turkey Breast Yield | Slightly less meat per pound | More uniform meat per pound |
Step-by-Step Instructions for Cooking Jennie O Turkey Breast In Oven
This is the core of our guide. Follow these steps carefully, and you will achieve perfectly cooked turkey breast every single time.
Preparing the Turkey Breast
Start by removing the turkey breast from its packaging. Pat it dry with paper towels. This step is crucial because moisture on the surface prevents proper browning. If you are using a bone-in turkey breast, check for any excess fat or loose skin. You can trim large fat deposits but leave some for flavor and moisture during cooking.
For a boneless turkey breast, look for any silver skin or tendons and remove them with a sharp knife. Place the breast in the roasting pan with the thicker end facing up. This helps the bird cook more evenly since the thinner side will cook faster.
Let the turkey sit at room temperature for about 30 minutes before cooking. This simple step helps the meat cook more evenly from edge to center. Cold meat going straight into a hot oven creates uneven cooking and longer overall turkey cooking time.
Seasoning and Flavoring
Now comes the fun part. Brush the entire surface of the turkey with olive oil or melted butter. This creates a barrier that locks in moisture and helps the skin crisp up. Sprinkle salt and pepper generously over all sides.
For extra flavor, mix together garlic powder, onion powder, dried thyme, and dried rosemary. Rub this blend evenly over the oiled surface. If you want a richer flavor, prepare a compound herb butter turkey mixture by mixing softened butter with minced garlic, chopped herbs, and a pinch of salt. Spread this under the skin and over the top of the bird.
Pro tip: If you are working with a bone-in turkey breast, carefully loosen the skin over the breast meat with your fingers. Slide small pieces of herb butter directly under the skin. This is a restaurant trick that keeps the meat incredibly juicy and adds a layer of herb-infused flavor that goes directly into the meat.
Oven Temperature and Timing
Preheat your oven to 350 degrees Fahrenheit. This is the ideal cooking temperature for turkey breast because it cooks the meat gently without drying it out. Higher temperatures can brown the outside too quickly while leaving the inside undercooked.
Place the seasoned turkey breast in the oven and roast for approximately 2 to 2.5 hours for a bone-in breast. A boneless turkey breast typically takes 1.5 to 2 hours. The exact turkey cooking time depends on the size of your cut, so always rely on internal temperature rather than the clock alone.
About 45 minutes before the estimated finish time, check the internal temperature. Insert the kitchen thermometer into the thickest part of the breast, avoiding the bone if you are using a bone-in cut. The target turkey breast internal temperature is 165 degrees Fahrenheit.
If the outside is browning too quickly, loosely tent the bird with aluminum foil. This foil tent turkey technique slows down the browning process while allowing the inside to continue cooking. Many home cooks skip this step, and it leads to burnt exteriors and undercooked centers.
Checking for Doneness
The only reliable way to know your oven-baked turkey is done is with a kitchen thermometer. Insert it into the thickest part of the meat, away from the bone and any cavities. You should read 165 degrees Fahrenheit for safe consumption.
Another sign of doneness is the juices. When you pierce the thickest part of the breast, the juices should run clear, not pink. If you see any pink, the turkey needs more time. Always check in multiple spots because ovens can have hot spots that cook unevenly.
Once the turkey reaches the correct temperature, remove it from the oven. Do not cut into it immediately. Let it rest for at least 15 to 20 minutes. This step is essential for rest turkey before slicing because it allows the juices to redistribute throughout the meat.
Tips for Juicy and Flavorful Results
Use a Kitchen Thermometer
This cannot be stressed enough. A kitchen thermometer is the single most important tool for cooking poultry. Without one, you are guessing, and guessing leads to dry turkey. Invest in a reliable instant-read thermometer and use it every time you roast a turkey breast recipe in the oven.
Check the temperature in at least two spots. The thickest part of the breast is the primary target, but checking a secondary spot ensures even cooking. Remember that the temperature will rise about 5 degrees during the resting period, so pull the turkey at 160 degrees for a perfect 165-degree finish.
Let the Turkey Rest
Resting the turkey after cooking is just as important as cooking it properly. When you rest turkey before slicing, the internal juices settle and redistribute. If you cut too early, those juices run out onto the cutting board instead of staying in the meat. This is the number one reason people serve dry turkey.
Cover the rested turkey loosely with foil and let it sit for 15 to 20 minutes. Use this time to prepare your side dishes or make a quick gravy from the pan drippings. The resting period does not cool the turkey down significantly, so plan your meal timing accordingly.
Save the Pan Drippings
Do you throw away the juices in the bottom of the roasting pan? Stop right there. Those pan drippings are liquid gold for making gravy. Pour them into a fat separator or let them settle for a few minutes, then skim off the fat and use the flavorful juices to make a simple pan gravy.
Simply heat the drippings in a saucepan, whisk in some flour or cornstarch to thicken, and season with salt and pepper. In just five minutes, you have a delicious homemade gravy that elevates your entire meal. This is a pro move that transforms a simple oven-baked turkey into a restaurant-quality dinner.
Quick Tips for Better Results
- Always bring the turkey to room temperature before roasting
- Use a meat thermometer to avoid overcooking
- Do not skip the resting period after cooking
- Save and use the pan drippings for gravy
- Let the turkey sit in its juices for 10 minutes before carving
- Store leftover turkey in the fridge within two hours of cooking
- Use the bones to make homemade stock for soups and stews
Common Mistakes to Avoid
Overcooking the Turkey
The most common mistake people make is cooking the turkey too long. Lean cuts like Jennie O turkey breast dry out quickly once they pass the target temperature. The difference between a perfectly juicy breast and a dry, chalky one is often just 10 to 15 minutes of extra cooking time.
Set a timer and check the temperature early. It is always better to pull the turkey slightly early and let carryover cooking finish the job than to overcook it. Remember that the internal temperature will continue to rise by about 5 degrees after you remove the bird from the oven.
Skipping the Resting Time
As mentioned earlier, skipping the rest is a huge mistake. Cutting into hot turkey immediately releases all the moisture and leaves you with dry slices. Give your roasted turkey breast the time it needs to relax. Those extra 15 to 20 minutes make a dramatic difference in the final texture and juiciness.
Not Seasoning Enough
Turkey breast on its own is mild and can taste bland if you do not season it properly. Many home cooks are too conservative with salt and spices. Be bold with your seasoning. The surface of the bird needs enough salt to create a flavorful crust. Under-seasoned turkey is one of the biggest complaints about home-cooked poultry.
Also, remember that seasoning should go beyond just salt and pepper. Garlic, herbs, and a touch of heat can transform a simple turkey breast recipe into something memorable. Taste your seasoning blend before applying it to make sure the flavors are balanced.
Serving Suggestions and Leftover Ideas
Classic Side Dishes
Roasted Jennie O turkey breast pairs beautifully with many classic sides. Here are some ideas to round out your meal:
- Mashed potatoes and gravy made from the pan drippings
- Roasted root vegetables like carrots, parsnips, and sweet potatoes
- Green beans almondine with toasted almonds and lemon zest
- Cranberry sauce or homemade chutney
- Cornbread stuffing or dinner rolls
- A simple mixed green salad with vinaigrette
These sides complement the mild, clean flavor of turkey without overwhelming it. The goal is to create a balanced plate where the oven-baked turkey is the star, and the sides support it.
Meal Prep and Leftovers
One of the best things about how to cook Jennie O turkey breast in oven is that it makes excellent leftovers. Here are some ideas for using up extra turkey:
- Turkey sandwiches with avocado, lettuce, and your favorite dressing
- Turkey salad with Greek yogurt, celery, and grapes
- Turkey soup using the bones and leftover meat
- Turkey stir-fry with vegetables and teriyaki sauce
- Turkey quesadillas with cheese, peppers, and salsa
- Turkey fried rice with leftover rice and vegetables
Store leftover turkey in an airtight container in the refrigerator for up to four days. You can also freeze cooked turkey for up to three months. Reheat gently in the oven or microwave to keep the meat from drying out. Proper storage ensures your meal prep turkey stays fresh and safe to eat.
Cooking Jennie O turkey breast in oven is a skill that anyone can master with a little practice. Once you nail the basics, you can experiment with different herbs, spices, and cooking techniques to make the recipe your own. The confidence you gain from a successful roast will carry over into other kitchen adventures.
Conclusion
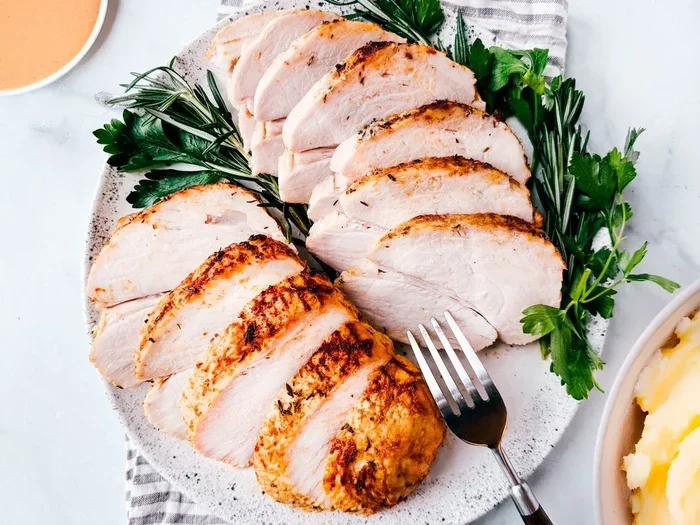
How to cook Jennie O turkey breast in oven is a straightforward process that yields impressive results. By following the steps in this guide, you will learn how to prepare a moist, flavorful roasted turkey breast that your whole family will love. From selecting the right cut to checking the internal temperature, every detail matters.
Remember to use a kitchen thermometer, let the turkey rest before slicing, and save those pan drippings for gravy. Avoid common mistakes like overcooking or under-seasoning, and you will be well on your way to becoming a confident turkey roaster. Whether it is Thanksgiving or a random Tuesday night, this easy turkey recipe will never let you down.
Now that you know exactly how to cook Jennie O turkey breast in oven settings, it is time to put this knowledge to work. Grab a Jennie O turkey breast from your local grocery store, preheat your oven, and enjoy the satisfying process of creating a wholesome, delicious meal from scratch. Happy cooking!
Frequently Asked Questions
Can I Cook Jennie O Turkey Breast at a Higher Temperature?
You can, but it is not recommended. Higher temperatures like 400 degrees Fahrenheit will brown the outside faster but can dry out the inside before it reaches the safe internal temperature of 165 degrees Fahrenheit. Stick to 350 degrees for the best balance of crispy skin and juicy meat.
How Long Does It Take to Cook a 4 Pound Jennie O Turkey Breast?
A 4 pound bone-in Jennie O turkey breast typically takes about 2 to 2.5 hours at 350 degrees Fahrenheit. A boneless breast of the same weight will cook faster, usually around 1.5 to 2 hours. Always use a kitchen thermometer to check for doneness rather than relying solely on time.
Should I Cover the Turkey Breast With Foil While Cooking?
Start cooking the turkey breast uncovered to allow the skin to crisp and brown. If the outside is browning too quickly, loosely tent it with aluminum foil about halfway through cooking. This foil tent turkey technique prevents burning while the inside continues to cook evenly.
Can I Use a Frozen Jennie O Turkey Breast?
Yes, but you must thaw it completely before cooking. Cooking a frozen turkey breast leads to uneven cooking and increases the risk of foodborne illness. Place the frozen breast in the refrigerator 24 to 48 hours before you plan to cook it, or use the cold water thawing method for faster results.
What Is the Best Way to Reheat Leftover Turkey Breast?
The best method is to reheat leftover turkey in the oven at 325 degrees Fahrenheit. Place the slices in a baking dish, add a splash of broth or water to keep them moist, and cover with foil. Heat for 15 to 20 minutes until warmed through. Avoid microwaving if possible, as it tends to dry out the meat quickly.
Can I Brine Jennie O Turkey Breast Before Roasting?
Absolutely. Brining is an excellent way to add moisture and flavor to a lean cut like Jennie O turkey breast. A simple brine of water, salt, sugar, and herbs for 4 to 12 hours before cooking can make a noticeable difference in juiciness. Just remember to pat the breast dry and adjust your seasoning accordingly before roasting.