How To Dehydrate Peaches In The Oven Easily At Home
Dehydrating peaches in the oven is one of the easiest ways to preserve summer fruit year-round. You only need ripe peaches, a baking sheet, and your home oven to create delicious, chewy peach chips. This guide walks you through every step, from prep to storage, so you can enjoy homemade dried peaches anytime. Whether you are a beginner or a seasoned home cook, this method is simple, affordable, and rewarding.
There is something magical about turning fresh, juicy peaches into crispy, chewy peach chips right in your own kitchen. Dehydrating peaches in the oven is a timeless kitchen skill that has been passed down through generations. It lets you capture the sweetness of summer and enjoy it long after the season ends.
If you have ever wondered how to make dried fruit at home without buying expensive equipment, you are in the right place. This guide covers everything from choosing the right peaches to storing your finished product. By the end, you will feel confident enough to start your first batch today.
The beauty of this method lies in its simplicity. You do not need a dehydrator, special trays, or hard-to-find tools. Just your oven, some baking sheets, and a few ripe peaches. Let us walk through the entire process together.
Key Takeaways
- Oven dehydration is simple: You do not need a fancy food dehydrator to make great dried peaches.
- Low heat is key: Setting your oven between 130°F and 170°F ensures perfect results without burning.
- Prep matters: Slicing evenly and removing the skin helps peaches dry uniformly and taste better.
- Storage extends shelf life: Airtight containers keep dried peaches fresh for months.
- Dried peaches are versatile: Use them in snacks, baking, trail mix, and more.
- It saves money: Homemade dried fruit costs less than store-bought versions.
📑 Table of Contents
- Why Dehydrate Peaches In The Oven?
- Choosing The Right Peaches For Dehydration
- What You Need Before You Start
- Step-By-Step Oven Dehydration Process
- Best Oven Settings For Perfect Peach Chips
- Storing Your Dried Peaches Properly
- Common Mistakes To Avoid
- Creative Ways To Use Your Dried Peaches
- Nutritional Benefits Of Dried Peaches
- Expert Tips For Perfect Results Every Time
- Quick Tips Summary
- Final Thoughts
Why Dehydrate Peaches In The Oven?
Oven dehydration is one of the most accessible methods for homemade dried fruit. It works well for beginners and experienced cooks alike. Here is why so many people choose this approach over other methods.
No Special Equipment Needed
Most households already own an oven. You do not need to invest in a separate food dehydrator or buy specialty gadgets. Your standard oven can handle the job beautifully. This makes oven drying fruit one of the most budget-friendly preservation methods available.
Preserve Summer Peaches Year-Round
Peaches are at their best during summer months. But what happens when winter arrives and you crave that sweet, fruity flavor? Fruit preservation through dehydration locks in the taste and nutrients. You can enjoy sun-ripened peaches even in the coldest months.
Healthy Snacking Made Easy
Store-bought dried fruit often contains added sugar, preservatives, and sulfur dioxide. When you dry your own peaches, you control exactly what goes into them. The result is a clean, natural snack full of fiber, vitamins, and natural sweetness.
Versatile Uses For Dried Peaches
Once you learn how to make oven-baked peach chips, you will find countless ways to use them. Toss them into trail mix, bake them into muffins, or crumble them over yogurt. They also make beautiful additions to charcuterie boards and gift baskets.
Choosing The Right Peaches For Dehydration
Not all peaches are created equal when it comes to drying. The variety and ripeness of your fruit make a big difference in the final result.
Best Peach Varieties
Freestone peaches are the top choice for dehydration. Their flesh separates easily from the pit, making slicing and pitting much simpler. Clingstone peaches work too, but they require more effort to remove the skin and pit. Yellow peaches offer a tangy flavor, while white peaches are sweeter and softer.
Ripeness Matters
Choose peaches that are ripe but still firm. Overripe peaches can become mushy and may not dry evenly. Underripe peaches lack sweetness and can taste bland after dehydration. A good rule of thumb is to pick peaches that yield slightly to gentle pressure.
Organic vs. Conventional
Organic peaches are ideal because you skip the concern about pesticide residue on the skin. However, conventional peaches work perfectly fine too, especially if you plan to peel them before drying. Washing any peaches thoroughly before starting is always a good practice.
What You Need Before You Start
Gathering your supplies ahead of time makes the whole process smoother. Here is everything you need for successful oven dehydration of peaches.
Essential Equipment
- Ripe peaches: About 3-4 pounds for one batch
- Baking sheets: Rimmed sheets work best to catch any drips
- Parchment paper or silicone mats: Prevents sticking and makes cleanup easy
- A sharp knife and cutting board: For slicing and pitting
- A large pot and ice water: For blanching and peeling
- Citric acid or lemon juice: To prevent browning
- Airtight containers: For storing the finished product
Optional Helpful Tools
A mandoline slicer helps you achieve uniform thickness, which is crucial for even drying. A fruit peeler saves time if you are processing large quantities. Some people also use a corer to remove the pit more efficiently. While these tools are not required, they do make the process faster and more consistent.
Step-By-Step Oven Dehydration Process
Now for the fun part. Follow these simple steps to create perfect dried peaches in your own kitchen.
Step 1: Wash And Prep Your Peaches
Rinse your peaches under cool running water. Use a vegetable brush if needed to remove any fuzz or residue. Pat them dry with a clean towel before moving to the next step.
Step 2: Blanch And Peel
Bring a large pot of water to a rolling boil. Prepare a bowl of ice water nearby. Submerge each peach in the boiling water for about 30 seconds, then transfer it to the ice water. The skin will slip right off after this quick blanching process. This step is essential for smooth, professional-looking oven dried peaches.
Step 3: Slice Evenly
Cut each peach in half around the pit. Remove the pit and slice the halves into thin wedges, about 1/4 inch thick. Uniform thickness is the secret to even drying. Thicker slices take longer and may not dry completely, while thinner ones can become too crispy.
Step 4: Prevent Browning
Place your slices in a bowl and toss them lightly with lemon juice or a diluted citric acid solution. This simple step keeps your peach chips looking golden and appetizing throughout the dehydration process. It also adds a subtle brightness to the flavor.
Step 5: Arrange On Baking Sheets
Lay the peach slices in a single layer on your prepared baking sheets. Do not overlap the slices. Leave a small gap between each piece to allow air to circulate. Proper spacing is one of the most overlooked tips for successful oven dehydration.
Step 6: Place In The Oven
Put the baking sheets on the middle rack of your oven. Prop the oven door open slightly with a wooden spoon or oven mitt. This allows moisture to escape and prevents the peaches from steaming instead of drying.
Step 7: Monitor And Flip
Check your peaches every 30 minutes. Rotate the baking sheets from top to bottom for even drying. Flip each slice gently to ensure both sides dry at the same rate. Most batches take between 4 and 8 hours total.
Step 8: Test For Doneness
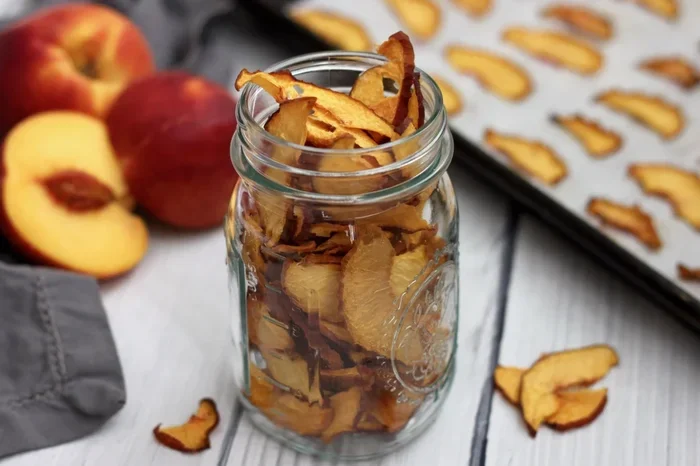
Remove a slice and let it cool completely. It should be dry and leathery but not brittle. If it feels sticky or moist in the center, it needs more time. Properly dried peaches should not snap in half but should bend slightly without feeling wet.
Best Oven Settings For Perfect Peach Chips
Getting the temperature right is the most important factor in dehydrating fruit in the oven. Too hot and you will cook the peaches instead of drying them. Too low and the process will take forever.
Recommended Temperature Range
Set your oven between 130°F and 170°F for optimal results. The ideal temperature is 135°F for most ovens. If your oven does not go that low, use the lowest setting and keep the door propped open. Some ovens have a “warm” setting that works perfectly for this purpose.
Time Guidelines
Drying time varies based on thickness, humidity, and oven type. Here is a general guide:
- Thin slices (1/8 inch): 3-5 hours
- Medium slices (1/4 inch): 5-7 hours
- Thick slices (3/8 inch): 7-10 hours
Humidity And Your Climate
Living in a humid area means your peaches will take longer to dry. You may need to extend the drying time by 1-2 hours. Conversely, dry climates can speed up the process. Always check your peaches frequently during the last few hours to prevent over-drying.
Storing Your Dried Peaches Properly
Proper storage is what separates great dried fruit from fruit that goes to waste. Follow these guidelines to maximize the shelf life of your homemade dried peaches.
Airtight Containers
Store your cooled peach chips in airtight glass jars, vacuum-sealed bags, or food-grade plastic containers. Oxygen exposure is the biggest enemy of dried fruit. The less air your peaches touch, the longer they will stay fresh.
Cool, Dark Storage
Keep your containers in a cool, dark pantry or cupboard. Heat and light degrade the quality of dried fruit over time. A basement or cellar is ideal if you have one available.
Shelf Life Expectations
When stored properly, dried fruit shelf life can range from 6 months to a full year. Vacuum-sealed peaches can last even longer. Always check your stored fruit periodically for any signs of moisture or mold.
Freezing For Long-Term Storage
If you want to keep your dried peaches for more than a year, freezing is your best option. Place the slices in freezer-safe bags, remove as much air as possible, and store in the freezer. Frozen dried peaches can last up to two years without significant quality loss.
Common Mistakes To Avoid
Even simple tasks like oven dehydration come with pitfalls. Learning from others’ mistakes saves you time and frustration.
Skipping The Peeling Step
Some people skip blanching and peeling to save time. While you can dry peaches with the skin on, the texture is less appealing and the skin can trap moisture. Peeling gives you a cleaner, more enjoyable snack.
Overcrowding The Baking Sheets
It is tempting to fit as many slices as possible on each sheet. Overcrowding blocks airflow and leads to uneven drying. Give your peach slices plenty of room. You may need extra baking sheets, but the results are worth it.
Using Too High A Temperature
High heat cooks the fruit rather than drying it. You end up with baked peaches instead of dried peach chips. Patience and low heat are the keys to perfect dehydration.
Not Checking Frequently Enough
Every oven runs differently. Relying solely on a timer without checking can lead to over-drying or under-drying. Make it a habit to check your peaches at least every 30 minutes during the final hours.
Ignoring Moisture In Storage
Even a small amount of moisture trapped in storage containers can cause mold. Always make sure your peach chips are completely cool and dry before sealing them away. Adding a food-safe desiccant packet to your storage container can provide extra insurance.
Creative Ways To Use Your Dried Peaches
Once you have mastered the art of oven dehydration, the fun really begins. Dried peaches are incredibly versatile and can be used in many delicious ways.
Snacking On Their Own
Plain dried peach slices make a satisfying, naturally sweet snack. They are perfect for lunchboxes, road trips, and afternoon pick-me-ups. Kids and adults alike love them as a healthier alternative to candy.
Adding To Trail Mix
Combine your dried peaches with nuts, seeds, dark chocolate chips, and other dried fruits for a custom trail mix. The chewy texture of peaches pairs wonderfully with crunchy almonds and walnuts.
Baking With Dried Peaches
Chop your dried peaches and fold them into muffin batter, bread dough, or cookie recipes. They add natural sweetness and a lovely chewy texture. Try adding them to oatmeal cookies or banana bread for a fruity twist.
Making Peach Leather
Blend your dried peaches with a little water and spread the mixture on a parchment-lined baking sheet. Dehydrate again at 135°F for 2-3 hours to create homemade fruit leather. This is a fantastic way to use any extra dried peaches and a healthy treat for the whole family.
Rehydrating For Cooking
Dried peaches can be rehydrated by soaking them in warm water for 20-30 minutes. Use them in sauces, chutneys, salads, or as a topping for oatmeal and cereal. Rehydrated peaches retain much of their original flavor and add a gourmet touch to simple dishes.
Nutritional Benefits Of Dried Peaches
Dried peaches are not just delicious. They also pack a nutritional punch that makes them a smart addition to any diet.
Dried fruit nutrition concentrates as the water content decreases. This means a small serving of dried peaches contains more fiber, vitamins, and minerals than the same weight of fresh peaches. They are rich in vitamin A, vitamin C, potassium, and dietary fiber.
The natural sugars in dried peaches provide a quick energy boost, making them an excellent pre- or post-workout snack. Because the water has been removed, dried peaches are also much lighter and more portable than fresh fruit.
Keep in mind that portion control matters with dried fruit. The concentration of sugar means it is easy to overconsume. A small handful of dried peaches makes a satisfying and nutritious snack without excess calories.
Expert Tips For Perfect Results Every Time
After testing and refining the oven dehydration method, here are some pro tips that make a noticeable difference.
- Use ripe but firm peaches: They hold their shape better during drying and develop richer flavor.
- Rotate your pans halfway through: Most ovens have hot spots. Rotating ensures even drying on all sides.
- Let slices cool completely before storing: Residual heat can create condensation inside your storage containers.
- Experiment with thickness: Try different slice thicknesses to find your preferred texture, from chewy to crispy.
- Add a light sprinkle of cinnamon: Before drying, a dash of cinnamon adds warmth and flavor to your peach chips.
- Keep a drying log: Note your oven temperature, slice thickness, and drying time for future reference.
Quick Tips Summary
Here is a quick recap of the most important tips for successful oven dehydration of peaches:
- Choose freestone peaches that are ripe but firm.
- Blanch and peel for the best texture and appearance.
- Slice uniformly at about 1/4 inch thick.
- Use lemon juice or citric acid to prevent browning.
- Set your oven to 135°F and prop the door open.
- Check and flip slices every 30 minutes.
- Store in airtight containers in a cool, dark place.
Following these steps consistently will give you professional-quality dried peaches right from your home oven. The process is forgiving and flexible, so do not be afraid to experiment and find what works best for your setup.
Final Thoughts
Dehydrating peaches in the oven is one of the most rewarding and practical kitchen skills you can develop. It requires minimal equipment, very little cost, and delivers delicious, healthy results you can enjoy for months. Whether you are preserving a bumper crop from your garden or simply looking for a wholesome homemade snack, this method delivers every time.
The key to success lies in patience and attention to detail. Low and slow is the golden rule of oven dehydration. Take your time, check your fruit regularly, and trust the process. Once you taste your first batch of homemade peach chips, you will wonder why you ever bought expensive store-bought versions.
Start with a small batch this weekend. You will be surprised at how simple and satisfying the process is. Once you master the basics, you can expand to other fruits like apples, pears, and plums. Oven dehydration opens up a world of homemade dried fruit possibilities right in your kitchen.
So grab some fresh peaches from your local market or farmers’ stand, preheat your oven, and give it a try. Your taste buds and your pantry will thank you. Happy dehydrating!