How To Oven Roast Beef For Mouthwatering Flavor Results
This guide shows you how to oven roast beef for mouthwatering flavor results every time. You’ll learn the best cuts, temperatures, and timing to get a perfect roast. We cover everything from seasoning to resting, so you can impress your family with a juicy, tender roast.
There’s something magical about a slow-roasting beef in the oven. The kitchen fills with a rich, savory aroma that makes everyone gather around the counter. If you want to learn how to oven roast beef for mouthwatering flavor results, you’re in the right place.
Oven roasting beef is one of the simplest cooking methods, yet it delivers restaurant-quality meals. You don’t need fancy equipment or years of experience. With a few basic steps, you can turn a humble cut of meat into a show-stopping centerpiece. This guide walks you through every detail, from choosing the right beef to making a quick pan gravy.
We’ll cover the best cuts, seasoning tricks, oven temperatures, and timing. You’ll also discover common mistakes to avoid and expert tips that make a huge difference. By the end, you’ll feel confident enough to roast beef anytime. Let’s dive in and make your next dinner unforgettable.
Key Takeaways
- Choose the Right Cut: Select well-marbled beef like chuck roast or ribeye for the best flavor and tenderness.
- Season Generously: Use a simple mix of salt, pepper, garlic, and herbs to enhance the natural taste.
- Low and Slow is Key: Roast at a lower temperature for a longer time to keep the meat juicy.
- Use a Meat Thermometer: Pull the beef at 135°F for medium-rare or 145°F for medium for perfect doneness.
- Rest Before Slicing: Let the roast rest for 15-20 minutes so the juices redistribute.
- Make Gravy from the Pan: Deglaze the roasting pan with broth for a rich, flavorful sauce.
📑 Table of Contents
Choosing the Best Beef for Oven Roasting
The first step to a perfect roast is picking the right piece of meat. Not all beef cuts work the same way in the oven. Some become fork-tender, while others stay chewy. Understanding the differences helps you choose with confidence.
Understanding Different Cuts
For oven roasting, you want cuts with enough connective tissue to break down slowly. These cuts become juicy and tender when cooked low and slow. Here are the top choices for oven roasted beef:
- Chuck Roast: This comes from the shoulder. It has great marbling and turns incredibly tender. It’s affordable and perfect for beginners.
- Ribeye Roast: Known for its rich, buttery flavor. It has excellent marbling and stays juicy even if you slightly overcook it.
- Beef Tenderloin: The most tender cut. It’s lean and best for special occasions. It roasts quickly and has a mild, delicate taste.
- Bottom Round Roast: A leaner option from the rear leg. It needs careful cooking to stay moist, but it’s very flavorful.
Each cut has its own personality. Chuck roast is forgiving and great for pot roast-style meals. Ribeye gives you a luxurious, beefy flavor. Tenderloin is elegant but requires close attention. Choose based on your experience level and what you’re craving.
Marbling Matters
When you’re shopping, look for fine streaks of fat running through the meat. This is called marbling. Marbling melts during roasting and bastes the beef from the inside. More marbling means more flavor and a juicier result. Avoid cuts that look too lean or have large chunks of hard fat.
| Cut | Marbling | Best For | Roasting Time |
|---|---|---|---|
| Chuck Roast | High | Falling-apart tenderness, pot roast | 3-4 hours |
| Ribeye Roast | Very High | Rich flavor, medium-rare perfection | 1.5-2 hours |
| Beef Tenderloin | Low | Lean, elegant roasts, quick cooking | 20-40 minutes |
| Bottom Round Roast | Moderate | Budget-friendly, sliced for sandwiches | 2.5-3 hours |
This table helps you compare the most popular oven roast beef options. Keep it handy when you’re at the butcher or grocery store.
How to Prep Your Beef Roast
Preparation is where the magic begins. Taking a few extra minutes here makes a big difference in the final flavor and texture. You’ll want to follow these simple steps every time.
Seasoning for Maximum Flavor
A basic seasoning blend lets the beef shine. You don’t need a long list of ingredients. Start with coarse salt and freshly ground black pepper. Then add garlic powder, onion powder, and dried herbs like rosemary or thyme. Rub the seasoning all over the meat, including the sides and ends.
For an extra layer of flavor, make a quick paste. Mix minced garlic, chopped fresh rosemary, olive oil, and a pinch of salt. Spread it over the beef and let it sit for at least 30 minutes. If you have time, refrigerate it overnight. The flavors will penetrate deeper, creating a more intense taste.
Some cooks like to sear the roast first. This adds a beautiful brown crust and locks in juices. Heat a little oil in a skillet, then sear each side for about 2 minutes. This step is optional but highly recommended for the best results.
Bringing Meat to Room Temperature
This is a step many people skip. Take the beef out of the fridge 30-60 minutes before roasting. Letting it sit at room temperature helps it cook more evenly. The center won’t be cold when the outside is already done. This simple trick leads to a more consistent roast throughout.
Quick Tip: Pat the beef dry with paper towels before seasoning. Dry meat browns better and develops a tastier crust.
Oven Temperature and Timing Guide
Getting the temperature right is the most important part of how to oven roast beef. Too high and the outside burns before the inside cooks. Too low and you end up with a gray, tough roast. The sweet spot is a moderate temperature that allows the meat to cook gently.
Low and Slow vs. High Heat
Most oven roast beef recipes use a low and slow approach. Roasting at 325°F gives you a tender, juicy result every time. The low heat breaks down the connective tissues without drying out the meat. If you’re short on time, you can roast at 375°F, but you’ll need to watch it closely.
High heat roasting (425°F or above) works well for smaller, tender cuts like beef tenderloin. The intense heat creates a deep brown crust quickly. But for tougher cuts like chuck roast, stick with the low and slow method. It’s the secret to falling-apart tenderness.
Internal Temperature Targets
A meat thermometer is your best friend. It takes the guesswork out of roasting. Here are the target internal temperatures for different levels of doneness:
- Rare: 125°F – 130°F. The center is cool and red. This is not recommended for beef roasts because the texture can be too soft.
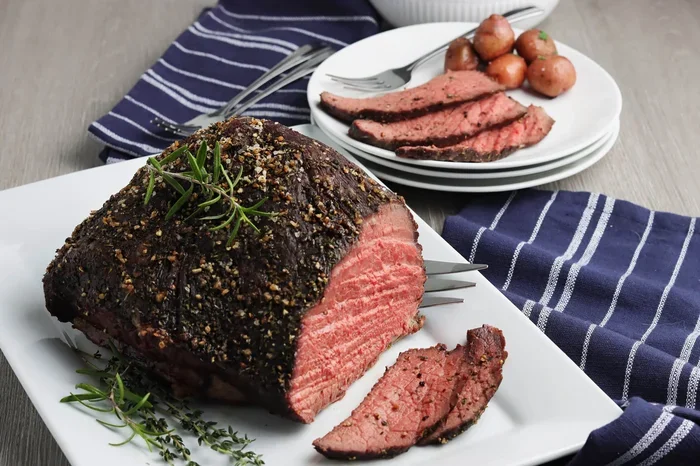
- Medium-Rare: 135°F – 140°F. The center is warm and pink. This is the sweet spot for flavor and juiciness.
- Medium: 145°F – 155°F. The center is pink and firm. A good choice for those who prefer less pink.
- Well-Done: 160°F and above. The meat is gray throughout. This can dry out the roast, so it’s best to avoid it.
Remember that the temperature will rise 5-10 degrees after you take the roast out. This is called carryover cooking. Pull the beef off the heat a few degrees before it reaches your target. The final result will be perfect.
| Beef Cut | Oven Temp | Approx. Time (per lb) | Target Temp |
|---|---|---|---|
| Chuck Roast | 325°F | 30-35 minutes | 145°F (medium) |
| Ribeye Roast | 325°F | 20-25 minutes | 135°F (medium-rare) |
| Beef Tenderloin | 425°F | 15-20 minutes | 135°F (medium-rare) |
| Bottom Round Roast | 325°F | 25-30 minutes | 145°F (medium) |
Use this table as a starting point. Every oven runs a little differently, so always rely on your meat thermometer. It’s the single most important tool for perfect oven roast beef.
The Secret to Juicy, Tender Roast Beef
Even with the right cut and temperature, you can still end up with dry meat if you skip a few key steps. The secret lies in what you do after the roast comes out of the oven.
Why Resting is Crucial
Resting is not just a waiting period. It’s a critical part of cooking. When the roast comes out of the oven, the juices are pushed toward the center. If you cut into it right away, those juices run out onto the cutting board. The meat becomes dry and less flavorful.
Instead, transfer the roast to a cutting board and tent it loosely with aluminum foil. Let it rest for 15-20 minutes. During this time, the juices redistribute evenly throughout the meat. When you finally slice, every piece is moist and tender. The temperature will also stabilize, making it easier to serve.
Expert Insight: Chef Maria Torres always tells her students, “A roast that rests is a roast that sings. Never skip this step, no matter how eager you are to eat.”
Slicing Against the Grain
How you slice the roast affects the texture just as much as the cooking process. Meat has muscle fibers that run in one direction. If you slice parallel to those fibers, each bite is chewy and tough. If you slice perpendicular to them, the fibers are shortened, and the meat feels tender.
Look at the roast and find the direction of the grain. Then cut across it, not with it. Use a sharp carving knife and make smooth, even slices. This trick transforms a good roast into a great one.
Common Mistake: Skipping the rest and slicing immediately leads to dry, tough meat. Set a timer and be patient.
Making Pan Gravy from the Roasting Juices
One of the best parts of oven roast beef is the flavorful pan drippings. Don’t let them go to waste. With just a few minutes of effort, you can turn them into a rich, silky gravy that elevates the whole meal.
Deglazing the Pan
After you remove the roast, place the roasting pan on the stovetop over medium heat. You’ll see browned bits stuck to the bottom. These are called fond, and they’re packed with flavor. Pour in a cup of beef broth, red wine, or even water. Use a wooden spoon to scrape up all those browned bits. Let the liquid simmer for a few minutes.
Simple Gravy Steps
Once you have a flavorful liquid, it’s time to thicken it. Sprinkle in a tablespoon of flour or cornstarch while whisking constantly. Cook for 2-3 minutes until the gravy thickens and turns glossy. Season with salt and pepper to taste. If it’s too thick, add a splash more broth. If it’s too thin, let it simmer a little longer.
Quick Tip: Add a splash of red wine or a spoonful of Dijon mustard while deglazing for an extra layer of flavor. It pairs beautifully with any roast.
Pour the gravy into a small pitcher and serve it alongside the sliced roast. Your family will think you spent hours in the kitchen. In reality, it took just five extra minutes.
Common Mistakes to Avoid
Even experienced cooks can make errors when roasting beef. Knowing what goes wrong helps you avoid the same pitfalls. Here are the most common mistakes and how to fix them.
Overcooking the Roast
The biggest fear with oven roast beef is drying it out. This usually happens when you cook too long or at too high a temperature. Always use a meat thermometer and check the temperature early. Start checking 15 minutes before the estimated finish time. Once you hit the target, pull it out immediately.
Another cause of overcooking is relying on the oven timer alone. Ovens vary, and the roast size affects cooking time. The thermometer never lies. Trust it over any printed recipe time.
Neglecting the Meat Thermometer
Some cooks still use the “poke test” or guess the doneness. This is a recipe for disappointment. A meat thermometer costs just a few dollars and takes the guesswork out completely. Insert it into the thickest part of the roast, away from the bone or fat. You’ll get consistent results every single time.
Using the Wrong Pan
A small pan can cause the beef to steam instead of roast. Choose a roasting pan that’s large enough to hold the meat with a few inches of space around it. This allows hot air to circulate freely. If you don’t have a roasting pan, a rimmed baking sheet works in a pinch. Avoid glass pans for high-heat roasting, as they can crack.
Final Thoughts
Learning how to oven roast beef is a skill that pays off for years. Once you master the basics, you can experiment with different cuts, seasonings, and flavors. The process is forgiving, and even small mistakes still yield a delicious meal. The aroma alone will make your home feel warm and inviting.
Start with a simple chuck roast. Follow the steps in this guide. Use a meat thermometer. Let the roast rest. Make the gravy from the pan. You’ll be amazed at the results. Soon, oven roast beef will be your go-to dinner for family gatherings, holidays, and cozy weeknight meals.
The key to mouthwatering flavor results is patience and attention to detail. Don’t rush the process. Enjoy the journey from raw meat to a beautiful, juicy roast. Your kitchen will smell incredible, and your taste buds will thank you. Now it’s your turn. Fire up the oven and create your perfect roast beef tonight.
Frequently Asked Questions
What is the best beef cut for oven roasting?
Chuck roast and ribeye roast are the best choices for most people. They have great marbling, which keeps the meat juicy. Beef tenderloin works well for leaner, more elegant roasts. Choose based on your budget and flavor preference.
How long does it take to oven roast beef?
It depends on the cut and size. A chuck roast takes 3-4 hours at 325°F. A ribeye roast takes 1.5-2 hours. Beef tenderloin cooks in just 20-40 minutes. Always use a meat thermometer to check doneness rather than relying on time alone.
Should I cover the beef with foil while roasting?
No, you should roast beef uncovered. This allows the outside to brown and develop a flavorful crust. You only cover the roast with foil while it rests after cooking, to keep it warm and let the juices redistribute.
What temperature should I roast beef at?
325°F is the ideal temperature for most oven roast beef cuts. It cooks the meat gently and evenly. For smaller, tender cuts like tenderloin, you can use 425°F for a faster roast with a nice sear.
How do I know when the roast is done?
Use a meat thermometer inserted into the thickest part of the roast. For medium-rare, aim for 135°F. For medium, aim for 145°F. Remember the temperature will rise a few degrees after you take it out of the oven.
Can I use the drippings to make gravy?
Absolutely. The drippings are full of flavor. Deglaze the roasting pan with beef broth or red wine, scrape up the browned bits, and simmer with a little flour or cornstarch to thicken. It makes a simple, delicious pan gravy in minutes.