Whirlpool Oven Broiler How To Use For Perfect Results
Using your Whirlpool oven broiler is easier than you think. This guide walks you through everything from setup to cleanup, so you can get perfectly broiled food every single time. You will learn how to position the rack, choose the right broil setting, and avoid common pitfalls that ruin your meals.
Have you ever wondered how to get that beautiful golden crust on your steak or perfectly melted cheese on your casserole? The answer is simple. You need to use the Whirlpool oven broiler correctly. Many home cooks own a Whirlpool oven but rarely use the broiler function. They miss out on one of the most powerful cooking tools in their kitchen.
This guide will change that. Whether you are a beginner or someone who just wants better results, you will find everything you need here. We will cover setup, technique, best foods, and common mistakes. By the end, you will feel confident using your Whirlpool oven broiler every single week.
Key Takeaways
- Know your broiler: Understanding the top heating element and rack positions makes all the difference.
- Preheat matters: Always preheat the broiler for 5-10 minutes before cooking.
- Watch your food closely: Broiling happens fast, so stay near the oven.
- Use the right pan: A broiler pan or drip pan prevents messes and flare-ups.
- Distance is key: Keep food 4-6 inches from the top element for best results.
- Clean regularly: A clean broiler works better and lasts longer.
- Broiling vs baking: Broiling uses direct high heat from above, while baking uses surrounding heat.
📑 Table of Contents
- Understanding Your Whirlpool Oven Broiler
- How to Set Up and Use the Broiler
- Best Foods to Broil in Your Whirlpool Oven
- Broiling Tips for Perfect Results Every Time
- Common Mistakes to Avoid When Broiling
- Cleaning and Maintaining Your Whirlpool Broiler
- Broil vs Bake: Understanding the Difference
- Frequently Asked Questions
- Conclusion
Understanding Your Whirlpool Oven Broiler
Before you start cooking, it helps to know what you are working with. The broiler in a Whirlpool oven uses a top heating element that produces intense direct heat. This is very different from baking, which heats food from all around. The broiler cooks food from above, giving it that signature charred, caramelized finish.
Most Whirlpool ovens come with a broiler drawer or an interior broiler compartment. The drawer style is common in slide-in ranges, while the interior broiler is found in many freestanding models. Both work the same way. They direct high heat straight down onto your food.
How the Broiler Heating Element Works
The top heating element glows red when it is on. This is your signal that the broiler is heating up. The element reaches very high temperatures, usually between 500 and 550 degrees Fahrenheit. This intense heat quickly sears the surface of food, creating a flavorful crust while keeping the inside moist.
Some Whirlpool models also offer a convection broil setting. This combines the top heating element with a fan that circulates hot air. The fan helps cook food more evenly. If your model has this feature, use it for larger items like whole chickens or multiple racks of food.
Rack Positions and Why They Matter
The rack position is one of the most important parts of broiling. You want your food close enough to the heat source to get a good sear, but not so close that it burns. Most Whirlpool ovens have multiple rack positions to choose from.
Here is a quick guide:
- Top rack (closest to the element): Use for thin foods like burgers, fish fillets, and sliced vegetables.
- Middle rack: Great for thicker items like chicken breasts or pork chops.
- Bottom rack: Best for larger cuts that need more time, like roasts or whole turkeys.
A good rule of thumb is to keep your food about 4 to 6 inches from the top element. This distance gives you control over how quickly the food cooks.
How to Set Up and Use the Broiler
Setting up your Whirlpool oven broiler is straightforward. Follow these steps and you will be broiling like a pro in no time.
Step 1: Choose the Right Pan
Always use a broiler pan or a drip pan with a wire rack. The pan catches grease and drippings, while the rack allows hot air to circulate around the food. This setup prevents flare-ups and makes cleanup much easier.
If you do not have a broiler pan, you can use a baking sheet lined with aluminum foil. Place a wire rack on top. Just make sure the pan is oven-safe and can handle high heat.
Step 2: Preheat the Broiler
Preheating is essential. Turn the oven to the broil setting and let it heat for at least 5 to 10 minutes. This ensures the top element reaches the right temperature before your food goes in.
Some Whirlpool ovens have a preheat indicator light. Wait until this light turns off before placing your food inside. Skipping this step leads to uneven cooking and disappointing results.
Step 3: Position the Rack
Move the oven rack to the correct position before preheating. Remember the 4 to 6 inch guideline. Adjust the rack based on the thickness of your food and how quickly you want it to cook.
Step 4: Place Your Food and Broil
Once the broiler is hot, place your food on the prepared pan. Slide the pan into the oven on the center rack. Close the door slightly ajar if your model allows it. This lets steam escape and helps the food crisp up better.
Set a timer. Broiling happens fast. Most foods need only 5 to 10 minutes. Check on your food frequently and flip it halfway through for even cooking.
Step 5: Check for Doneness
Use a food thermometer to check the internal temperature of meats. This is the most reliable way to know if your food is done. Here are some target temperatures:
- Chicken: 165 degrees Fahrenheit
- Steak: 135 to 145 degrees Fahrenheit (depending on how you like it)
- Fish: 145 degrees Fahrenheit
- Pork: 145 degrees Fahrenheit
Remove the food as soon as it reaches the right temperature. The residual heat will continue cooking it slightly after you take it out.
Best Foods to Broil in Your Whirlpool Oven
The broiler shines when it comes to certain foods. The intense top-down heat works magic on items that benefit from a crispy, caramelized exterior. Here are the best foods to try.
Meats and Poultry
Steaks, chicken breasts, and pork chops all come out beautifully broiled. The high heat sears the outside quickly, locking in juices. Thin cuts work best because they cook fast and evenly.
For thicker cuts, try broiling from one side first, then flipping and finishing on the other side. This technique gives you a great crust without overcooking the inside.
Seafood
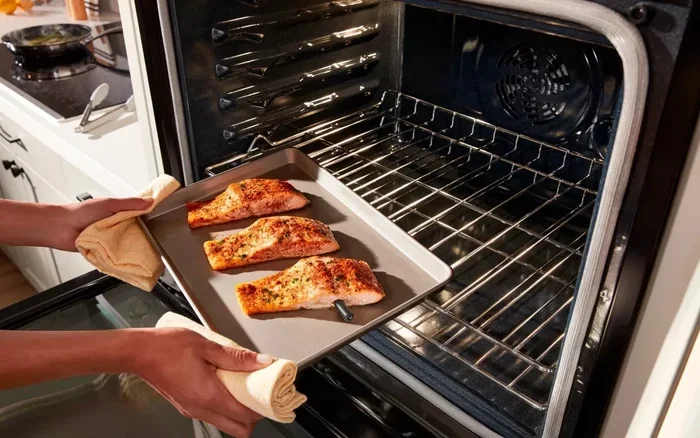
Fish fillets like salmon, tilapia, and cod broil wonderfully. Shrimp and scallops also take well to the broiler. Place seafood on the top rack and watch it closely. Most fish needs only 4 to 6 minutes.
Brush your seafood with a little olive oil and seasoning before broiling. This adds flavor and helps prevent sticking.
Vegetables
Broiled vegetables are a game changer. Broccoli, bell peppers, zucchini, and asparagus all develop a smoky, slightly charred flavor that is hard to achieve any other way.
Cut vegetables into uniform pieces so they cook evenly. Toss them with olive oil, salt, and pepper. Spread them in a single layer on the broiler pan. Broil for 3 to 5 minutes, flipping halfway through.
Cheese and Casseroles
Ever want that perfect golden brown top on a casserole or gratin? The broiler is your best friend. Sprinkle cheese on top and place the dish under the broiler for 2 to 3 minutes. Watch it closely. Cheese can go from perfectly bubbly to burnt in seconds.
French onion soup is another classic dish that benefits from broiling. Ladle the soup into oven-safe bowls, top with bread and cheese, and broil until bubbly and golden.
Broiling Tips for Perfect Results Every Time
Getting great results with your Whirlpool oven broiler comes down to a few simple techniques. These tips will help you avoid common problems and elevate your broiling game.
Keep the Oven Door Slightly Open
Most Whirlpool ovens allow you to leave the door cracked open during broiling. This lets excess heat and steam escape. It also prevents the oven from overheating, which can trigger the automatic shut-off on some models.
Leaving the door open also gives you a clear view of your food. This makes it much easier to monitor the cooking process and prevent burning.
Use the Right Amount of Oil and Seasoning
A light coat of oil helps food brown evenly. Too much oil can cause excessive smoke and flare-ups. Use a spray bottle or a brush to apply a thin, even layer.
Season your food generously before broiling. The high heat intensifies flavors, so a little seasoning goes a long way. Try garlic powder, paprika, cumin, or fresh herbs for extra depth of flavor.
Flip Food Halfway Through
Flipping your food ensures even browning on both sides. Use tongs to turn items carefully. The pan and the food will be very hot, so be careful.
For vegetables, flipping helps all sides get that nice char. For meats, flipping promotes even cooking from edge to edge.
Do Not Overcrowd the Pan
Give each piece of food space. Overcrowding blocks hot air from circulating and leads to uneven cooking. Steam gets trapped, and instead of getting a crispy exterior, your food ends up soggy.
Cook in batches if needed. It is better to do two rounds than to crowd everything onto one pan.
Let Food Rest After Broiling
Just like with baking or grilling, letting food rest after broiling is important. Remove the pan from the oven and let the meat sit for 3 to 5 minutes. This allows the juices to redistribute, resulting in a more tender and flavorful bite.
Quick Tips for Better Broiling
- Always preheat the broiler before adding food.
- Use a wire rack for better air circulation.
- Line the bottom pan with foil for easy cleanup.
- Keep a spray bottle of water handy to tame flare-ups.
- Never leave the broiler unattended.
- Use a food thermometer for meats to avoid under or overcooking.
- Pat food dry before broiling for a better sear.
Common Mistakes to Avoid When Broiling
Even experienced cooks make mistakes with the broiler. Knowing what to avoid will save you from ruined meals and frustration.
Not Preheating the Broiler
This is the number one mistake. Putting cold food into a cold broiler leads to uneven cooking. The outside will burn before the inside is done. Always preheat for at least 5 minutes.
Using the Wrong Pan
Do not use glass, plastic, or regular baking pans in the broiler. These materials cannot handle the extreme heat and may crack or melt. Stick to metal broiler pans, cast iron skillets, or oven-safe wire racks.
Placing Food Too Far from the Element
If your food is too far from the top element, it will not get the intense heat it needs. You will end up with pale, steamed food instead of a beautifully broiled result. Adjust the rack closer if needed.
Leaving Food Unattended
Broiling is fast and intense. Food can go from perfectly done to burnt in under a minute. Stay in the kitchen and watch your food closely. Set a timer on your phone if you need to.
Overcooking Thin Cuts
Thin foods like fish fillets and burger patties cook very quickly under the broiler. Check them early and often. It is always better to undercook slightly and add more time than to overcook and ruin the meal.
Ignoring Flare-Ups
Grease dripping onto the heating element can cause flames. This is normal, but it needs to be managed. Keep a spray bottle of water nearby. A few spritzes will tame small flare-ups quickly. If flames get large, turn off the broiler and let the fire die down before opening the oven.
Cleaning and Maintaining Your Whirlpool Broiler
Keeping your Whirlpool oven broiler clean ensures it performs well every time you use it. A dirty broiler can cause smoke, off-flavors, and even grease fires. Cleaning takes just a few minutes with the right approach.
Clean After Every Use
Wait for the oven to cool down before cleaning. Remove the broiler pan and drip pan. Soak them in warm soapy water to loosen grease and food residue. Use a non-abrasive sponge to scrub them clean.
For tough, baked-on grime, make a paste of baking soda and water. Apply it to the stuck-on areas and let it sit for 15 minutes before scrubbing. This natural cleaner works wonders without damaging the pan surface.
Clean the Oven Interior
Wipe down the inside of the oven with a damp cloth. Pay special attention to the area around the top heating element. Grease buildup on the element can cause smoke during future broiling sessions.
If your Whirlpool oven has a self-clean cycle, use it periodically. This feature heats the oven to very high temperatures, burning off residue. Just make sure you remove the broiler pans before running the self-clean cycle.
Replace Damaged Parts
Check the broiler element regularly for damage. If you notice any cracks, warping, or areas that do not glow red when heating, it is time to replace the element. A damaged element cooks unevenly and wastes energy.
Replacement parts for Whirlpool ovens are widely available online and at hardware stores. Most are easy to install with basic tools. Refer to your oven manual for specific instructions.
Broil vs Bake: Understanding the Difference
Many people confuse broiling with baking. While both use an oven, the cooking methods are very different. Understanding these differences helps you choose the right technique for every dish.
Baking uses indirect heat that surrounds the food from all sides. The bottom heating element and sometimes the top element work together to create a consistent oven temperature. Baking is ideal for bread, cakes, cookies, and casseroles that need even, gentle heat over a longer period.
Broiling uses direct, intense heat from above. The top element blasts food with high infrared energy. This creates a rapid sear and caramelized surface. Broiling is perfect for thin cuts of meat, vegetables, and dishes that need a golden top finish.
Think of it this way. Baking is like a gentle, even hug. Broiling is like a quick, powerful sunburn. Both have their place in the kitchen, and knowing when to use each one makes you a better cook.
Here is a simple comparison:
- Baking: Lower heat, longer cooking time, even heat from all sides, great for baked goods and roasts.
- Broiling: High heat, short cooking time, direct heat from above, great for searing and browning.
Some recipes actually use both methods. You might bake a casserole first and then broil it at the end to get that golden, bubbly top. This two-step approach combines the best of both techniques.
Frequently Asked Questions
What temperature does a Whirlpool oven broiler reach?
Most Whirlpool oven broilers reach temperatures between 500 and 550 degrees Fahrenheit. This intense heat is what gives broiled food its characteristic sear and caramelized flavor. Always preheat the broiler for 5 to 10 minutes to ensure it reaches the proper temperature before cooking.
Can I use a regular baking sheet in the broiler?
Yes, but only if it is made of metal. Glass, ceramic, and plastic baking sheets can crack or melt under broiler heat. For best results, use a metal broiler pan, a cast iron skillet, or a metal baking sheet lined with aluminum foil. Always check that your pan is labeled oven-safe.
How do I prevent flare-ups when broiling?
Flare-ups happen when grease drips onto the heating element. To prevent them, use a drip pan or broiler pan to catch excess grease. Keep a spray bottle of water nearby to tame small flames. Trim excess fat from meats before broiling, and always stay near the oven while cooking.
How long should I broil food in my Whirlpool oven?
Most foods broil for 5 to 10 minutes. Thin items like fish fillets and burger patties may need only 4 to 5 minutes. Thicker cuts like chicken breasts or steaks might need 8 to 10 minutes. Flip food halfway through for even cooking, and always use a food thermometer to check for doneness.
Is it safe to leave the oven door open while broiling?
Yes, leaving the door slightly open is safe and actually recommended for most Whirlpool models. It allows heat and steam to escape, which helps food crisp up better. It also prevents the oven from overheating and triggering the automatic shut-off. Just make sure the door is secure and will not fall all the way open.
What is the difference between convection broil and regular broil?
Convection broil uses the top heating element along with a fan that circulates hot air. This helps cook food more evenly, especially for larger items. Regular broil uses only the top element without a fan. Regular broil works best for thin foods that cook quickly, while convection broil is great for larger or multiple items.
Conclusion
Mastering the Whirlpool oven broiler is one of the easiest ways to elevate your home cooking. The intense, direct heat creates flavors and textures that no other cooking method can match. From perfectly seared steaks to golden casseroles and charred vegetables, the broiler opens up a world of delicious possibilities.
Remember to preheat, use the right rack position, and watch your food closely. Avoid common mistakes like using the wrong pan or leaving food unattended. Keep your broiler clean and well-maintained for the best performance every time.
With the tips and techniques in this guide, you are now ready to use your Whirlpool oven broiler with confidence. Try it this week. Pick your favorite food, fire up the broiler, and enjoy the amazing results. Once you start broiling regularly, you will wonder how you ever cooked without it.