How To Dehydrate Celery In Oven And Keep It Crispy
Dehydrating celery in the oven is one of the easiest ways to make crunchy celery chips at home. This guide shows you exactly how to dehydrate celery in oven so it stays crispy and full of flavor. You will learn the right temperature, timing, and storage tips to get perfect results every time. Whether you want a healthy snack or a cooking ingredient, dried celery is a game changer. Follow these simple steps and enjoy crispy celery all year round.
Have you ever wondered how to turn a simple bunch of celery into a crunchy, delicious snack? The answer is easier than you think. Dehydrating celery in oven is a straightforward process that anyone can master at home.
Whether you are looking for a healthy alternative to potato chips or want to preserve celery for cooking, oven drying is the way to go. It requires no fancy equipment. Just your kitchen oven, a cutting board, and a little patience. In this guide, you will learn everything you need to know about dehydrate celery in oven and keep it perfectly crispy.
Dried celery makes an excellent snack on its own. You can crush it into soup mixes, sprinkle it over salads, or use it as a seasoning base. The possibilities are endless once you know how to do it right. Let us dive in and explore the full process step by step.
Key Takeaways
- Low and slow is the key: Use 170-200°F to dehydrate celery evenly without burning it.
- Slice matters: Thin, uniform slices dry faster and turn out crispier.
- Pat dry before baking: Removing surface moisture helps achieve the best crunch.
- Flip halfway through: This ensures even drying on both sides.
- Store properly: Airtight containers keep dried celery crispy for weeks.
- Oven vs dehydrator: Your oven works great for dehydrating celery with a few simple adjustments.
- Get creative with seasoning: Salt, pepper, and garlic powder make amazing celery chips.
📑 Table of Contents
- Why Dehydrate Celery in Oven?
- How to Prepare Celery for Dehydration
- Best Oven Temperature for Dehydrating Celery
- Step-by-Step: How to Dehydrate Celery in Oven
- How to Keep Dried Celery Crispy
- Creative Uses for Dried Celery
- Common Mistakes to Avoid
- Expert Tips for Perfect Oven-Dried Celery
- Frequently Asked Questions
- Conclusion
Why Dehydrate Celery in Oven?
Oven dehydration is one of the most accessible methods for drying vegetables at home. Not everyone owns a food dehydrator, but nearly everyone has an oven. This makes the oven method the most practical choice for most households.
When you dehydrate celery in oven, you remove the water content slowly and evenly. This preserves the natural flavor and nutrients. The result is a lightweight, crispy snack that can last for weeks when stored correctly.
Here are some great reasons to try oven drying for your celery:
- No special equipment needed: You only need a standard oven and baking sheets.
- Cost effective: Skip the expense of buying a dedicated dehydrator machine.
- Full control: You can adjust temperature and time to match your preference.
- Great results: When done right, oven-dried celery turns out incredibly crispy.
- Batch friendly: You can dry large quantities of celery in a single session.
Many people also ask about dehydrator vs oven for drying vegetables. While a dehydrator offers more consistency, an oven works wonderfully for celery. The key is maintaining a low temperature and being patient throughout the process.
Health Benefits of Dried Celery
Celery is already a nutritious vegetable. It is low in calories and high in fiber. When you dry it, most of the vitamins and minerals remain intact. Dried celery retains its potassium, vitamin K, and antioxidant properties.
Because the water is removed, dried celery becomes a concentrated source of nutrients. This means you get more nutrition per serving compared to fresh celery. It is also a great source of dietary fiber, which supports healthy digestion.
How to Prepare Celery for Dehydration
Proper preparation is the foundation of great dried celery. Skipping this step often leads to uneven drying or soggy results. Take your time here, and the rest of the process will go smoothly.
Choosing the Right Celery
Start with fresh, firm celery stalks. Look for celery that is bright green and crisp. Avoid celery that has wilted, brown spots, or soft patches. The fresher your starting celery, the better your final product will be.
Organic celery is a great choice if you have it available. Since you will be eating the skin, avoiding pesticides is always a smart move. But regular celery works perfectly fine too. Just make sure to wash it thoroughly.
Washing and Slicing
Rinse your celery under cold running water. Use a vegetable brush to gently scrub away any dirt or residue. Pat the stalks completely dry with a clean towel. Removing as much surface moisture as possible helps the drying process significantly.
Now it is time to slice. Use a sharp knife or a mandoline slicer for the best results. Here are some tips for slicing celery for dehydration:
- Cut slices about 1/8 inch thick: This is the sweet spot for crispy results.
- Keep slices uniform: Even thickness ensures everything dries at the same rate.
- Remove the ribs and leaves: The outer ribs and leaves can dry faster and become overly brittle.
- Cut away the base and top: These parts are tougher and may not dry evenly.
If you want extra crispy celery chips, you can slice them even thinner. Just be careful not to make them so thin that they burn during drying. A consistent thickness of about one-sixteenth to one-eighth of an inch works beautifully.
Patting Dry
This is a step many people overlook. After slicing, lay your celery pieces on a clean kitchen towel. Gently pat them dry on both sides. Removing surface moisture helps the oven do its job more efficiently.
You can also let the slices air dry for about 15 to 20 minutes before placing them on the baking sheet. This small extra step can make a noticeable difference in the final texture of your crispy celery.
Best Oven Temperature for Dehydrating Celery
Getting the temperature right is the single most important factor in oven dehydration. Too hot, and your celery will burn before the moisture escapes. Too low, and it will take forever and may not dry properly.
Recommended Temperature Range
The ideal temperature range for dehydrate celery in oven is between 170°F and 200°F. Most experts agree that 175°F is the sweet spot. This low heat allows moisture to evaporate slowly while keeping the celery from cooking or charring.
If your oven does not go this low, you can crack the oven door slightly. This helps release moisture and keeps the temperature from climbing too high. Some people even place a wooden spoon in the oven door to keep it slightly ajar.
Here is a quick reference for oven drying temperatures:
- 170-175°F: Best for slow, even drying. Produces the crispiest results.
- 180-200°F: Works well but requires closer monitoring to prevent burning.
- Above 200°F: Not recommended. Celery will cook rather than dehydrate.
Why Low Heat Matters
Dehydration is not the same as cooking. The goal is to remove water, not to cook the celery. Low heat achieves this by allowing moisture to escape gradually. This preserves the color, flavor, and nutritional value of the celery.
High heat causes the outside of the celery to cook and brown before the inside has time to dry. This leads to uneven texture and a loss of the crispy quality you are aiming for. Keep that oven temperature low and steady for the best outcome.
Step-by-Step: How to Dehydrate Celery in Oven
Now that your celery is prepared and your oven is set, it is time to start the drying process. Follow these steps for perfect results every time.
Step 1: Arrange Slices on Baking Sheets
Line your baking sheets with parchment paper or silicone mats. This prevents sticking and makes cleanup much easier. Arrange the celery slices in a single layer with no overlapping. Air needs to flow around each piece for even drying.
If your oven has multiple racks, you can use them all. Just make sure to rotate the trays halfway through the process. This helps compensate for any hot spots in your oven.
Step 2: Place in the Oven
Put the baking sheets on the middle rack of your oven. If you are using the crack-the-door method, place a wooden spoon or a folded oven mitt to hold the door open slightly. This allows moisture to escape as the celery dries.
Set a timer for the first hour. You will check on the celery regularly after that. Oven drying times can vary based on your specific oven, humidity levels, and slice thickness.
Step 3: Flip the Slices
After the first hour, open the oven and carefully flip each celery slice. Use tongs or a spatula to turn them over. This ensures both sides dry evenly and helps prevent one side from becoming too brittle.
Continue checking and flipping every 30 to 45 minutes. This regular turning is what separates good dried celery from great dried celery.
Step 4: Test for Doneness
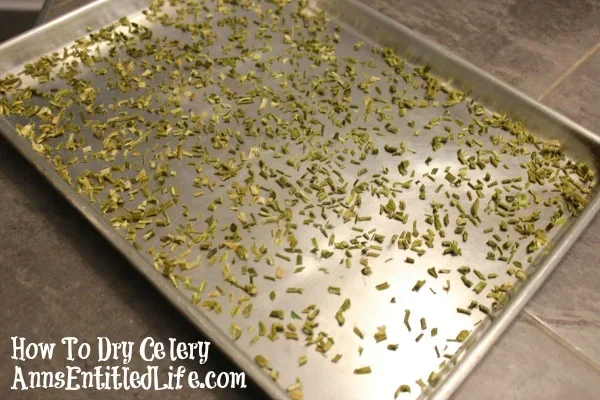
Celery is done when it is dry and crispy throughout. It should snap easily when you bend it. If it bends without breaking, it needs more time in the oven.
Here are signs your celery is properly dehydrated:
- It snaps cleanly when bent.
- It feels dry and lightweight.
- There is no moisture or flexibility left.
- The color is a uniform light green or slightly darker.
Total drying time typically ranges from 2 to 4 hours. Thinner slices will be done faster, while thicker pieces may need additional time. Trust the texture test rather than the clock alone.
Step 5: Cool Completely
Once the celery is done, remove the baking sheets from the oven. Let the slices cool completely on the trays. This is important because the celery will crisp up as it cools.
Do not store warm celery. Trapped heat will create condensation inside the storage container, and that moisture will make your crispy celery soggy. Wait until the slices are completely room temperature before moving to storage.
How to Keep Dried Celery Crispy
The drying process is only half the battle. Keeping your celery crispy after it comes out of the oven requires proper storage techniques. Even perfectly dried celery can lose its crunch if stored incorrectly.
Storage Containers
The best containers for storing dried celery are airtight and moisture-proof. Glass jars with tight-fitting lids work wonderfully. So do vacuum-sealed bags and heavy-duty zip-lock containers.
Avoid using paper bags or loosely covered bowls. These allow moisture from the air to seep in and soften your celery chips. The goal is to create a sealed environment with no humidity.
Adding Desiccant Packets
For extra protection, add a food-safe desiccant packet to your storage container. These small packets absorb any residual moisture and help maintain crispiness for a longer period. You can find them in bulk online or reuse them from store-bought packages.
This is a simple trick that makes a big difference. Especially if you live in a humid climate where moisture in the air is always a concern.
Storage Location
Store your dried celery in a cool, dark, and dry place. A pantry or cupboard away from the stove works perfectly. Avoid storing it near the oven or in direct sunlight, as heat and light can degrade the quality over time.
Properly stored oven-dried celery can last for 2 to 4 weeks at room temperature. If you want to extend the shelf life even further, you can store it in the refrigerator or freezer.
Creative Uses for Dried Celery
Once you have mastered how to dehydrate celery in oven, you will want to use it in all sorts of ways. Dried celery is incredibly versatile and adds flavor and crunch to many dishes.
Homemade Celery Chips
The simplest way to enjoy dried celery is as a standalone snack. Season your crispy celery with a light sprinkle of salt before drying for classic flavor. Or try adding garlic powder, black pepper, or a touch of paprika for a more interesting taste.
Celery chips are a fantastic low-calorie alternative to traditional potato chips. A full cup of fresh celery has only about 14 calories. When dried, the volume shrinks, making it easy to eat more without guilt.
Soup and Stock Seasoning
Dried celery is a wonderful addition to homemade soup mixes and stock blends. Crush the dried pieces into small flakes and store them in a spice jar. When you are ready to make soup, just add a spoonful for instant celery flavor.
Many people also blend dried celery with other dried herbs and vegetables to create a custom seasoning blend. Try mixing it with dried onion flakes, dried parsley, and a pinch of salt for a versatile all-purpose seasoning.
Salad Topping and Garnish
Crumbled dried celery adds a pleasant crunch to fresh salads. It works especially well in potato salad, coleslaw, or grain bowls. The concentrated celery flavor adds depth without adding extra moisture.
You can also use dried celery as a garnish for soups and stews. Just crumble a few pieces on top right before serving for a fresh, crunchy touch.
Common Mistakes to Avoid
Even though dehydrating celery in oven is simple, there are a few common mistakes that can ruin your results. Being aware of these pitfalls will help you achieve better outcomes.
- Slicing too thick: Thick slices take much longer to dry and may not become crispy.
- Overcrowding the pan: Slices that overlap block airflow and dry unevenly.
- Setting the temperature too high: This cooks the celery instead of dehydrating it.
- Skipping the flip: One side will dry faster than the other without regular turning.
- Storing while warm: This traps moisture and leads to soggy celery.
- Not checking frequently: Ovens vary, and celery can go from perfectly dry to burnt quickly.
By avoiding these mistakes, you set yourself up for success. The process is forgiving, but attention to detail makes all the difference.
Expert Tips for Perfect Oven-Dried Celery
Here are some pro tips that will elevate your dried celery from good to exceptional:
- Use a mandoline slicer: It gives you perfectly uniform thickness every time.
- Rotate your trays: Ovens have hot spots. Rotating ensures even drying.
- Season before drying: Flavors meld into the celery as it dries, creating a more intense taste.
- Blend into powder: Fully dried celery can be ground into a powder using a spice grinder. Use it as a natural seasoning.
- Experiment with temperatures: Try 170°F, 180°F, and 190°F to find your preferred texture and flavor.
- Pair with other vegetables: Drying celery alongside carrots or zucchini makes a great mixed veggie snack.
These small adjustments can transform your experience with oven dehydration. Once you find your preferred method, it will become second nature.
Frequently Asked Questions
How long does it take to dehydrate celery in oven?
It typically takes 2 to 4 hours to dehydrate celery in oven at 175°F. Thinner slices dry faster, while thicker pieces need more time. Check the celery every 30 minutes after the first hour and flip the slices for even drying.
Can I use a regular oven to dehydrate celery?
Yes, a regular home oven works perfectly for dehydrating celery. You just need to set it to a low temperature between 170°F and 200°F. If your oven does not go below 200°F, crack the door slightly to release moisture and keep the temperature lower.
How do I know when dehydrated celery is done?
Done celery snaps cleanly when you bend it. It should feel dry, lightweight, and crispy with no flexibility or moisture remaining. If it bends without breaking, it needs more time in the oven.
Can I add seasoning before drying the celery?
Absolutely. Adding seasoning before drying is a great way to infuse flavor into your celery chips. Try salt, pepper, garlic powder, smoked paprika, or even a light drizzle of olive oil before placing the slices in the oven.
How should I store dried celery to keep it crispy?
Store dried celery in an airtight container at room temperature in a cool, dark place. Glass jars with tight lids work best. You can also add a desiccant packet to absorb any residual moisture and extend the crispiness for several weeks.
Is dehydrated celery healthy?
Yes, dehydrated celery retains most of its nutritional value. It is still low in calories and high in fiber, potassium, and vitamin K. Since the water is removed, the nutrients become more concentrated per serving compared to fresh celery.
Conclusion
Dehydrating celery in oven is a simple, rewarding process that anyone can do at home. With the right temperature, proper slicing, and a little patience, you can create perfectly crispy celery chips that rival any store-bought version. The key is keeping the heat low, the slices thin, and the airflow steady.
Once you learn how to dehydrate celery in oven, you will never go back to buying expensive packaged snacks. Homemade dried celery is healthier, tastier, and completely customizable to your preferences. You control the ingredients, the seasoning, and the level of crispiness.
Start with a single bunch of celery and follow the steps in this guide. You will be surprised at how easy and satisfying the process is. Soon enough, you will have a steady supply of crispy celery ready for snacking, cooking, or garnishing your favorite dishes.
Grab some fresh celery, preheat your oven, and give it a try today. Your taste buds will thank you.