How Many Coals For Dutch Oven Make Or Break Your Cook
Knowing how many coals for Dutch oven cooking can make or break your meal. The right coal count ensures even heat, perfect browning, and zero guesswork. Whether you bake, sear, or slow-cook, this guide covers every method you need. We break down the 3-2-1 method, lid placement rules, and expert tips for campfire and kitchen cooking. Master your Dutch oven with confidence using these proven coal-counting strategies.
Few things in outdoor cooking feel as rewarding as pulling a perfectly baked Dutch oven loaf from the coals. But here is the truth most beginners learn the hard way. How many coals for Dutch oven setups you use directly determines whether your food turns out golden or burnt.
The magic of Dutch oven cooking lies in heat control. Too many coals and your meal scorches. Too few and it stays raw in the middle. This guide walks you through everything you need to know about coal counts, placement, and techniques that deliver consistent results every single time.
Whether you camp in the woods or cook in your backyard, understanding your charcoal briquettes is the single most important skill you can build. Let us dive in and make your next Dutch oven meal a masterpiece.
Key Takeaways
- The 3-2-1 Method: Place 3 coals under the Dutch oven, 2 on the lid for every 10 inches of diameter.
- Bottom Coals Matter Most: They control your base temperature and prevent burning on the bottom.
- Lid Coals Create Even Top Heat: Proper lid placement mimics an oven’s top-down warmth.
- Season and Size Change Everything: A seasoned cast iron Dutch oven needs fewer coals than raw or enameled versions.
- Wind and Weather Affect Coal Burn: Always adjust your coal count for outdoor conditions.
- The Ring of Fire Method: A popular arrangement for even heat distribution around the entire Dutch oven.
- Start Simple, Then Experiment: Begin with the standard ratios before tweaking for your specific recipes.
📑 Table of Contents
Why Coal Count Matters for Dutch Oven Cooking
A Dutch oven is not like a regular pot on a stove. It uses indirect heat from all sides. The bottom coals provide the base temperature. The lid coals create top-down warmth that surrounds your food evenly. Together, they form a balanced heat environment that mimics a traditional kitchen oven.
But here is where people go wrong. They toss on a random handful of charcoal and hope for the best. That approach works sometimes, but it fails often. The Dutch oven needs a deliberate coal arrangement to cook food properly.
Think of your coals like the temperature dial on your oven. More coals means higher heat. Fewer coals means lower heat. The placement pattern determines how evenly that heat spreads. Get the count wrong and you end up with half-baked bread or tough, overcooked meat.
The Science Behind Even Heat Distribution
Cast iron Dutch ovens are heavy and thick. They hold heat incredibly well. This is great for slow cooking but tricky for temperature control. Your coals need to match the thermal mass of the pot.
When you spread coals evenly, the heat radiates from every angle. The food inside cooks at a consistent rate. Hot spots disappear. Cold zones vanish. This is why the coal placement method matters so much more than just tossing coals under the pot.
For baking in a Dutch oven, you want steady, moderate heat. For searing meat, you need a burst of high heat from below. Each cooking style demands a different coal strategy. Understanding this difference is the first step toward becoming a skilled Dutch oven cook.
The Golden Rule: Coals Per Inch of Diameter
Every Dutch oven has a diameter measured in inches. This number is the foundation of your coal count. The general rule is simple. For every inch of Dutch oven diameter, you need one charcoal briquette for total heat.
But not all those coals go in the same place. The real art lies in splitting them between the bottom and the lid. This split creates the balance you need for oven-like cooking.
Breaking Down the 3-2-1 Method
The 3-2-1 method is the gold standard for Dutch oven coal placement. Here is how it works.
Take your Dutch oven diameter. Divide it into three parts. Place 3 coals under the oven for every 10 inches of diameter. Place 2 coals on the lid. This gives you a bottom-heavy heat source that mimics a home oven perfectly.
For example, a 10-inch Dutch oven needs 3 coals underneath and 2 on top for low and slow cooking. A 12-inch Dutch oven uses 4 coals below and 3 on the lid for moderate heat. The math is simple once you know the pattern.
The 2-1-2 Method for Higher Heat
Sometimes you need more heat. The 2-1-2 method flips the ratio. You place 2 coals under the oven, 1 in the center of the lid, and 2 around the edges of the lid. This creates a hotter environment ideal for searing and browning.
This method works beautifully when you want a crispy crust on bread or a caramelized exterior on a roast. The center lid coal concentrates heat directly above the food. The bottom coals push heat upward through the cast iron walls.
For campfire cooking, the 2-1-2 method is a favorite among experienced outdoor cooks. It gives you control without complexity. You can adjust on the fly by adding or removing coals as needed.
Bottom Coals vs Lid Coals: What Goes Where
Understanding the difference between bottom coals and lid coals is essential. They serve completely different purposes in your Dutch oven setup.
Bottom coals provide the primary heat source. They heat the base of the cast iron pot. This is where the direct cooking energy comes from. More bottom coals means a hotter cooking surface.
Lid coals create the top-down heat that cooks the upper surface of your food. They also help circulate heat inside the oven. Without lid coals, the top of your dish stays cold while the bottom burns.
How Many Coals for Dutch Oven Bottom Placement
For the bottom of your Dutch oven, follow this simple guide.
- 10-inch Dutch oven: 3 to 4 coals underneath for moderate heat.
- 12-inch Dutch oven: 4 to 5 coals for standard baking and roasting.
- 14-inch Dutch oven: 5 to 6 coals for larger meals and longer cook times.
- 16-inch Dutch oven: 6 to 8 coals for big batches and group cooking.
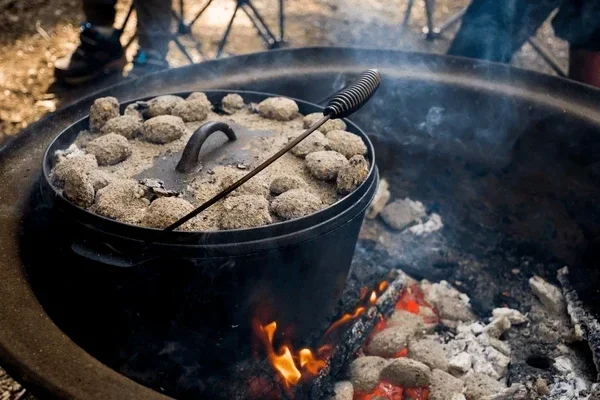
Always arrange bottom coals in a ring pattern. This creates an even heat perimeter around the entire base. A cluster of coals in the center creates hot spots. A ring of coals spreads the warmth evenly across the bottom of the pot.
How Many Coals for Dutch Oven Lid Placement
Lid coals follow a different logic. You want heat distributed across the top surface of the lid. This ensures your food cooks evenly from all sides.
- 10-inch Dutch oven: 2 to 3 coals on the lid.
- 12-inch Dutch oven: 3 to 4 coals on the lid.
- 14-inch Dutch oven: 4 to 5 coals on the lid.
- 16-inch Dutch oven: 5 to 6 coals on the lid.
Place one coal in the center of the lid. Then surround it with the remaining coals in a ring. This ring pattern on the lid mirrors the ring on the bottom. Together, they create a balanced heat envelope around your food.
Quick Tips for Perfect Coal Placement
Getting your coals right does not need to be complicated. Follow these quick tips and your Dutch oven cooking will improve immediately.
- Use a chimney starter. It lights your charcoal evenly and saves you time. No lighter fluid needed.
- Wait for ashy coals. Charcoal needs to turn gray-white before you place it in your Dutch oven setup. Raw charcoal creates uneven heat and off-flavors.
- Count your coals before placing them. Line them up in a row so you can see exactly how many you have. Guessing leads to mistakes.
- Rotate your Dutch oven. Every 15 minutes, turn the pot a quarter turn. This prevents hot spots and ensures even cooking.
- Use a coal rake or tongs. Moving coals safely protects your hands and gives you precision control.
- Adjust for wind. Wind cools coals faster. Add 1 to 2 extra coals on windy days to maintain your target temperature.
- Keep a spare coal pile nearby. You will almost always need to add more coals during long cooking sessions.
Common Mistakes to Avoid
Even experienced cooks make mistakes with their coal setup. Here are the most common ones and how to fix them.
- Using too many coals on the bottom. This scorches the bottom of your food. Reduce the bottom count and add more to the lid instead.
- Placing coals directly under the center. This creates a concentrated hot spot. Always use the ring pattern for even distribution.
- Ignoring weather conditions. Cold or windy days drain heat fast. Add extra coals and check your temperature more often.
- Opening the lid too often. Every time you lift the lid, you lose heat and extend cooking time. Check your food quickly and close the lid fast.
- Using old or damp charcoal. Damp coals burn inconsistently. Store your charcoal in a dry place and use fresh briquettes whenever possible.
Adjusting Coal Count for Different Cooking Styles
Not all Dutch oven meals are the same. Baking bread requires a different coal setup than roasting a roast. Let us break down the coal counts for popular cooking styles.
| Cooking Style | Bottom Coals | Lid Coals | Best For |
|---|---|---|---|
| Baking Bread | 3-2-1 ratio | 2-1-2 ratio | Artisan loaves, rolls, pizza dough |
| Roasting Meat | 4-5 coals | 3-4 coals | Chicken, pot roast, pork shoulder |
| Stewing and Braising | 3-4 coals | 2-3 coals | Soups, stews, chili |
| Searing and Frying | 5-6 coals | 1-2 coals | Cornbread, skillet meals, stir-fry |
| Slow Smoking | 8-10 coals | 5-6 coals | Brisket, ribs, pulled pork |
Baking Bread in a Dutch Oven
Baking bread is one of the most popular uses for a Dutch oven. The Dutch oven bread technique uses a tight-fitting lid to trap steam. This creates a crispy crust and a soft, airy interior.
For bread, you want a slightly higher bottom heat than lid heat. This pushes the dough upward and creates a nice rise. The 3-2-1 method works perfectly for most bread recipes. A 10-inch Dutch oven with 3 bottom coals and 2 lid coals maintains the ideal temperature of around 450 degrees Fahrenheit.
Preheat your Dutch oven with the coals burning for at least 15 minutes before adding your dough. This ensures the cast iron is hot enough to create an immediate sear on the bottom of the bread.
Roasting Meat in a Dutch Oven
Roasting meat in a Dutch oven is where this cooking tool truly shines. The even heat from all sides creates a beautiful, uniform sear on the outside while keeping the inside juicy and tender.
For a whole chicken in a 12-inch Dutch oven, use 4 bottom coals and 3 lid coals. This gives you a steady 325 to 350 degrees Fahrenheit. The meat cooks through evenly without drying out. Add a few extra coals if you are cooking in cold weather.
For a pot roast, you want lower and slower heat. Drop to 3 bottom coals and 2 lid coals for a 12-inch oven. Let it cook for 3 to 4 hours. The cast iron retains heat so well that it barely needs any additional coals after the first hour.
Expert Insights on Dutch Oven Coal Management
Professional outdoor cooks and camp chefs have spent years perfecting their Dutch oven techniques. Here is what the experts want you to know about managing your coals.
Build an Ember Bed, Not a Coal Pile
The key to consistent heat is creating an even ember bed. Spread your lit coals into a flat, uniform layer before placing them under or on your Dutch oven. A pile of unspread coals creates hot and cold zones that ruin your cook.
Use a charcoal chimney to light your briquettes evenly. Once they are covered in gray ash, pour them out and spread them into a flat circle. This takes just a couple of minutes and makes a huge difference in your results.
The Ring of Fire Technique
The Ring of Fire is a favorite technique among seasoned Dutch oven cooks. You place all your bottom coals in a ring around the outside edge of the Dutch oven base. This leaves the center open for direct heat to rise through the food.
This technique works especially well for casseroles and baked dishes. The outer ring of coals heats the sides and bottom of the pot. The center opening allows heat to flow upward through the food without burning the top layer.
Indirect Heat for Delicate Dishes
For delicate dishes like fish or custards, you need gentle, indirect heat. Move your coals further away from the Dutch oven. Use fewer coals and place them at the edges of your heat source.
This creates a low, steady temperature that cooks food without shocking it. Indirect heat is the secret behind perfectly steamed seafood and silky-smooth custards baked in a Dutch oven.
Key Takeaways
- The 3-2-1 Method: Place 3 coals under the Dutch oven, 2 on the lid for every 10 inches of diameter.
- Bottom Coals Matter Most: They control your base temperature and prevent burning on the bottom.
- Lid Coals Create Even Top Heat: Proper lid placement mimics an oven’s top-down warmth.
- Season and Size Change Everything: A seasoned cast iron Dutch oven needs fewer coals than raw or enameled versions.
- Wind and Weather Affect Coal Burn: Always adjust your coal count for outdoor conditions.
- The Ring of Fire Method: A popular arrangement for even heat distribution around the entire Dutch oven.
- Start Simple, Then Experiment: Begin with the standard ratios before tweaking for your specific recipes.
Conclusion
How many coals for Dutch oven cooking is not just a number. It is the foundation of every great meal you prepare in your cast iron pot. Whether you are baking bread at camp or slow-roasting a pot roast in your backyard, getting the coal count right changes everything.
The 3-2-1 method gives you a reliable starting point for almost any recipe. The 2-1-2 method adds flexibility when you need more heat. And the ring placement pattern ensures your food cooks evenly from all sides.
Practice these techniques. Adjust your coal count based on weather, pot size, and what you are cooking. Over time, you will develop an intuition for your Dutch oven that makes every meal better. The more you cook, the more confident you will become with your heat control.
Grab your charcoal briquettes, fire up your Dutch oven, and put these tips into action. Your next meal will be better than the last one. Happy cooking.
Frequently Asked Questions
How many coals for Dutch oven bread baking?
For a 10-inch Dutch oven, use 3 coals underneath and 2 on the lid. For a 12-inch oven, increase to 4 coals below and 3 on top. The 3-2-1 method works perfectly for bread because it provides steady, moderate heat that creates a crispy crust and soft interior. Preheat your Dutch oven for at least 15 minutes before adding your dough for the best results.
Can I use lump charcoal instead of briquettes in my Dutch oven?
Yes, you can. Lump charcoal burns hotter and cleaner than briquettes. You may need fewer coals because lump charcoal produces more intense heat. Start by reducing your coal count by about 10 to 15 percent and adjust as needed. Lump charcoal also burns faster, so keep extra coals nearby for longer cooking sessions.
How do I know if I have the right number of coals?
Use an oven thermometer placed inside your Dutch oven to check the temperature. If the heat is too high, remove a coal or two. If it is too low, add more. The ideal temperature for most Dutch oven recipes is between 325 and 375 degrees Fahrenheit. Over time, you will learn to judge the heat by the color and arrangement of your coals alone.
What is the best coal arrangement for a 12-inch Dutch oven?
A 12-inch Dutch oven works best with 4 coals underneath arranged in a ring and 3 coals on the lid. One coal goes in the center of the lid and the other two sit on opposite sides. This 4-3 setup gives you balanced heat for roasting, baking, and stewing. Adjust by adding or removing one coal depending on your recipe requirements.
How does weather affect my Dutch oven coal count?
Cold weather, wind, and rain all reduce the effectiveness of your charcoal. Wind cools coals faster and can blow them out entirely. In cold conditions, add 1 to 2 extra coals to compensate. On windy days, use a windbreak around your cooking area. Rain can dampen your coals, so keep a lid or foil cover handy to protect your heat source.
How long do coals last in a Dutch oven setup?
A standard batch of charcoal briquettes lasts about 45 minutes to 1 hour at moderate heat. For longer cooking sessions, you will need to add fresh coals periodically. Plan ahead by having a second chimney starter ready with coals that are already lit and ashed over. This way, you can add more coals without interrupting your cook or dropping the temperature.