How To Bake Oysters In Oven For Crispy Seafood Perfection
Baking oysters in the oven is one of the easiest ways to enjoy fresh seafood at home. This guide shows you exactly how to bake oysters in oven with simple ingredients, perfect temperatures, and foolproof timing. You will learn everything from shucking and prep to topping ideas and serving suggestions for crispy, golden results.
There is something magical about how to bake oysters in oven at home. The kitchen fills with a warm, oceanic aroma, and within minutes you have a restaurant-quality seafood dish on the table. Oysters are one of the most beloved treats in the seafood world, and baking them unlocks a whole new world of flavor and texture.
Many people think cooking oysters is intimidating. They worry about shucking, timing, or getting the texture just right. But here is the truth: baked oysters in oven is one of the simplest seafood recipes you can make. With the right temperature and a few tasty toppings, you will get perfectly plump oysters with a crispy golden finish every single time.
This guide walks you through everything you need to know. From choosing the freshest oysters to picking the best toppings and nailing the bake time, we have you covered. Whether you are a seasoned home cook or a complete beginner, you will find practical tips and easy-to-follow steps that make how to bake oysters in oven feel like second nature.
Key Takeaways
- Easy Preparation: Baking oysters in oven requires minimal effort and a few quality ingredients.
- Perfect Temperature: 400-425°F is the sweet spot for crispy, juicy oven-baked oysters.
- Versatile Toppings: From garlic butter to parmesan, you can customize flavors to your liking.
- Quick Cooking Time: Most oysters bake in just 10-15 minutes.
- Great for Beginners: No special equipment needed beyond a basic oven and baking sheet.
- Impressive Appetizer: Oven-baked oysters make a stunning seafood dish for any gathering.
📑 Table of Contents
- Why Bake Oysters In The Oven?
- How To Choose The Best Oysters For Baking
- How To Prepare Oysters For Baking
- The Best Oven Temperature And Time For Baked Oysters
- Delicious Topping Ideas For Oven-Baked Oysters
- Common Mistakes To Avoid When Baking Oysters
- Serving And Storing Baked Oysters
- Expert Tips For Perfectly Crispy Baked Oysters
- Frequently Asked Questions
- Conclusion
Why Bake Oysters In The Oven?
Grilling and frying are popular ways to cook oysters, but baking has some real advantages. It is hands-off, easy to control, and produces incredibly consistent results. When you bake oysters in oven, you let the gentle, even heat do all the work.
Oven baking also gives you more room to get creative. You can cook a large batch on a single sheet pan, experiment with different toppings, and avoid the mess that comes with frying. Plus, oven-baked oysters retain their natural juices better than other methods, which means every bite is flavorful and satisfying.
Here are some reasons to love baked oysters in oven:
- Simplicity: Minimal prep and no special equipment needed.
- Even Cooking: The oven heats oysters uniformly from all sides.
- Batch-Friendly: You can bake dozens of oysters at once.
- Healthier Option: No extra oil or deep frying required.
- Versatile: Works with countless topping combinations and flavor profiles.
- Set-It-and-Forget-It: You can focus on other dishes while oysters bake.
How To Choose The Best Oysters For Baking
The secret to great baked oysters in oven starts long before they hit the heat. Choosing the right oysters makes a huge difference in flavor, texture, and overall success. Freshness is everything when it comes to seafood.
Look For Freshness
When buying fresh oysters, look for shells that are closed tight or close when tapped. A cracked or open shell usually means the oyster is dead and should be avoided. The oysters should smell like the ocean, not fishy or sour. If you are buying from a fish market, ask the seller when the shipment arrived. Fresh oysters for baking should be alive and briny-smelling.
Size Matters
Oysters come in different sizes, from small cocktail oysters to large ones. For baking, medium to large oysters work best. They hold their toppings well and cook evenly. Very small oysters can overcook quickly, while extra-large ones may need a slightly longer bake time. Pick a consistent size so they all finish at the same time.
Where To Buy
You can find fresh oysters at fish markets, grocery stores, and even online seafood suppliers. Look for oysters labeled as “sushi-grade” or “shellfish-grade” for the best quality. If you live near the coast, buying directly from local harvesters is ideal. Store-bought oysters should be kept cold and used within a day or two of purchase.
How To Prepare Oysters For Baking
Preparing oysters for the oven is straightforward, but a few careful steps make all the difference. Proper oyster preparation ensures they cook evenly and taste their best.
Step 1: Clean The Shells
Rinse your oysters under cold running water. Use a stiff brush to scrub away any dirt or debris from the shells. This step removes grit and sand that can end up in your dish. Pat them dry with a clean towel before shucking.
Step 2: Shuck The Oysters
Shucking can feel tricky at first, but you will get the hang of it quickly. Place the oyster flat-side up on a clean towel. Hold it firmly and insert an oyster knife into the hinge, the pointed end where the two shells meet. Twist the knife gently until the shell pops open. Slide the knife along the top shell to cut the muscle, then remove the top shell. Run the knife under the oyster to free it completely, keeping as much liquor (the natural juice) as possible.
Tip: If you are new to shucking, wear a thick glove on your holding hand to protect against slips. You can also buy pre-shucked oysters from reputable seafood counters, which saves time and effort.
Step 3: Check For Shell Fragments
After shucking, inspect each oyster carefully for any small shell pieces. Run your finger over the oyster meat to feel for sharp fragments. Removing these before baking ensures a safe and pleasant eating experience.
Step 4: Place On Baking Sheet
Line a baking sheet with rock salt or crumpled aluminum foil. The salt or foil holds the oysters steady and keeps them level. Nestle each oyster into the salt so it sits flat and does not tip over. This small step prevents spills and ensures even cooking.
The Best Oven Temperature And Time For Baked Oysters
Getting the temperature right is the most important part of how to bake oysters in oven. Too hot and they dry out; too cool and they take forever. The good news is that oysters bake quickly and the window for perfection is forgiving once you know the basics.
Recommended Temperature
The ideal temperature for baked oysters in oven is 400°F to 425°F. At 400°F, oysters cook gently and stay juicy. At 425°F, you get a slightly crispier top if you are using breadcrumb or cheese toppings. Most recipes work well at 425°F because it speeds up the process without overcooking.
Cooking Time
Oysters bake fast. At 425°F, they typically need 10 to 15 minutes. You want the edges to curl slightly and the tops to become opaque and firm. Overcooked oysters become rubbery and tough, so watch them closely during the last few minutes. A good rule of thumb is to pull them out as soon as the edges start to curl.
Quick Reference Table
- 400°F: 12-15 minutes for juicy, tender oysters.
- 425°F: 10-13 minutes for slightly crispier results.
- With toppings: Add 2-3 minutes to account for the extra layer.
- Small oysters: Check at 8-10 minutes to avoid overcooking.
- Large oysters: May need up to 15-18 minutes.
Delicious Topping Ideas For Oven-Baked Oysters
One of the best things about how to bake oysters in oven is the chance to get creative with toppings. The right topping adds flavor, texture, and visual appeal. Here are some tried-and-true combinations that turn simple oysters into showstoppers.
Classic Garlic Butter
The timeless favorite. Mix softened butter with minced garlic, a squeeze of lemon juice, and a pinch of salt. Spoon a small dollop over each oyster and bake until the butter is bubbly and golden. This topping enhances the natural sweetness of the oyster without overwhelming it.
Cheesy Parmesan Crust
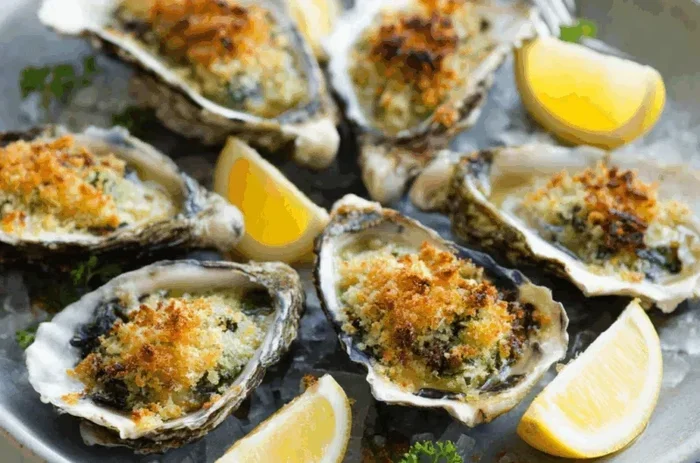
Combine grated parmesan, breadcrumbs, a drizzle of olive oil, and a sprinkle of parsley. Spread a thin layer over each oyster and bake until the cheese is melted and slightly crispy. This crispy oyster topping adds a wonderful crunch that pairs beautifully with the briny oyster meat.
Lemon Herb Butter
Blend butter with fresh herbs like parsley, dill, and chives, plus zest from one lemon. This light, fresh topping lets the oyster shine while adding a bright, aromatic note. It works especially well with smaller oysters that have a more delicate flavor.
Spicy Cajun Style
For those who love a kick, mix Cajun seasoning into melted butter and add a dash of hot sauce. This spicy baked oyster recipe brings bold flavor and warmth. It pairs wonderfully with a cold beer on a summer evening.
Smoky Bacon And Onion
Crispy bacon bits sautéed with caramelized onions make a rich, savory topping. Sprinkle the mixture over each oyster before baking. The smoky, sweet flavors create a depth that makes these oysters feel indulgent and satisfying.
Common Mistakes To Avoid When Baking Oysters
Even with a great recipe, small mistakes can affect your results. Knowing what to avoid helps you serve perfect oven-baked oysters every time.
Overcooking The Oysters
This is the number one mistake people make. Oysters cook fast, and a few extra minutes can turn them from tender to rubbery. Set a timer and check them early. Look for the edges just starting to curl as your cue to pull them out.
Using Frozen Oysters Without Thawing
If you buy frozen oysters, thaw them in the refrigerator overnight before baking. Baking them from frozen leads to uneven cooking and a watery texture. Proper thawing ensures the oyster meat firms up and bakes evenly.
Skipping The Rock Salt
Placing oysters directly on a bare baking sheet can cause them to tip over and spill their juices. Rock salt or crumpled foil keeps them stable and level. It also helps conduct heat evenly around each shell.
Using Too Much Topping
A little topping goes a long way. Piling on too much butter or breadcrumbs can mask the delicate flavor of the oyster and create a soggy texture. A thin, even layer is all you need for maximum impact.
Not Checking For Shell Pieces
Even after careful shucking, tiny shell fragments can hide in the oyster meat. Always do a quick visual and tactile check before baking. This simple step prevents an unpleasant surprise at the table.
Serving And Storing Baked Oysters
Once your oysters baked in oven are done, presentation matters. Serve them on a platter lined with ice or seaweed for a rustic, elegant look. Provide small forks, lemon wedges, and hot sauce on the side. Oyster serving ideas include pairing them with a crisp white wine, a light salad, or crusty bread to soak up the delicious juices.
Leftover baked oysters can be stored in the refrigerator for up to two days. Place them in an airtight container and reheat gently in the oven at 300°F for 5-7 minutes. Avoid microwaving, which can make the oysters rubbery. Storing baked oysters properly preserves their texture and flavor for a second helping.
Expert Tips For Perfectly Crispy Baked Oysters
Expert Insight: Professional chefs agree that the key to crispy baked oysters is starting with very cold oysters and a hot oven. The cold center helps the oyster hold its shape while the hot oven creates a beautiful sear on the topping. Let your oysters sit at room temperature for just 5 minutes before baking, then place them in a preheated oven immediately.
Another pro tip is to brush the shells with a thin layer of oil before adding the oyster and toppings. This helps the shells crisp up slightly and adds an extra layer of flavor. For an even crunchier result, broil the oysters for the last 1-2 minutes of baking, but watch them closely to prevent burning.
Quick Tips:
- Always preheat your oven before placing oysters inside.
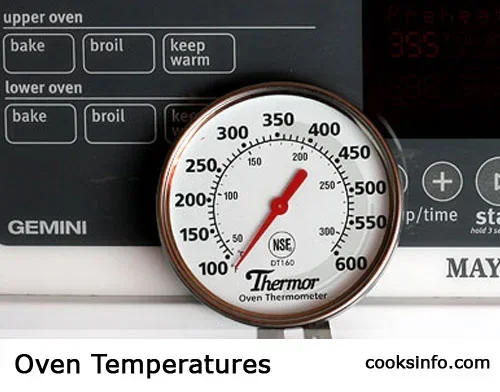
- Use a kitchen thermometer to check that your oven reaches the target temperature.
- Pat oysters dry after shucking to help toppings adhere better.
- Space oysters evenly on the baking sheet for consistent heat circulation.
- Experiment with different toppings to find your personal favorite combination.
Frequently Asked Questions
Can I bake oysters in their shells without shucking them?
Yes, you can bake oysters in their shells for a more dramatic presentation. Simply place them cup-side up on a baking sheet with rock salt and bake at 425°F for about 10-12 minutes. The shells will open slightly when the oysters are done, and guests can enjoy them right in the shell with a knife and fork.
How do I know when baked oysters are done?
Baked oysters are done when the edges curl slightly and the meat becomes opaque and firm to the touch. The topping should be bubbly and golden. If you are unsure, gently tap the top of an oyster with a fork. If it feels solid and does not wobble, it is ready to serve.
Can I use canned oysters for baking?
Yes, canned oysters work in a pinch and can be used for baked oysters in oven. Drain them well and pat dry before adding toppings. Keep in mind that fresh oysters have a superior flavor and texture, so use canned oysters when convenience matters more than the perfect taste.
What temperature should I bake oysters at?
The best temperature to bake oysters is 400°F to 425°F. At 425°F, oysters bake in about 10-13 minutes and develop a nice light crispness. At 400°F, they take slightly longer but stay extra juicy. Always preheat your oven before placing the oysters inside.
How long do baked oysters last in the fridge?
Cooked oysters can be stored in the refrigerator for up to two days. Place them in an airtight container and reheat gently in the oven at 300°F for about 5 minutes. Avoid storing them at room temperature for more than two hours to stay food-safe.
What is the best way to shuck oysters at home?
The easiest way is to use a sturdy oyster knife and a thick glove for safety. Place the oyster flat-side up, insert the knife at the hinge, twist gently, and slide along the top shell to free the meat. If shucking feels too challenging, buy pre-shucked oysters from a trusted seafood counter or fish market.
Conclusion
How to bake oysters in oven is a skill that anyone can master with a little practice and the right guidance. From choosing the freshest oysters to picking your favorite toppings and nailing the perfect bake time, every step is simpler than it seems. Baked oysters in oven deliver a restaurant-quality seafood experience right in your own kitchen, with minimal effort and maximum flavor.
Remember to keep your oven hot, your timing tight, and your toppings creative. Whether you go classic with garlic butter or venture into spicy or cheesy territory, the results are always impressive. Now that you have all the tools and knowledge, it is time to fire up the oven and start baking. Your taste buds will thank you.