How To Build Your Own Brick Pizza Oven From Scratch
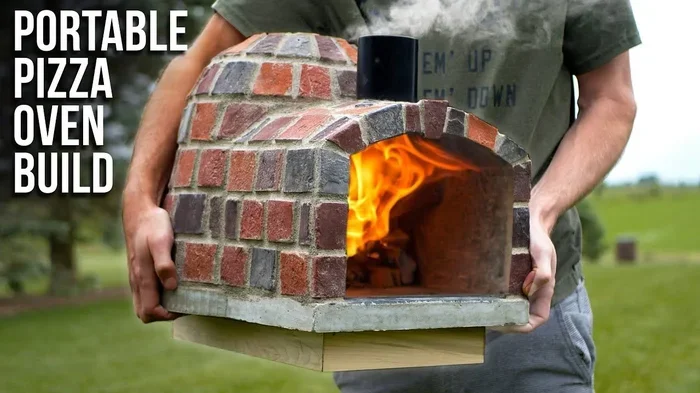
Building your own brick pizza oven is easier than you think. This guide walks you through every step of the pizza oven build, from choosing materials to firing up your first pie. You will learn how to create a stunning outdoor pizza oven that delivers restaurant-quality cooking pizza right in your backyard.
There is something magical about pulling a fresh pizza out of your own brick pizza oven. The crispy crust, the blistered cheese, and the smoky flavor — none of that comes from a standard kitchen oven. A DIY pizza oven transforms your backyard into a pizzeria. And the best part? You do not need to be a master mason to pull it off.
In this guide, we will walk you through every single step of how to build your own brick pizza oven from scratch. We will cover the base, the dome, the door, and everything in between. By the end, you will feel confident enough to start your own pizza oven construction project this weekend.
Whether you are a seasoned DIYer or a total beginner, this guide has you covered. We kept the language simple and the steps clear. No jargon, no confusion. Just straightforward advice that gets results. So grab your safety glasses and let us get building.
Key Takeaways
- A DIY brick pizza oven saves money and adds value to your outdoor cooking setup.
- Firebricks, refractory cement, and a solid base are the three essentials you cannot skip.
- Building the dome shape is the most creative part of the pizza oven build process.
- Proper curing takes time — do not rush this step or you risk cracking your oven.
- A wood-fired pizza oven reaches temperatures over 800°F, perfect for Neapolitan-style crusts.
- Start small and simple if you are a beginner, then upgrade as you gain confidence.
📑 Table of Contents
Why Build a Brick Pizza Oven?
A homemade pizza oven brings so much to the table. It is not just about cooking food. It is about creating experiences. Here is why so many people are jumping into this project.
Unmatched Pizza Quality
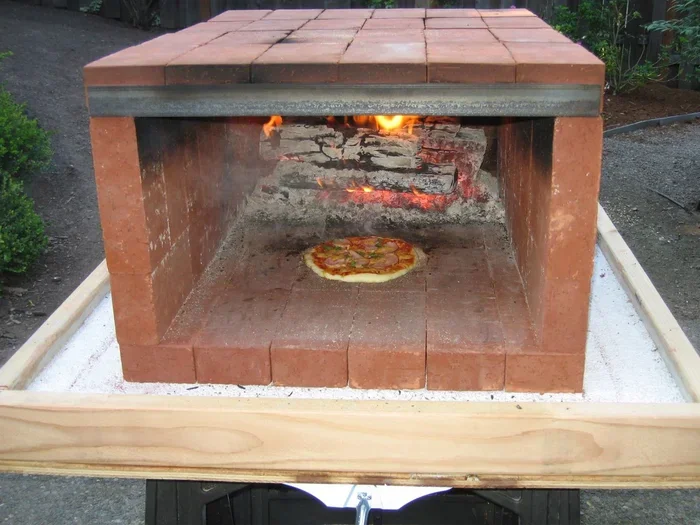
A wood-fired pizza oven can reach temperatures above 800°F. At that heat, a pizza cooks in 60 to 90 seconds. The crust gets perfectly charred on the edges while staying soft in the center. No home oven on earth can replicate that. The thermal mass of the bricks holds heat beautifully, giving you consistent results every time.
It Saves You Money
Store-bought pizza oven kits can cost anywhere from 500 to 3,000 dollars. Building your own brick pizza oven cuts that cost significantly. You control the materials and the design. A basic DIY version can be done for under 300 dollars if you source materials wisely.
It Boosts Your Outdoor Space
A backyard pizza oven becomes the centerpiece of any outdoor cooking area. Friends and family will gather around it. It makes every gathering feel special. Plus, it adds real estate value to your property. A well-built outdoor pizza oven is a feature buyers notice.
Planning Your Brick Pizza Oven Build
Before you pick up a single brick, you need a solid plan. Rushing into construction without preparation is the number one mistake beginners make. Take your time with this phase. A good plan saves you time, money, and frustration later on.
Choose Your Location
Pick a flat, stable spot in your yard. The area should be away from wooden fences or overhanging trees. You want at least 6 feet of clearance on all sides. Wind direction matters too. You do not want smoke blowing into your dining area. A spot near your kitchen door is ideal for easy food transport.
Decide on the Size
A standard pizza oven base is about 4 feet wide and 3 feet deep. This size fits a 12-inch pizza comfortably. If you plan to cook larger meals like roasts or bread, go bigger. The interior dome height should be about 18 inches for a small oven. Taller domes work better for roasting and baking bread.
Pick Your Design
There are two main styles to consider:
- Traditional dome oven — This is the classic rounded shape inspired by Italian bread ovens. It looks stunning and performs beautifully.
- Barrel vault oven — This has a rectangular opening and a barrel-like shape. It is slightly easier to build and great for cooking multiple items at once.
Both designs work well for a DIY pizza oven. Choose the one that fits your skill level and aesthetic preference.
Gather Your Materials and Tools
Having everything ready before you start makes the build so much smoother. Here is a list of what you will need:
- Firebricks — These are the heat-resistant bricks that line the inside of the oven. You will need about 100 to 150 bricks for a standard build.
- Refractory cement — This special mortar can withstand extreme heat. Regular mortar will crumble and crack. Do not skip this.
- Standard building bricks — These form the outer structure and base of the oven.
- Concrete mix — For pouring the foundation and base slab.
- Plywood and insulation — For building the dome mold and insulating the oven.
- Steel door — A custom or store-bought door helps control airflow and temperature.
- Pizza peel and peel — You will need these for loading and unloading pizzas.
For tools, you will need a trowel, a level, a saw, a drill, and basic measuring tools. Nothing fancy. Most people already have these in their garage.
Building the Base and Foundation
The base of your brick pizza oven is the foundation of everything. A weak base means a cracked oven. Take this step seriously. A solid foundation ensures your oven lasts for decades.
Pour the Concrete Slab
Start by pouring a concrete slab that measures about 5 feet by 4 feet and 4 inches thick. Use a level to make sure it is perfectly flat. Let it cure for at least 48 hours before moving on. This slab will support the entire weight of the oven, so do not rush it.
Build the Base Structure
Once the slab is set, start stacking standard building bricks to form the base walls. Build them about 2 feet high. Leave an opening at the front for the oven door and a small hole at the side for the chimney. The chimney is crucial — it creates the draft that pulls smoke out and feeds the fire.
Inside the base, add a layer of insulation. Use mineral wool or ceramic fiber board. This keeps the heat inside the oven instead of leaking into the ground. On top of the insulation, pour a thin layer of firebricks to create the cooking surface. This is where your pizza will go.
Quick Tip for a Stronger Base
Add a layer of sand between the concrete slab and the first row of bricks. This helps with drainage and prevents moisture from getting trapped. Moisture is the enemy of any pizza oven build. It causes cracking and weakens the structure over time.
Constructing the Dome
This is the most exciting part of building your own brick pizza oven. The dome is what gives the oven its signature shape and its incredible heat retention. The pizza oven construction of the dome requires patience and precision, but the results are worth every effort.
Build the Dome Mold
You will need to create a dome-shaped mold out of plywood. Cut several curved pieces and stack them to form a half-sphere. The inside diameter should match your desired oven size — about 36 inches across for a standard build. Secure the pieces together with screws and wrap the outside with plastic sheeting. This prevents the mortar from sticking.
Place the mold on top of the base. Use bricks or sand bags to hold it in place while you work. The mold should be centered over the base opening.
Lay the Firebricks
Start applying refractory cement to the top of the base walls. Press firebricks into the cement, starting from the bottom and working your way up. Overlap the bricks like you would lay roof tiles. This creates a strong, interlocking pattern. Each brick should be firmly seated. Use a rubber mallet to tap them into place.
Continue layering until the dome is complete. Leave an opening at the front for the door and the chimney opening at the top or back. The dome should be smooth on the inside. Use a piece of curved wood to press the bricks into the right shape as you go.
Remove the Mold
Let the refractory cement cure for at least 24 hours. Then carefully remove the plywood mold. You will be left with a beautiful brick dome. This is the moment everything starts to feel real. Step back and admire what you have built.
Expert Insight: The Dome Shape Matters
The dome shape is not just for looks. It creates a natural convection current inside the oven. Hot air rises to the top and circulates back down. This ensures even heat distribution across the entire cooking surface. A flat-topped oven would have hot spots and cold spots. The dome solves this problem elegantly.
Adding the Door and Chimney
The door and chimney are small components, but they make a huge difference in how your brick pizza oven performs. They control airflow, temperature, and smoke direction.
Build or Buy a Door
You can make a door from a thick steel plate or purchase one online. The door should fit snugly into the front opening. It needs to be removable so you can load pizzas and manage the fire. Some people use a simple wooden handle attached to the door for easy removal.
Seal the edges with high-temperature silicone or more refractory cement. You want minimal air leakage around the door. Every bit of air that sneaks in can drop your oven temperature significantly.
Install the Chimney
The chimney is typically a metal pipe that attaches to the opening at the top or back of the oven. It should extend at least 2 feet above the dome. A taller chimney creates better draft. You can use a standard stove pipe for this purpose. Make sure the connection is secure and heat-resistant.
Quick Tip: Before you permanently attach the chimney, test the draft by lighting a small fire inside the oven. If the smoke flows smoothly up and out, your chimney is working correctly. If smoke spills out the front, adjust the chimney position or add a baffle plate.
Curing Your Brick Pizza Oven
Curing is the most overlooked step in building a brick pizza oven. It is also the most important. Rushing the cure is the number one reason ovens crack within the first few months. Do not make this mistake. Patience here pays off big time.
The Curing Process
Curing means slowly drying out all the moisture trapped inside the oven. If you light a full fire too soon, the steam has nowhere to go and it cracks the bricks and mortar. Here is the proper curing schedule:
- Day 1: Light a small fire using just a few twigs and kindling. Keep it small for 2 to 3 hours. Let it burn out naturally. Close the door and let the oven cool overnight.
- Day 2: Build a slightly larger fire. Burn for 3 to 4 hours. Again, let it cool completely overnight.
- Day 3: Increase the fire size again. Burn for 4 to 5 hours. Let it cool.
- Days 4 to 7: Gradually increase the fire size each day. By day 7, you should be running a full-strength fire for several hours.
This gradual process drives out all the moisture safely. After a full week of curing, your brick pizza oven is ready for cooking. The walls should feel dry to the touch and the mortar should be fully set.
Common Mistakes During Curing
- Skipping days — Do not rush the schedule. Each day serves a purpose.
- Using wet wood — Green or wet wood creates more steam, which increases the risk of cracking.
- Closing the door too early — Keep the door slightly open during the curing fires to allow moisture to escape.
Cooking Your First Pizza
After the cure is complete, it is time for the moment you have been waiting for. Cooking your first pizza in a DIY pizza oven you built yourself is an incredibly rewarding experience.
Get the Temperature Right
Aim for an oven temperature of 750°F to 900°F for Neapolitan-style pizza. Use an infrared thermometer to check the internal temperature. The dome should be too hot to touch for more than a second. Once you reach the right temperature, push the coals to the back of the oven and slide your pizza in using a pizza peel.
Tips for Perfect Pizza
- Keep your dough thin for fast, even cooking.
- Use minimal toppings. A brick pizza oven cooks so fast that heavy toppings will burn.
- Rotate the pizza every 20 seconds for even browning.
- Let the oven cool slightly for thicker-crust or Detroit-style pizza.
Once you taste the difference, you will never go back to your kitchen oven. The smoky, charred flavor of a wood-fired pizza oven is something truly special.
Maintenance and Long-Term Care
Your brick pizza oven will last for decades if you take care of it. Maintenance is simple and quick.
After each use, let the oven cool naturally. Do not hose it down or pour water on it. Sweep out the ash and coals once the oven is cool. Cover the oven with a weatherproof cover when not in use. This protects the exterior from rain and UV damage.
Inspect the mortar joints once a year. If you notice any cracks, fill them with refractory cement before the next use. A little maintenance goes a long way in keeping your outdoor pizza oven in top shape.
Seasonal Tips
- Spring: Check for any winter damage and repair as needed.
- Summer: This is prime pizza season. Use your oven often to keep it in good condition.
- Fall: Clean out the chimney and inspect the door seal.
- Winter: Always use a fitted cover. Moisture is the biggest threat during cold months.
Key Takeaways
- A DIY brick pizza oven saves money and adds value to your outdoor cooking setup.
- Firebricks, refractory cement, and a solid base are the three essentials you cannot skip.
- Building the dome shape is the most creative part of the pizza oven build process.
- Proper curing takes time — do not rush this step or you risk cracking your oven.
- A wood-fired pizza oven reaches temperatures over 800°F, perfect for Neapolitan-style crusts.
- Start small and simple if you are a beginner, then upgrade as you gain confidence.
Frequently Asked Questions
How long does it take to build a brick pizza oven?
A basic brick pizza oven can be built in 2 to 3 weekends if you work steadily. The base and foundation take one weekend. The dome construction takes another. Curing adds about one week to the timeline. So plan for roughly two to three weeks from start to finish before you cook your first pizza.
What kind of bricks do I need for a pizza oven?
You need firebricks for the interior of the oven. These are made from high-density clay that can withstand extreme heat without cracking. Regular building bricks work fine for the exterior base and walls. Never use regular bricks inside the cooking chamber. They will crumble under high heat and ruin your pizza oven build.
Can I build a brick pizza oven on a deck or patio?
Yes, but you need to protect the deck from heat. Place a layer of concrete board or stone between the oven base and the wooden surface. A pizza oven base made from steel or concrete can be set on a deck safely. Always check with a professional if you are unsure about weight limits or fire safety on your deck.
How hot does a brick pizza oven get?
A well-built wood-fired pizza oven can reach temperatures between 800°F and 1,000°F. This is hot enough to cook a Neapolitan pizza in under 90 seconds. You can also use the oven for roasting vegetables, baking bread, and slow-cooking meats at lower temperatures by letting the fire burn down.
Do I need a chimney on my brick pizza oven?
Yes, a chimney is essential for proper airflow and smoke control. Without a chimney, smoke will fill the oven and blow back into your face when you open the door. A simple metal stove pipe works perfectly as a chimney for a DIY brick pizza oven. Make sure it extends high enough to clear the dome.
Is building a brick pizza oven difficult for beginners?
Not at all. The basic pizza oven construction is surprisingly straightforward. You do not need advanced masonry skills. If you can mix concrete and lay bricks in a straight line, you can build a brick pizza oven. Start with a simple dome design and follow a trusted guide. You will be surprised how quickly you can build something that lasts a lifetime.
Conclusion
Building your own brick pizza oven from scratch is one of the most satisfying DIY projects you can take on. It combines creativity, practical skill, and the joy of cooking outdoors. Every step — from pouring the base to lighting your first fire — brings you closer to a truly unique outdoor cooking experience.
The process is simpler than most people expect. With the right materials, a solid plan, and a bit of patience, you can have a stunning outdoor pizza oven that serves your family and friends for years to come. The thermal mass of the bricks keeps the heat steady and even, giving you restaurant-quality results every time you cook.
Do not wait for the perfect day. Start planning your DIY pizza oven today. Gather your materials, clear your weekend schedule, and get ready to build something amazing. Once you taste that first wood-fired pizza fresh from your own brick pizza oven, you will wonder why you did not start sooner. Now go build it.