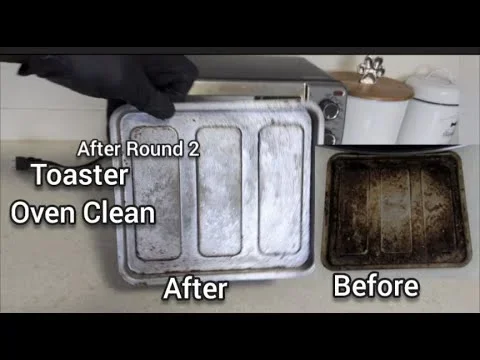
How To Clean Breville Toaster Oven Tray The Right Way
Cleaning your Breville toaster oven tray regularly keeps it performing at its best and extends its lifespan. This guide shows you the safest and most effective methods to remove grease, food residue, and baked-on grime. You will learn step-by-step techniques using household items like baking soda, vinegar, and dish soap. We also cover preventive habits and common mistakes to avoid so your tray stays in top shape.
Your Breville toaster oven is one of the most versatile kitchen appliances you own. It bakes, broils, toasts, and roasts with impressive precision. But over time, the tray collects grease, crumbs, and stubborn baked-on food. A dirty tray affects cooking performance and can even create unpleasant odors. That is why learning how to clean Breville toaster oven tray the right way matters so much.
Many people put off cleaning their oven tray because they think it is a difficult chore. The truth is, with the right approach, it takes just minutes. You do not need expensive chemical cleaners or special tools. Simple household ingredients work wonders. This guide walks you through every method, tip, and trick you need to keep your Breville tray looking and functioning like new.
Key Takeaways
- Soak and scrub: A warm soapy soak loosens baked-on grease and food particles from your Breville tray.
- Use natural cleaners: Baking soda and vinegar are safe, effective, and affordable options for deep cleaning.
- Avoid harsh abrasives: Steel wool and abrasive pads can damage the non-stick coating on your oven tray.
- Clean after every use: Quick wipe-downs prevent buildup and make deep cleaning much easier.
- Dry thoroughly: Proper drying prevents rust and keeps your tray looking new for longer.
- Know when to replace: Warped or heavily damaged trays should be replaced to maintain cooking performance.
📑 Table of Contents
- Why Cleaning Your Breville Toaster Oven Tray Matters
- How Often Should You Clean Your Breville Toaster Oven Tray
- Gathering Your Cleaning Supplies
- Step-by-Step Methods to Clean Your Breville Toaster Oven Tray
- What Not to Do: Common Cleaning Mistakes
- Preventing Buildup: Tips for Easier Cleaning
- When to Replace Your Breville Toaster Oven Tray
- Expert Tips for Keeping Your Breville Oven Tray in Top Shape
- Conclusion
Why Cleaning Your Breville Toaster Oven Tray Matters
A clean tray does more than just look good. It directly impacts how your Breville toaster oven performs. When grease and food residue build up, they create a barrier that affects heat distribution. This means your food may cook unevenly or take longer to prepare.
Built-up grime can also smoke during cooking, leaving behind unpleasant smells and potentially affecting the taste of your food. Over time, accumulated grease can become a fire hazard, especially at high temperatures. Regular cleaning keeps your appliance safe, efficient, and hygienic.
Beyond performance, a well-maintained tray lasts much longer. Trays that are neglected can develop stubborn stains, discoloration, and even rust. Taking a few minutes to clean your tray after each use saves you from deep cleaning sessions later. It is one of the simplest ways to invest in the longevity of your Breville toaster oven.
The Role of Your Oven Tray in Cooking
The tray sits at the bottom of the oven cavity and catches all the drippings and crumbs that fall from food above. During roasting, baking, and broiling, fats render and sugars caramelize. This creates a layer of residue that hardens over time. If left unchecked, this residue becomes very difficult to remove. That is why understanding how to clean Breville toaster oven tray properly is essential for any Breville owner.
How Often Should You Clean Your Breville Toaster Oven Tray
Consistency is the key to easy maintenance. If you clean your tray after every use, you will never face a tough deep-cleaning situation. A quick wipe-down takes less than two minutes and keeps grease from building up.
For most home cooks, a light cleaning after each use works perfectly. However, if you use your Breville toaster oven frequently or cook greasy foods like bacon or roasted chicken, you may want to do a deeper clean once a week. Pay attention to how your tray looks and smells. If you notice sticky residue or lingering odors, it is time for a more thorough cleaning session.
Quick Daily Maintenance Routine
After each use, let the tray cool down enough to handle safely. Then, remove it from the oven and give it a quick wipe with a damp cloth. This simple habit prevents food from hardening and sticking. A little effort after every session saves you a lot of work in the long run.
Gathering Your Cleaning Supplies
Before you start, make sure you have the right supplies on hand. You do not need anything fancy or expensive. Most of what you need is already in your kitchen. Having everything ready makes the cleaning process smooth and efficient.
Here is a list of supplies you will need for a basic cleaning:
- Warm water — the foundation of most cleaning methods
- Dish soap — a gentle degreaser that cuts through grease effectively
- Baking soda — a natural abrasive that lifts stubborn stains without scratching
- White vinegar — a natural acid that breaks down grease and deodorizes
- Soft sponge or microfiber cloth — safe for all tray surfaces
- Non-abrasive scrubbing pad — for tougher residue without damaging the surface
- Rubber gloves — protects your hands from hot water and grease
For deep cleaning, you may also want to have a few extra items ready. A paste made from baking soda and water works incredibly well on baked-on grime. Hydrogen peroxide can help with tough stains. A plastic scraper or old toothbrush can reach into corners and grooves. Having these supplies ready means you can tackle any level of dirt on your Breville toaster oven tray with confidence.
Step-by-Step Methods to Clean Your Breville Toaster Oven Tray
There are several effective methods for cleaning your Breville tray. Each approach works well for different levels of grime. Let us walk through them one by one so you can choose the best method for your situation.
Method 1: The Warm Soapy Soak
This is the simplest and most gentle method. It works well for light to moderate grease and food residue. Start by filling your kitchen sink or a large basin with warm water. Add a few drops of dish soap and stir until it creates a gentle lather.
Place your tray into the soapy water and let it soak for 15 to 20 minutes. The warm water softens the grease and loosens stuck-on food. After soaking, use a soft sponge to gently scrub the surface. Most residue will come off easily at this point. Rinse the tray thoroughly with clean water and dry it with a soft towel.
This method is ideal for regular maintenance. It keeps your tray clean without any harsh chemicals. If you make this part of your post-cooking routine, you will rarely need a more intensive approach.
Method 2: Baking Soda Paste for Stubborn Stains
When the soapy soak is not enough, a baking soda paste comes to the rescue. Baking soda is a gentle yet effective cleaner that works on baked-on grease and discoloration. Mix three parts baking soda with one part water to create a thick paste. The consistency should be similar to toothpaste.
Spread the paste evenly over the entire surface of the tray. Pay extra attention to areas with heavy staining or grease buildup. Let the paste sit for 20 to 30 minutes. During this time, the baking soda works to break down the stubborn residue.
After the waiting period, use a damp sponge or soft cloth to scrub the tray in circular motions. The baking soda provides just enough gentle abrasion to lift stains without scratching the surface. Rinse thoroughly with warm water and dry completely. This method is one of the best ways to deep clean your Breville toaster oven tray without using harsh chemicals.
Method 3: Vinegar and Baking Soda Power Clean
For really tough grime, combining baking soda and vinegar creates a powerful cleaning reaction. Start by sprinkling baking soda generously over the tray. Then, spray or drizzle white vinegar over the baking soda. You will see it fizz and bubble, which helps lift dirt and grease from the surface.
Let the mixture sit for about 15 minutes. The reaction breaks down stubborn residue and deodorizes the tray at the same time. After the waiting period, use a damp sponge to scrub away the loosened grime. Rinse the tray well with warm water to remove all cleaning residue. Dry it completely with a clean cloth. This method is especially effective for trays that have not been cleaned in a while.
Method 4: Hydrogen Peroxide for Discoloration
If your Breville tray has developed discoloration or stubborn stains that other methods cannot remove, hydrogen peroxide is a great option. Apply a small amount of three percent hydrogen peroxide directly to the stained areas. Let it sit for 10 to 15 minutes. The peroxide works to lighten and lift the stains naturally.
After the waiting period, scrub gently with a soft sponge and rinse thoroughly. This method is particularly useful for trays that have been exposed to high heat repeatedly and developed darkened spots. Always make sure to rinse the tray well after using hydrogen peroxide to remove any residue before placing it back in the oven.
What Not to Do: Common Cleaning Mistakes
Knowing what to avoid is just as important as knowing the right cleaning methods. Certain habits can damage your Breville tray and shorten its lifespan. Here are the most common mistakes people make when cleaning their toaster oven trays.
Using Abrasive Scrubbers
Steel wool, metal scrub brushes, and harsh abrasive pads can scratch and damage the surface of your tray. Many Breville trays have a non-stick or coated surface that is easily ruined by abrasive materials. Once the coating is damaged, food is more likely to stick and grease is harder to clean. Always use soft sponges, microfiber cloths, or non-abrasive pads when scrubbing your tray.
Using Harsh Chemical Cleaners
Strong chemical cleaners and bleach can leave behind residues that transfer to your food during cooking. These chemicals can also degrade the tray’s surface over time. Stick to natural, food-safe cleaners like baking soda, vinegar, and mild dish soap. They are just as effective and completely safe for kitchen use.
Soaking for Too Long
While soaking is helpful, leaving your tray submerged for hours or overnight can cause problems. Prolonged exposure to water can lead to rust, especially if the tray has any exposed metal or if the coating is already worn. Stick to the recommended soaking times of 15 to 30 minutes for the best results.
Skipping the Drying Step
Many people clean their tray and put it away while it is still damp. This is a mistake that can lead to rust and mold growth. Always dry your tray thoroughly with a clean towel before storing it back in the oven. For extra protection, you can apply a very light coat of food-safe mineral oil to metal trays after drying.
Preventing Buildup: Tips for Easier Cleaning
The best way to keep your Breville toaster oven tray clean is to prevent buildup in the first place. A few simple habits can make a huge difference in how often and how intensely you need to clean.
- Line the tray with foil or parchment paper: This catches drippings and crumbs, making cleanup a breeze. Just make sure the lining does not touch the heating elements.
- Place a baking sheet underneath: When roasting or baking, a sheet pan underneath catches most spills before they reach the tray.
- Wipe immediately after use: A quick wipe while the tray is still warm prevents food from hardening and sticking.
- Avoid overfilling dishes: Overfilled dishes are more likely to spill and create messes on the tray.
- Use a drip pan for greasy foods: When cooking bacon or other fatty foods, a small drip pan catches excess grease and protects the tray.
These preventive habits take very little effort but save you significant time and effort during cleaning. Over time, they become second nature and keep your Breville toaster oven tray in excellent condition with minimal work.
When to Replace Your Breville Toaster Oven Tray
Even with the best care, trays eventually wear out. Knowing when to replace your tray is important for maintaining cooking performance and safety. Here are the signs that your Breville tray may need replacing.
First, look for warping. If the tray has become significantly bent or curved, it will not sit properly in the oven. This affects heat circulation and cooking results. Second, check for deep scratches or peeling coating. A damaged non-stick surface can release particles into your food and makes cleaning much harder. Third, look for rust that does not come off with cleaning. Surface rust can sometimes be treated, but deep rust compromises the structural integrity of the tray.
If you notice any of these issues, it is time to invest in a replacement tray. Contact Breville customer support or check their official website for compatible parts. Using a damaged tray not only affects cooking quality but can also pose safety risks. Replacing it ensures your Breville toaster oven continues to perform at its best.
Expert Tips for Keeping Your Breville Oven Tray in Top Shape
Professional chefs and appliance experts share a few extra tips that can take your tray maintenance to the next level. These insights help you get the most out of every cleaning session.
One expert tip is to clean your tray while it is still slightly warm, not hot. Warm trays allow grease to soften without the risk of burns. Another tip is to sprinkle baking soda on the tray immediately after cooking if you know there will be residue. The baking soda absorbs grease and odors while the tray cools, making the actual cleaning step much faster.
Experts also recommend doing a monthly deep clean even if the tray looks fine. This preventive approach stops minor buildup from turning into stubborn stains. Finally, always refer to your Breville owner’s manual for any specific cleaning instructions related to your model. Different Breville toaster oven models may have slightly different tray materials or coatings that require particular care.
Conclusion
Cleaning your Breville toaster oven tray does not have to be a dreaded chore. With the right methods and a little consistency, it becomes a quick and easy part of your kitchen routine. Whether you prefer the simple warm soapy soak, the power of baking soda, or the fizz of vinegar and baking soda, there is a method that works for every level of grime.
Remember that prevention plays a huge role. A few simple habits like wiping after use and lining the tray can dramatically reduce the cleaning effort required. Avoid common mistakes like using abrasive scrubbers or harsh chemicals, and always dry your tray thoroughly after cleaning.
By following the tips and techniques in this guide, you can keep your Breville toaster oven tray spotless, safe, and performing at its best. The effort you put into regular maintenance pays off with better cooking results and a longer-lasting appliance. Start applying these methods today, and you will wonder why you did not clean your tray this way all along.
Frequently Asked Questions
Can I use bleach to clean my Breville toaster oven tray?
It is best to avoid bleach when cleaning your Breville tray. Bleach can damage the tray’s surface and leave behind chemical residues that may transfer to your food. Stick to natural, food-safe cleaners like baking soda, vinegar, and mild dish soap for safe and effective results.
How do I remove baked-on grease from my Breville oven tray?
For baked-on grease, make a thick paste of baking soda and water. Spread it over the greasy areas and let it sit for 20 to 30 minutes. Then scrub gently with a soft sponge and rinse thoroughly. For extra power, spray white vinegar over the baking soda paste to create a fizzing reaction that helps lift tough grease.
Can I put my Breville toaster oven tray in the dishwasher?
While some Breville trays are dishwasher-safe, hand washing is always recommended to preserve the tray’s surface and coating. The high heat and strong detergents in dishwashers can gradually degrade the non-stick finish over time. Check your owner’s manual to confirm whether your specific model is dishwasher-safe.
What is the best way to prevent my Breville oven tray from rusting?
The best way to prevent rust is to always dry your tray thoroughly after cleaning. Never store a damp tray back in the oven. If you notice any signs of surface rust, treat it immediately with a mixture of baking soda and water. For metal trays, a light coat of food-safe mineral oil after drying adds extra protection against moisture.
How often should I deep clean my Breville toaster oven tray?
For most users, a deep clean once a week is sufficient if you use the oven regularly. If you cook greasy or messy foods frequently, you may want to increase this to twice a week. Daily quick wipes after each use will keep the need for deep cleaning minimal and manageable.
Is it safe to use oven cleaner on my Breville toaster oven tray?
It is best to avoid commercial oven cleaners on your Breville tray. These products contain harsh chemicals that can damage the tray’s coating and leave residues that may contaminate your food. Natural cleaners like baking soda, vinegar, and dish soap are just as effective and completely safe for regular use.